

Every year, Orbit Media releases their Blogging Statistics and Trends survey.
To compile their findings, it’s sent to over 1,000 unique bloggers and content marketing specialists.
Naturally, it’s packed with valuable information, graphs, and tidbits that can transform your outlook on content creation.
But reading a 5,000+ word blog post and deciphering the meaning of dozens of graphs is time-consuming.
And remembering all of it down the line without taking copious, detailed notes? Slim chance.
So, I did it for you!
Here are the biggest takeaways you can learn from the 1,000+ bloggers surveyed to improve your content.
1. Start Spending More Time on Each Post
Most people spend an average of 3 hours and 57 minutes writing a blog post before sending it live, according to the Blogging Survey.
Unless you’ve been an expert in that specific field for the last 10 years, that still isn’t enough.
The problem with spending only four hours on a single post is lack of research.
It’s nearly impossible to conduct impactful (deep) research, synthesize the information, and condense the key takeaways into 2,000 words in four hours or less.
A common issue then becomes the regurgitation of already existing content.
Essentially, just Googling the target keyword, pulling tips from top posts, and then calling it “new.”
That’s not original and it’s sure as heck not going to get results.
Some of the most interesting (and successful) content is months in the making before being published.
Prime example: Search Engine Journal’s 18-part 2020 SEO Guide.

Now go try to write a 2020 SEO guide that matches the quality above in four hours and get back to me with the traffic and ranking results.
It ain’t gonna work.
Content is becoming incredible.
It’s more detailed than ever before.
It delves deeper into each subject’s subtopics and sub-subtopics.
It’s complete with tutorials, tips, studies, original research, and unique value.
If you want average results, spend the average 1-4 hours on your content.
But bloggers spending 6+ hours per post are 38% more likely to report stronger results.
And I’d be willing to wager that with each additional hour (up to a point), those results increase even more.
2. Stop Putting (Real) Editing on the Backburner
Most content out there is dead boring.
It’s dry, nails on a chalkboard content.
Even if the copy is appetizing, it doesn’t mean squat if nobody can digest it.
Content should get people aroused and pique their senses.
It needs to be flawless in tone, style, and delivery.
Without an editor, this becomes a fool’s errand.
You’ve just written 2,000+ words. The last thing your brain wants to do is re-read it five times to check for grammatically incorrect phrases or to see if every last sentence matches the tone of your target audience.
Are you editing your own work?
If so, you aren’t alone.
According to the survey, 41% of writers edit their own work.
Another 28% informally showcase it to one or two people.
Only 22% of writers have a formal editor.
And guess what? Those that use one or more formal editors report 38% better results.
Bad grammar and sloppy editing can damage your credibility and even hinders your likelihood of being promoted and accelerating job advancement.
Plus, the readers don’t lie:
42% of ‘em state that spelling errors give them a negative perception of brand and status.
And, according to the Blogging Survey, showing it to a friend isn’t good enough.
You need serious editors dedicated to the task of content perfection.
There are countless sites like Fiverr and UpWork where you can hire quality editors:

Feeling frugal?
There are dozens of grammar and editing tools online.
I never send off an article without running it through Grammarly:
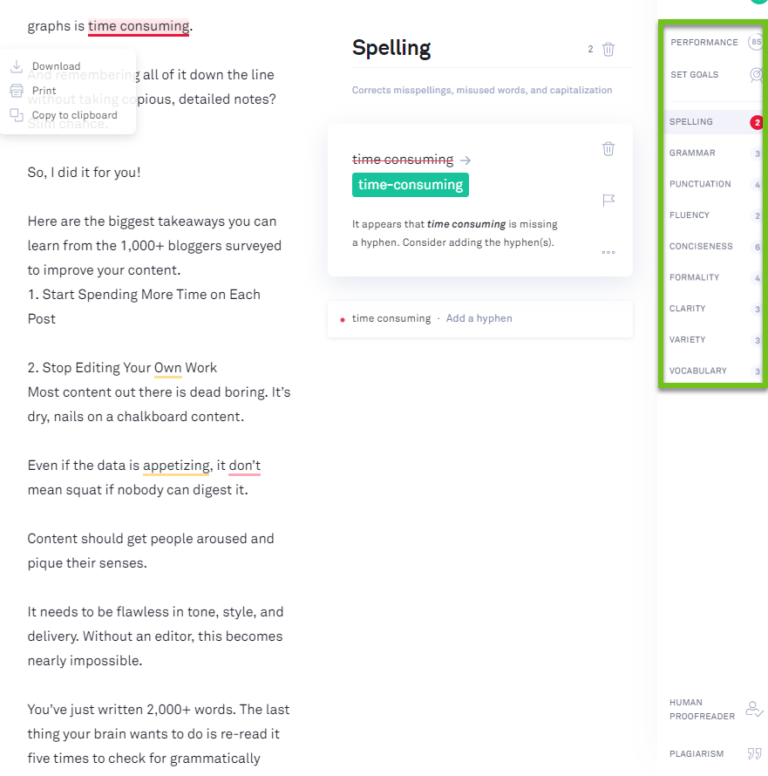
It checks for plagiarism, spelling, grammar, punctuation, fluency, conciseness, formality, clarity, variety, and vocabulary.
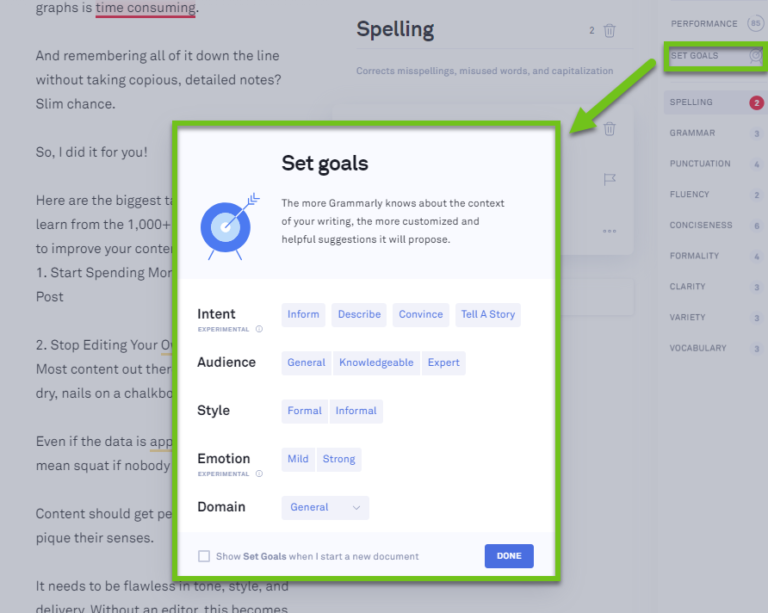
Plus, you can customize goals to deliver more accurate editing suggestions based on what intent, style, and emotion you are going for:
This should serve as a baseline for editing your content.
Once you do this, it’s time to run it by an editor.
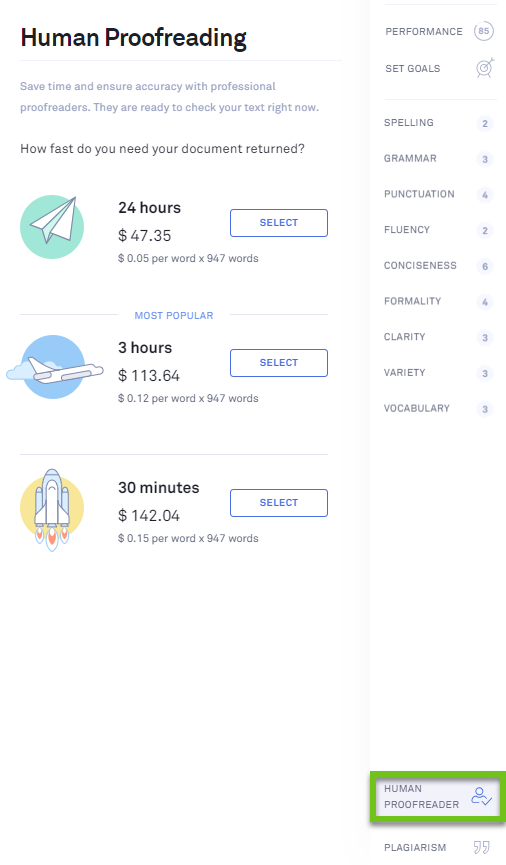
Can’t find one?
Grammarly even offers human proofreading services, so you have no excuse.
No matter what you do, always run your content through an editing tool and a professional editor.
Your readers can (and will) thank you later.
3. Stop Neglecting Old Content
Writing a top quality blog post takes hours. Days. Weeks.
Maybe even months if it’s a long guide with production quality visuals.
With so much time invested in a piece of content, it’s easy to hit the publish button and kick back in your chair.
You did it, right?
Sort of. But not really.
Content doesn’t just stay evergreen because you want it to.
Sure, planning in advance for more evergreen topics can help, but even still, nothing in digital marketing stays the same for long.
Once you hit publish, your work is only 75% of the way done. Posts can become outdated in just weeks.
According to the Blogging Statistics and Trends survey, over 33% of content marketers aren’t updating their content after hitting that shiny, instantly gratifying publish button.
I’ve been guilty of going on cruise control, too.
Yet those who do update old content are “2x more likely to report success.”
Updating content gives you the opportunity to grab low-hanging fruit and overtake posts above you if you fall behind, or ensure that competitors can’t do it to you.
Start by looking at your analytics for given posts.
What rankings and traffic did you have when your post was at its peak?
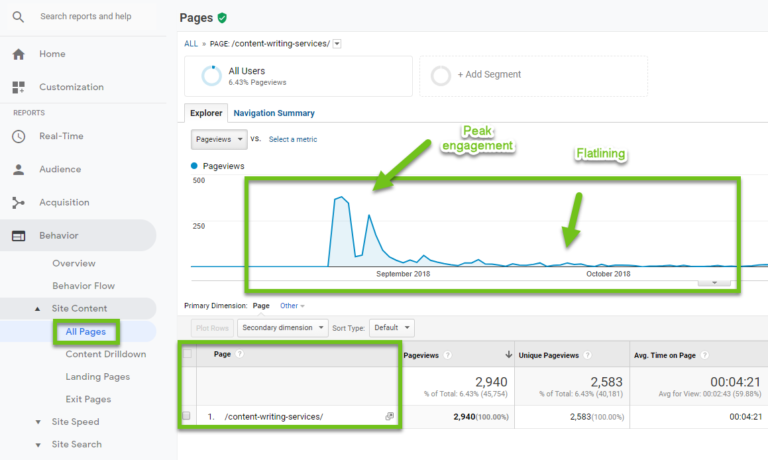
Has traffic flatlined?
Check to see if rankings have changed over time:
If they have, it’s time to update your post to fit searcher expectations.
Head to SERPs for the target keywords and examine the few posts ranking above yours.
Are they targeting Google’s machine learning by answering critically related questions?

Is their content more in-depth, longer, or contain more visuals than yours?
Does it touch on the latest updates and news to keep it relevant?
Ultimately ask yourself:
What are they doing that I haven’t?
Fix it, republish it, and reclaim your rightful SERP position.
4. Start Conducting Your Own Research for Backlink Goldmines
Infographics have long been touted as “link bait.”
But most are far too long, dense, and text-heavy to make a big impact.
Not to mention their cheesy illustrated graphics that we’ve all seen thousands of times over.
And now, good infographics are few and far between.
Hootsuite wrote about the decline of infographics back in 2015.
And a study from 2010-2015 proved that infographics were declining in usage and impact.
So, what works to generate genuine backlinks now?
Original research – ironic, considering I’m writing an entire post about an original research study.
And it’s true: original research is killing it right now.
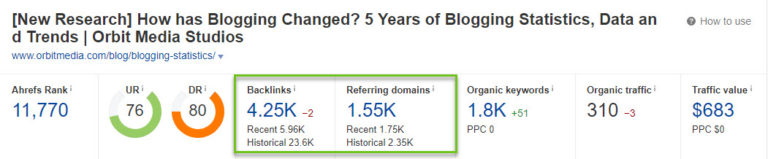
Case and point, the study I am deconstructing here has 4.25k backlinks already.
Plug in just about any reputable, informative, relevant, and statistically significant original research post and you’ll see similar results.
Tons of:
- Links.
- Keywords.
- Traffic.
- Winning.
Why?
Because anybody that writes good content knows research is critical to making your point stick.
Writers need data to back up claims, and marketers need data-driven strategies to maximize their budget.
Providing original research nails both with precision.
According to the Blogging Statistics and Trends survey, 85% of those publishing original research report stronger results than traditional blogging.
Want to create better content that gets noticed?
Start developing original research on unique and trending topics in your niche.
Sure, it might cost you a few thousand bucks to do, but that’s why it works:
You aren’t posting cookie-cutter content.
5. Start Doing What Everyone Else Isn’t Doing
It’s tempting to pump out a bunch of content for the sake of content.
It makes you feel great when you click on your blog and see dozens of long-form posts.
But, unless you are actively doing what most people are not doing, content is a total waste of time.
If you think that you can go write a cookie-cutter SEO tip post in the current age and generate good rankings, think again.
Today’s landscape is brutal.
Even for the most obscure, low-traffic keywords.
Check out the SERPs for “International SEO,” a keyword with just 250 searches a month.
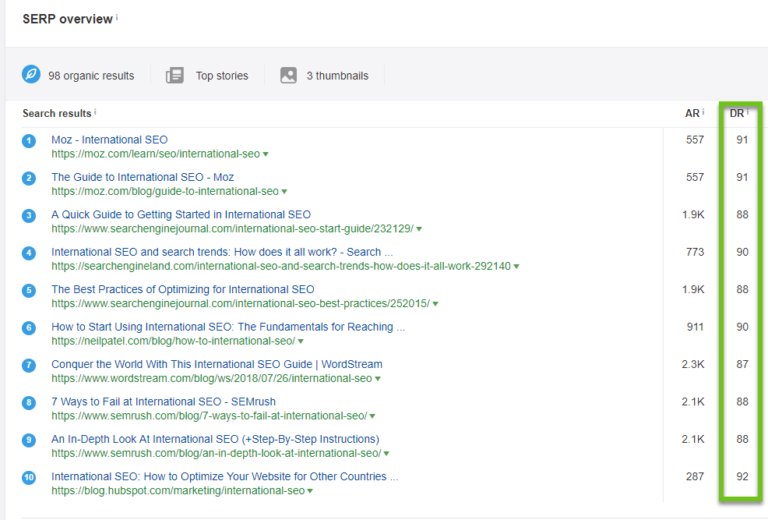
Moz, Search Engine Journal, SEL, Neil Patel, WordStream, SEMrush, and HubSpot. Not a single DA under 87.
Yikes.
Want to rank for it without a DA above 87 and hundreds to thousands of backlinks over years of time?
Two-thousand words ain’t gonna cut it.
“Long-form” doesn’t mean jack if it’s not different in some fundamental way.
You’re gonna need much more, and most people are far too stingy or lazy to do it.
But that’s actually good news.
If everyone was doing it, you’d be stuck in the same position: unable to outrank the big players.
Thankfully, there are tons of strategies that most bloggers are not using, including said big players.
This gives you a powerful opportunity to capitalize on what readers (and Google) want to see:
- Only 11% publish 2,000+ word posts: Increase your length, but make sure the content isn’t fluff. Actively research subtopics and provide value. Nobody wants to read 5,000 words if it doesn’t help them solve a problem.
- Only 1% collaborate with influencers: Reach out to influencers for quotes to boost credibility. The benefit here is both credibility and the increased chance of these influencers sharing the content and linking back to it.

- Only 26% add video content to their articles, and only 7% use audio, but they generate the biggest impacts: For just a few bucks, you can outsource video and audio summaries of your articles to freelancers on UpWork or Fiverr and add immense value for mobile users who enjoy video or want to listen podcast-style.
All of these strategies are listed as the least common tactics among 1,000+ bloggers.
And unsurprisingly, they also rank as the most effective.
Why? Because everything else is beaten to a pulp.
As tactics become more popular over time, receptiveness sinks like a rock (see: Law of Shitty Click-Throughs)
Want better content, better rankings, and better engagement?
Invest in what most content creators are skipping.
Conclusion
With millions of blog posts being written, edited, and published on a daily basis, differentiation is the holy grail.
If you take anything away from this post, it should be this:
Do what other content creators fail to do.
- Spend more time on each post (more research, more outlining, more flow development, and more writing).
- Have multiple, dedicated editor third-parties edit and proofread your work. They are going to catch errors you simply can’t.
- Start revamping your old content and be consistent. Once you hit publish, your job is far from done.
- Start producing your own research studies. People love original research. Is it hard to produce? Duh. Is it time-consuming? You know the answer. Is it worth it? Data says yes, unequivocally.
- Invest time and money into tactics that most content producers don’t: video, audio, influencer outreach, and more.
More than 1,000 bloggers can teach us that going the extra mile is the only hope in the noise of modern SERPs.
More Resources:
- 6 Quick & Easy Tips to Supercharge Your Blog Content
- 10 Amazing Tips to Write High-Quality Blog Posts
- 101 Quick & Easy Tips to Skyrocket Your Blog Content
Image Credits
Featured Image: Pixabay
All screenshots taken by author, April 2020
