
The end of Universal Analytics is major news for all marketers relying on Google Analytics to analyze traffic, behavior, attribution, and more on a regular basis.
Especially for ecommerce.
You see, GA4 is not your typical software upgrade.
It’s a completely different platform, and setting up GA4 on ecommerce sites is not as easy as flipping a toggle switch anymore.
The following is a comprehensive guide on how to set up GA4 for ecommerce.
1. Basic GA4 Configuration
Understandably, the shift to GA4 is stressful.
And it doesn’t help that the implementation steps are far different from what we were used to with Universal Analytics.
The good news is that GA4 is packed with features that were previously unavailable.
For example, there is no data sampling for standard reports, you’re not stuck with last-click only attribution, and there is a really helpful funnel builder in Explorations.
To get started, you will need to add GA4, create a purchase data layer, and create a product view data layer.
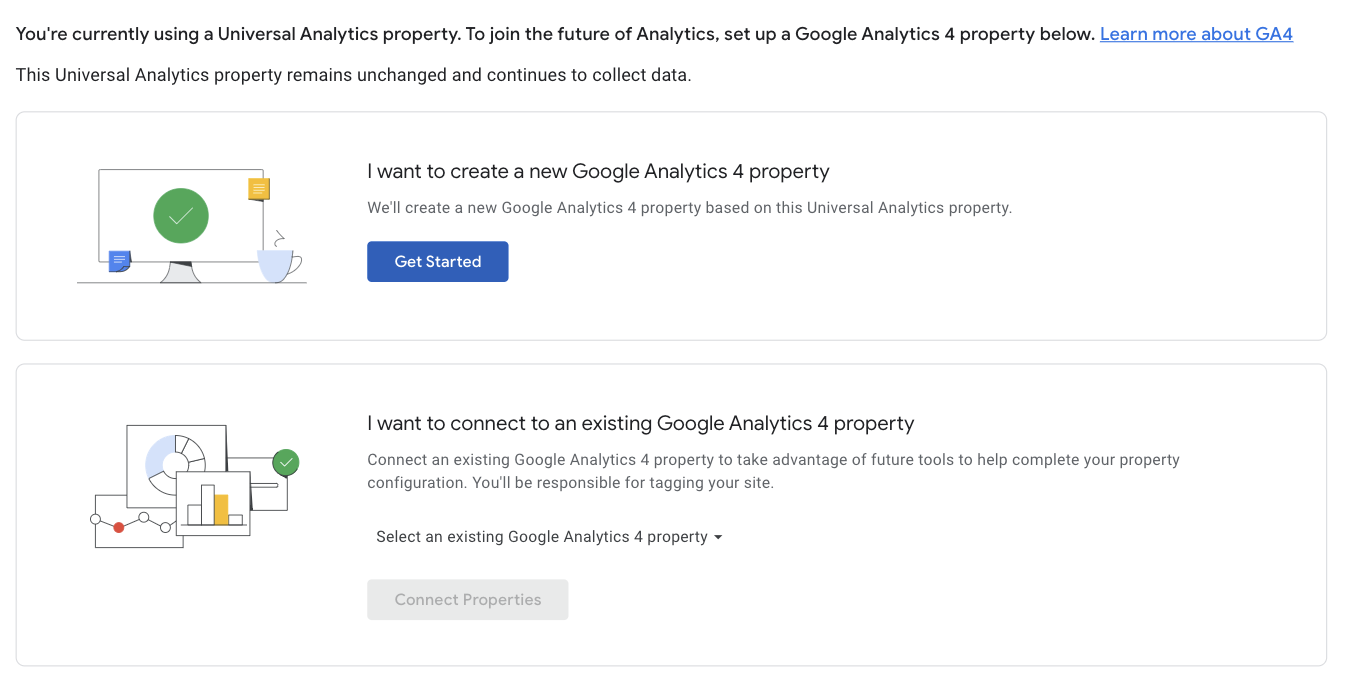
Beginners should start with our article Get to Know Google Analytics 4, to learn how to set up a GA4 account and data property.
If you’ve already configured Google Tag Manager for GA4, go ahead and jump to step 2, where we get into creating data layers for ecommerce.
After you’ve created the GA4 property, you’ll need to create tags to send data from your website to your Google Analytics account.
There are two methods for configuring GA4 on your shop site: Global Site Tag (gtag.js) or Google Tag Manager (GTM).
If you’re using the Global Site Tag method, you will need to communicate with your developer. Here is a link to Google Analytics guide for developers to help them get started.
Or, you can use Google Tag Manager (GTM).
Google Tag Manager is a free data container by Google Analytics. You can learn to manage GTM yourself, and it does not require a developer on staff.
Read SEJ’s Google Tag Manager GA4 guide for a complete step-by-step covering setup, installation, and the basic GA4 configuration tag.
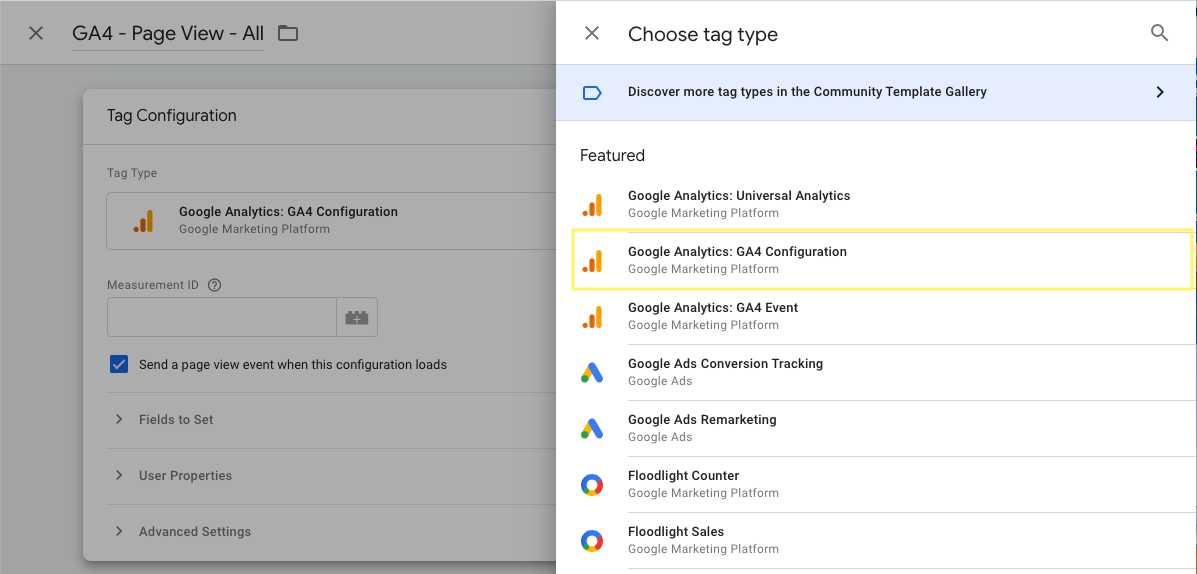
Once GA4 is configured, you will notice that the GTM container alone is not enough for ecommerce shops.
To get our ecommerce reports working, we need to add two additional pieces of code, called a data layer, to pass purchase and product view details to Google Analytics.
Let’s start with the purchase data layer. This is the code that is responsible for conversions and sales revenue.
Note: This article uses Shopify as the ecommerce example. You will need the ability to edit your theme and checkout liquid file.
2. Purchase Data Layer
When a customer completes an order, the purchase data layer will pass variables to Google Tag Manager.
Variables are the data points we want to track, such as revenue, tax, and shipping information.
There are four steps to setting up a purchase data layer:
- Adding the code to the checkout page.
- Creating a custom event.
- Creating a data layer variable.
- Creating a new tag in GTM.
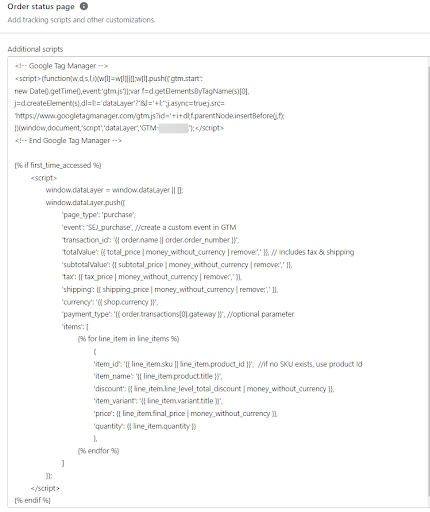
Create Purchase Data Layer Code
Your exact data layer code may vary depending on your data collection strategy, and I encourage you to speak with your developer.
Here is an example of a purchase data layer for Shopify originally created by Analyzify and edited by Adam Gorecki.
{% if first_time_accessed %}

<script>

window.dataLayer = window.dataLayer || [];

window.dataLayer.push({

'page_type': 'purchase',

'event': 'SEJ_purchase', //create a custom event in GTM

'transaction_id': '{{ order.name || order.order_number }}',

'totalValue': {{ total_price | money_without_currency | remove:',' }}, // Includes tax & shipping

'subtotalValue': {{ subtotal_price | money_without_currency | remove:',' }},

'tax': {{ tax_price | money_without_currency | remove:',' }},

'shipping': {{ shipping_price | money_without_currency | remove:',' }},

'currency': '{{ shop.currency }}',

'payment_type': '{{ order.transactions[0].gateway }}', //optional parameter

'items': [

{% for line_item in line_items %}

{

'item_id': '{{ line_item.sku || line_item.product_id }}', //if no SKU exists, use product Id

'item_name': '{{ line_item.product.title }}',

'discount': {{ line_item.line_level_total_discount | money_without_currency }},

'item_variant': '{{ line_item.variant.title }}',

'price': {{ line_item.final_price | money_without_currency }},

'quantity': {{ line_item.quantity }}

},

{% endfor %}

]

});

</script>

{% endif %}
Note: Adjust the custom event parameter “event: SEJ_purchase” by replacing SEJ with the account name you’re working on or use a universal option like “event: checkoutComplete.”
Add Purchase Data Layer To Checkout Page
Copy and paste the purchase data layer into the checkout page of your Shopify store.
Click on Admin settings in the far bottom left-hand corner and select “Checkout” from the left-hand navigation.
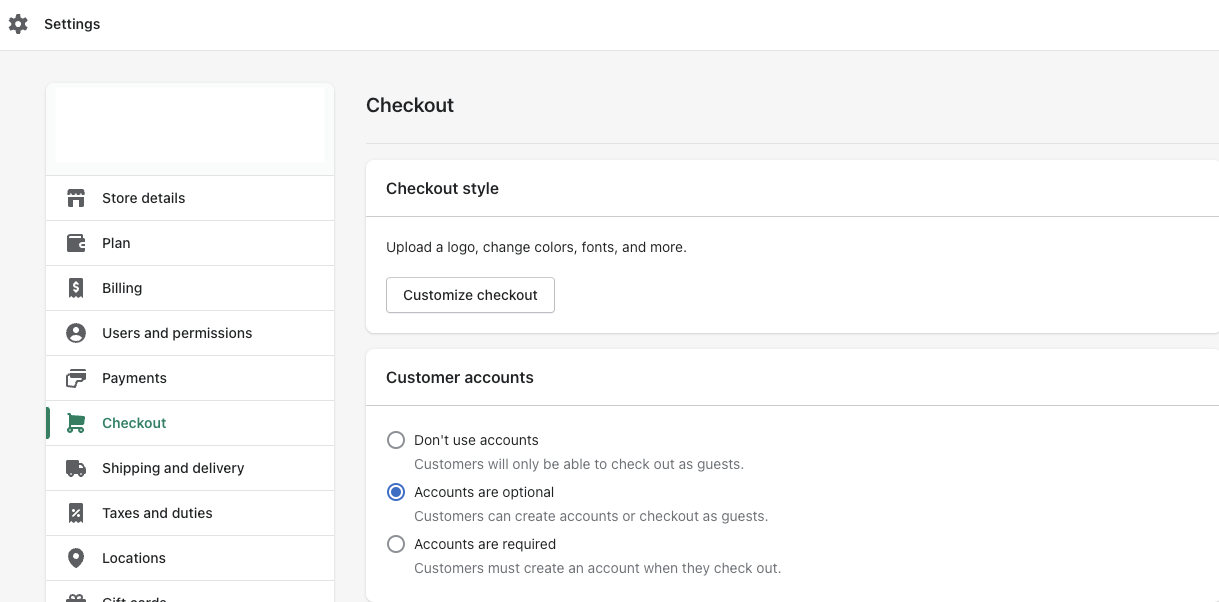
Scroll down to the Order status page section. Paste the code you copied in Additional scripts right below your GTM container snippet.
Click Save.
If you do not see a GTM container snippet, read SEJ’s Google Tag Manager GA4 guide.
Create Custom Purchase Event Trigger In GTM
Your purchase data layer is ready for Google Tag Manager.
Before you go, copy the custom event from your data layer code.
Using the example above we will copy SEJ_purchase.

Time to head over to Google Tag Manager. Open the GTM account and workspace for the company you’re working on.
Select Triggers in the left-hand menu and click the blue button in the top right corner to create a new trigger.
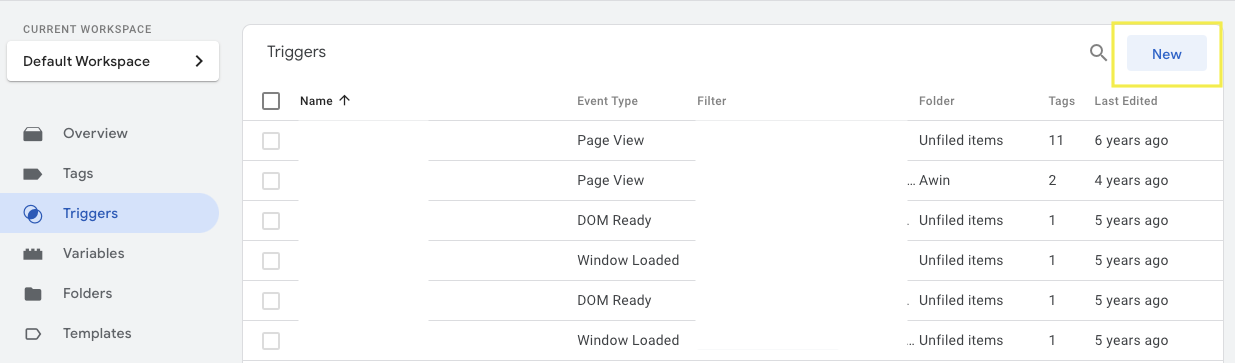
Name the new trigger something that will make sense internally.
For example, Custom Purchase Event.
Click to configure the trigger and select custom event from the options on screen.
Paste the event name you copied previously.
It is important that the event name matches the data layer code exactly. Best practice is to copy/paste.
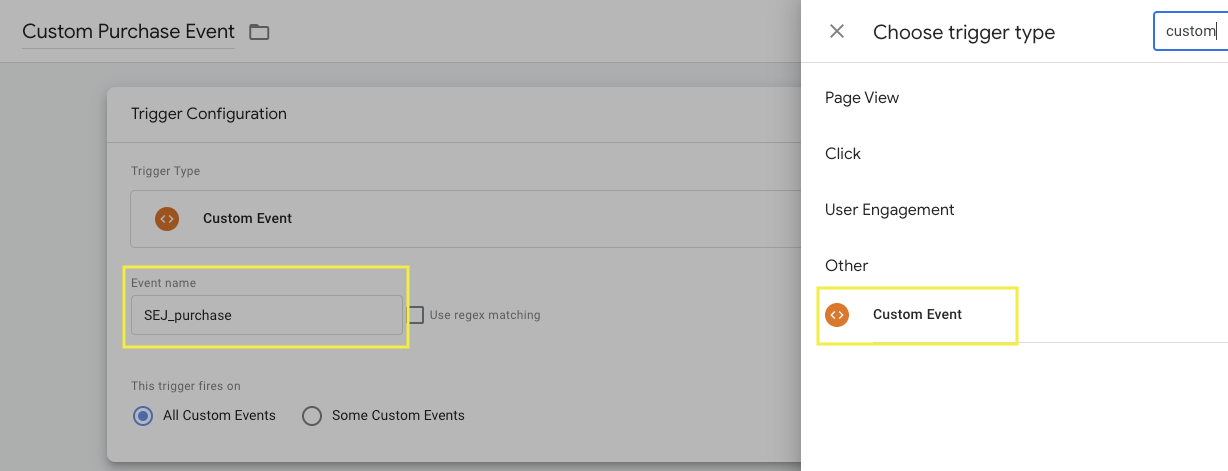
For this example, we are creating a trigger for the custom purchase event “SEJ_purchase.” Click to save your event trigger.
It is a good idea to test at this stage before building out your whole GTM just to ensure that the data layer is working as expected.
To test, return to your workspace and click Preview in the top right corner.
Enter your site’s URL and wait for the screen to say “Connected!”
Complete a test purchase and watch in Tag Assistant for the new event trigger.
In the left-hand column, Summary, click the event SEJ_purchase.
Then click the API Call dataLayer.push and you should be able to see all the variables in your code.

This means that our purchase data layer is successfully sending information to Google Tag Manager. Hooray!
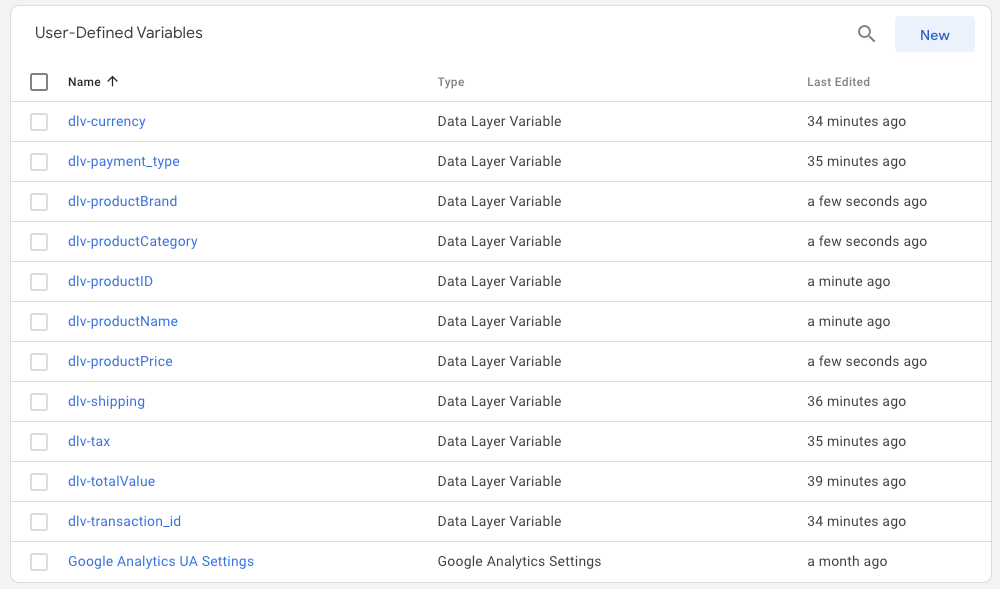
Create Data Layer Variables
Return to your GTM workspace and click Variables in the left-hand navigation.
Here you will see built-in variables and any variables you have defined previously, like your Universal Analytics ID tracking.
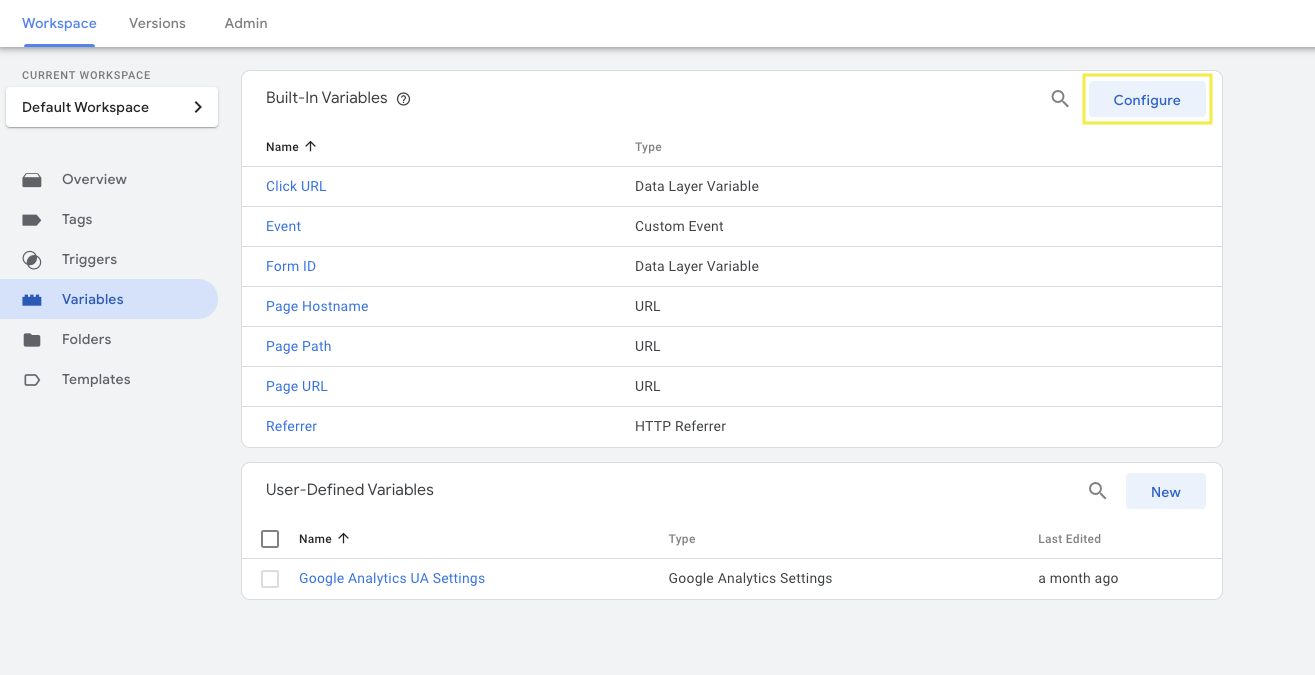
Click to create a new user-defined variable.
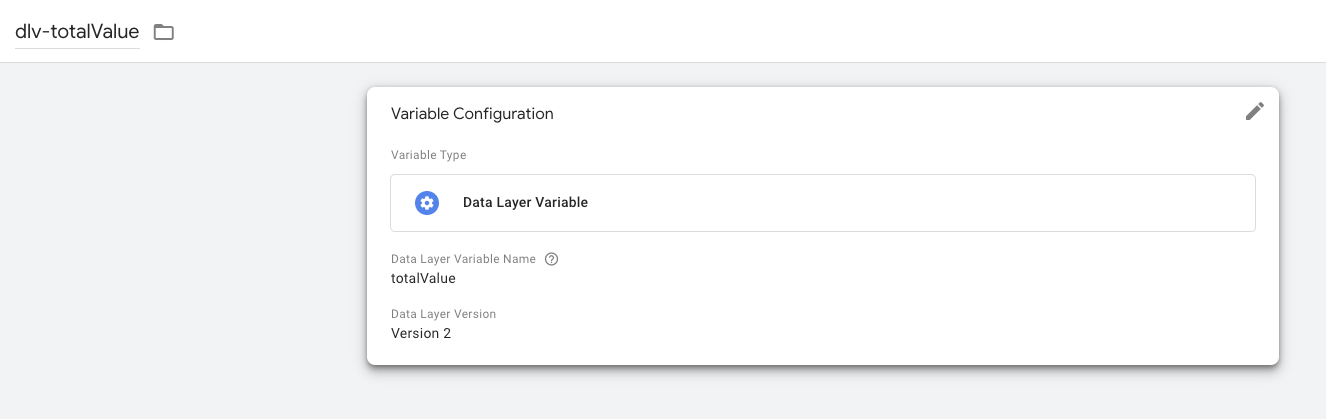
The naming of your variable is for internal use, but it helps when other people are working within the Google Tag Manager to use something informative like “dlv-totalValue.”
Click to choose the variable type and select the Data Layer Variable option.
The Data Layer Variable name value must match what is in your data layer exactly. Otherwise, it will not work. It’s best to copy and paste.
For example, totalValue.
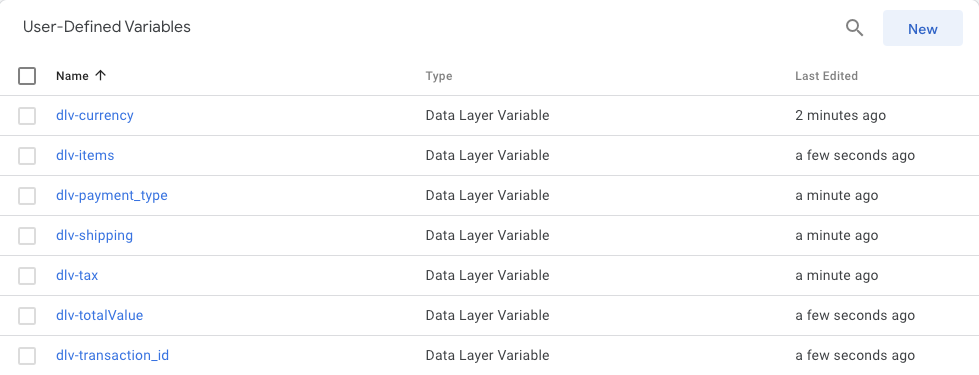
You will need to repeat this process for all seven variables:
- dlv-currency/currency.
- dlv-items/items.
- dlv-payment_type/payment_type.
- dlv-shipping/shipping.
- dlv-tax/tax.
- dlv-totalValue/totalValue.
- dlv-transaction_id/transaction_id.
At the end of this step, your GTM variable settings should look like the screenshot below.
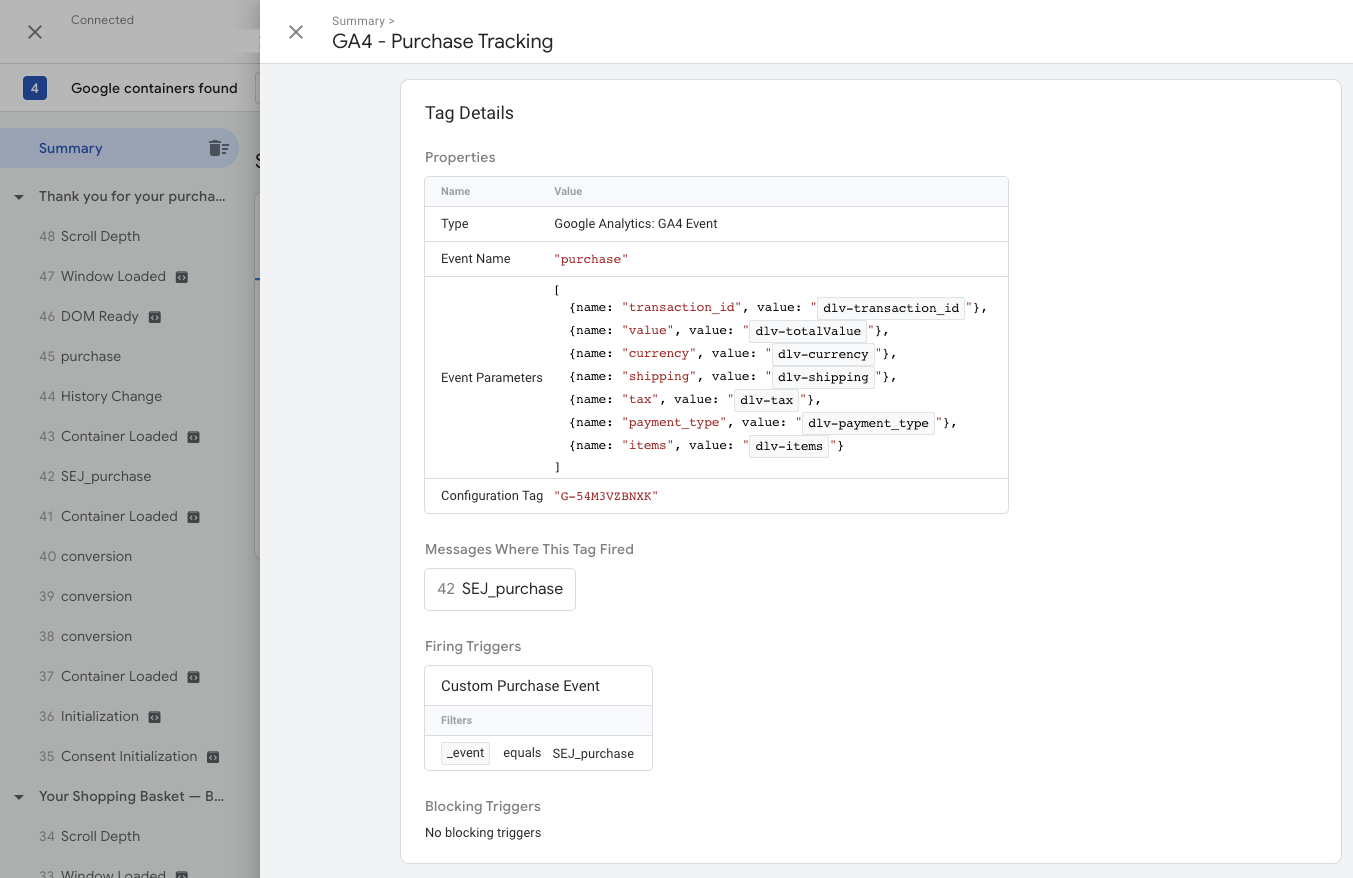
Send Conversions To GA4
Now, you need to send this purchase information to your Google Analytics account so your marketing team can start digging into reports.
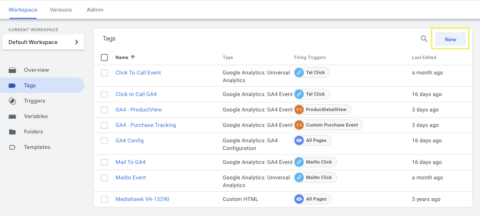
Click Tags in the left-hand menu and select New.
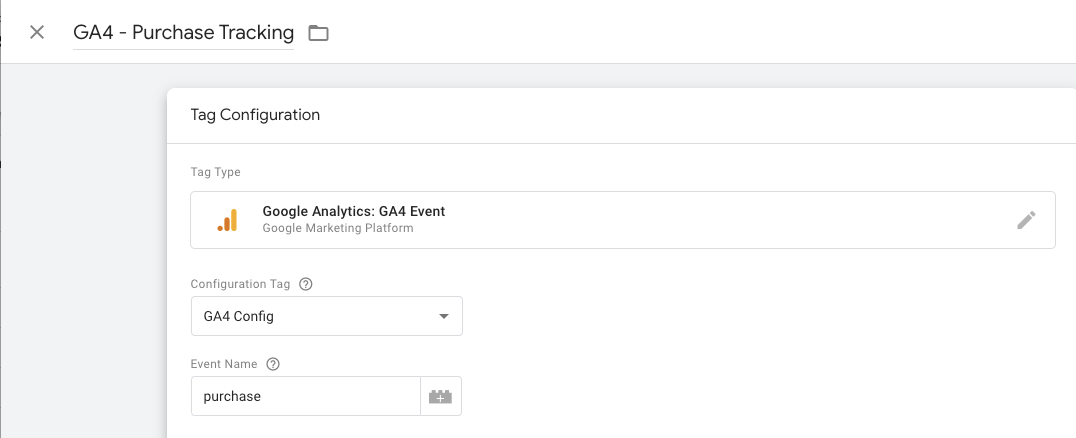
Name your new tag “GA4 – Purchase Tracking” and click within the body of the first card to configure your tag.
Choose the tag type, Google Analytics GA4 Event.
Configuration tag will be your GA4 – Global Tag, which we created earlier.
If you do not see a GA4 Global Tag, read SEJ’s Google Tag Manager GA4 guide.
The Event Name will be “purchase.”
With GA4 you also need to add event parameters.
This is a link to the full documentation of available GA4 event parameters.
We will be adding event parameters for the variables in our data layer. Under Event Parameters, click Add Row.
The parameter name you will copy and paste from GA4 documentation.
For example, “transaction_id.”
The value will be the data layer variable we created in step 4.
For example, “dlv-transaction_id.”
To add your data layer variable, you can either click the plus icon to open a popup with all the variables available or type double brackets {{ which will open a dropdown with all of your options.
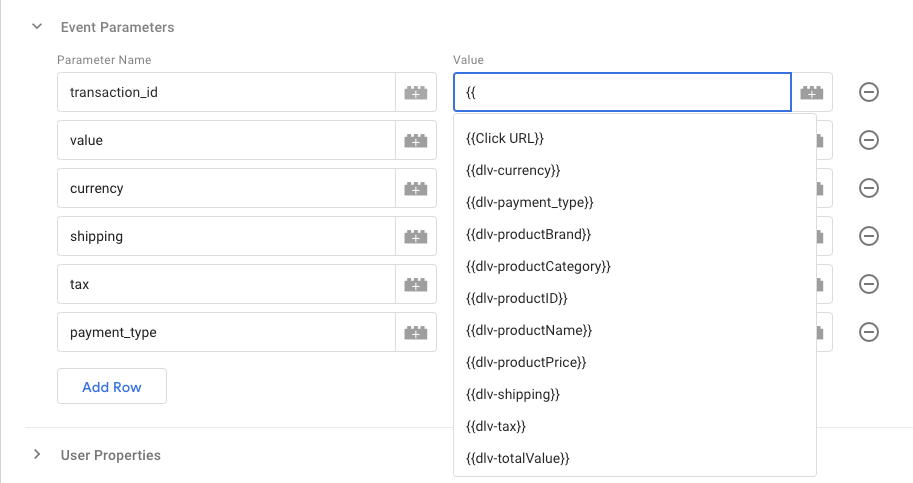
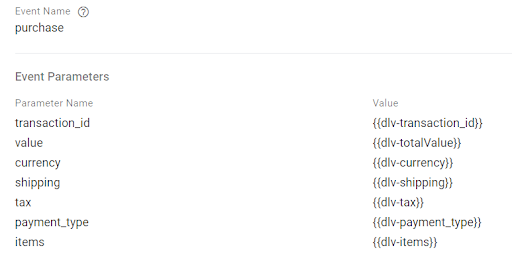
Here is an example of what your final event parameters screen may look like.
Trigger will be the custom purchase event previously created. If you do not see a custom purchase event, revisit step 3 above.
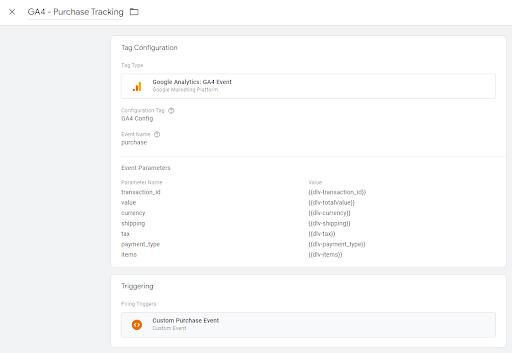
Upon completion, your GA4 purchase tracking tag will look similar to the screenshot below. Click Save.
Submit to publish your container.
Now, you will want information about which products were viewed before purchasing in your reports. Let’s keep going.
3. Product View Data Layer
To get product-level detail in Google Tag Manager, we will need to add a second data layer. The product view data layer will be added to the Shopify theme.liquid file.
The same five steps are involved.
We will be adding a data layer code, creating a custom event, creating data layer variables, and creating a new trigger in GTM.
You’ve totally got this!
Create A Product Data Layer
Your exact product data layer code may vary, and I encourage you to speak with your developer.
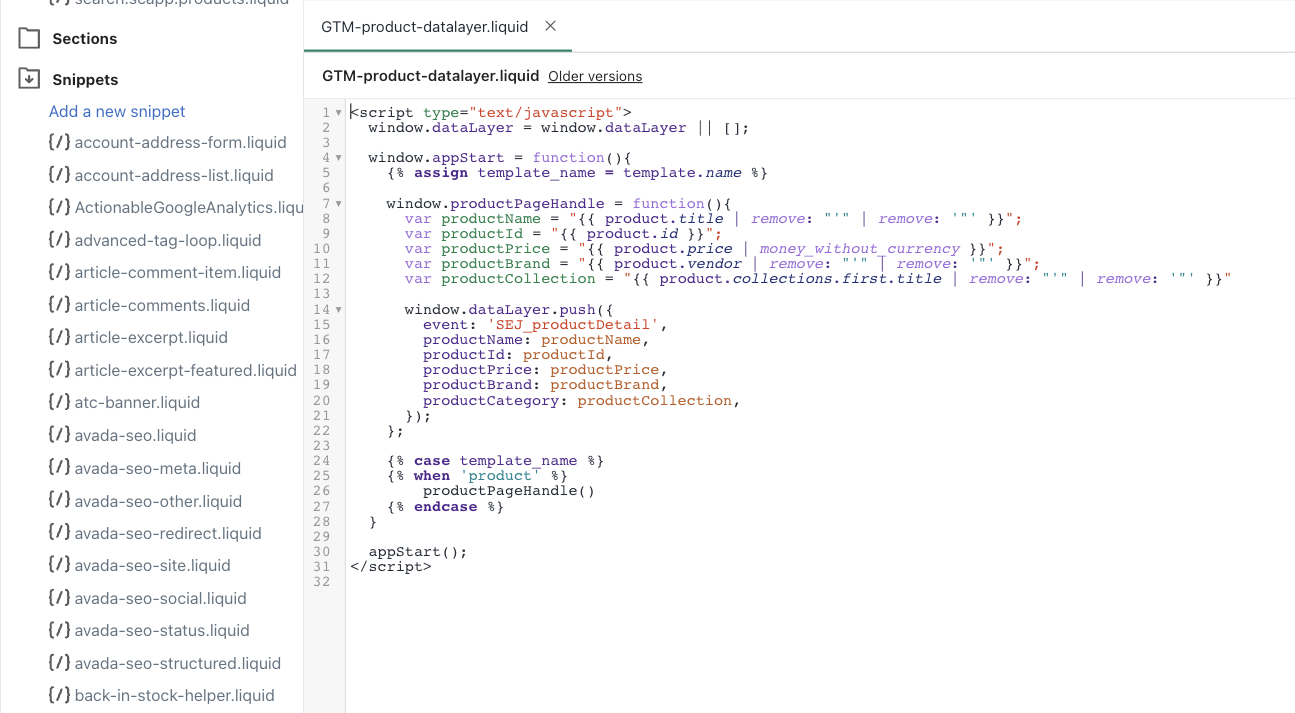
Here is an example of a Shopify product data layer.
<script type="text/javascript">

window.dataLayer = window.dataLayer || [];

window.appStart = function(){

{% assign template_name = template.name %}

window.productPageHandle = function(){

var productName = "{{ product.title | remove: "'" | remove: '"' }}";

var productId = "{{ product.id }}";

var productPrice = "{{ product.price | money_without_currency }}";

var productBrand = "{{ product.vendor | remove: "'" | remove: '"' }}";

var productCollection = "{{ product.collections.first.title | remove: "'" | remove: '"' }}"

window.dataLayer.push({

event: 'SEJ_productDetail',

productName: productName,

productId: productId,

productPrice: productPrice,

productBrand: productBrand,

productCategory: productCollection,

});

};

{% case template_name %}

{% when 'product' %}

productPageHandle()

{% endcase %}

}

appStart();

</script>
Add Product Data Layer To Theme Files
To send product information to GA4, you must edit your theme files.
Changes to your theme file are relatively risk-free because Shopify automatically saves change history.
But, if you’re feeling unsure, you can absolutely work within a copy of the live theme.
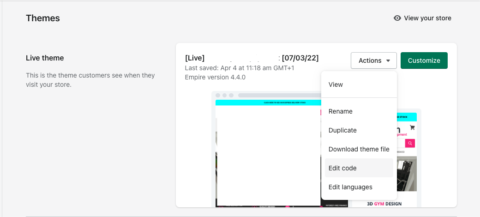
Open your Shopify Admin panel and click Online Store.
Select Themes and choose your live theme. Click Actions and select edit code from the drop-down menu.
Scroll down to the Snippets‘ section and click Add new snippet.
Name the new snippet GTM-product-datalayer and click create.
Paste the code you copied from step 1 into this newly created snippet file and click Save.
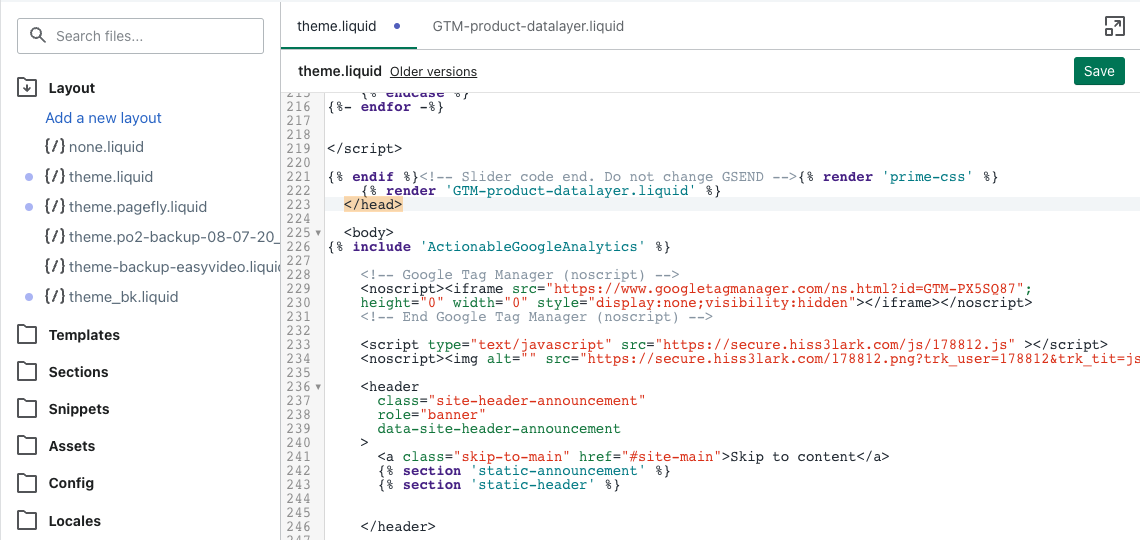
In the left-hand menu, scroll up to find the theme.liquid file. It is located under the “Layout” section.
Open the theme.liquid file and search for “/head”.
Paste the following code just above “/head”: {% render ‘GTM-product-datalayer.liquid’ %} and save your work.
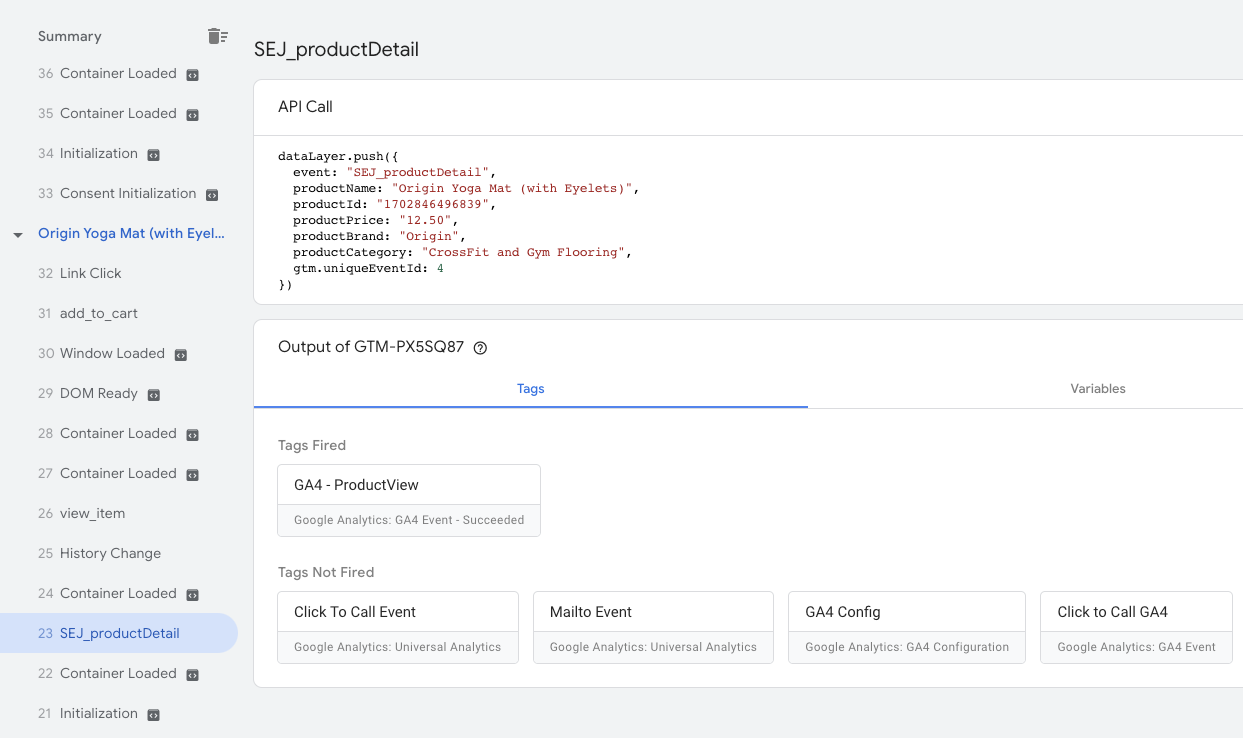
Now it’s time to test if the product data layer is passing information about our product views to Google Tag Manager as expected.
Open Google Tag Manager and click Preview.
Follow the onscreen prompts and then complete a test purchase.
If the product detail data layer is working, you will see the custom event SEJ_productDetail in the left-hand navigation.
When you click on this custom event, you should see all the variables from your code.

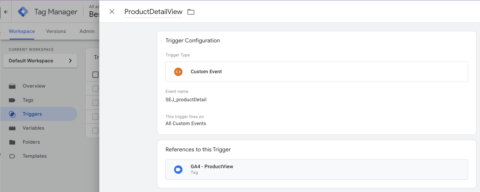
Create Product Detail View Trigger
Your Shopify product view data layer is ready for Google Tag Manager.
Open Google Tag Manager and click Triggers in the left-hand menu and click “Add New.”
From the trigger options, choose “Custom Event” and name the new trigger, “ProductDetailView.”
Now add “SEJ_productDetail” in the custom event name field. This name matches your data layer event name. Remember to save.
GTM Variables
Just as we did before, it is time to add variables from our data layer. This time it will be to pass the product detail information like product name, brand, and category.
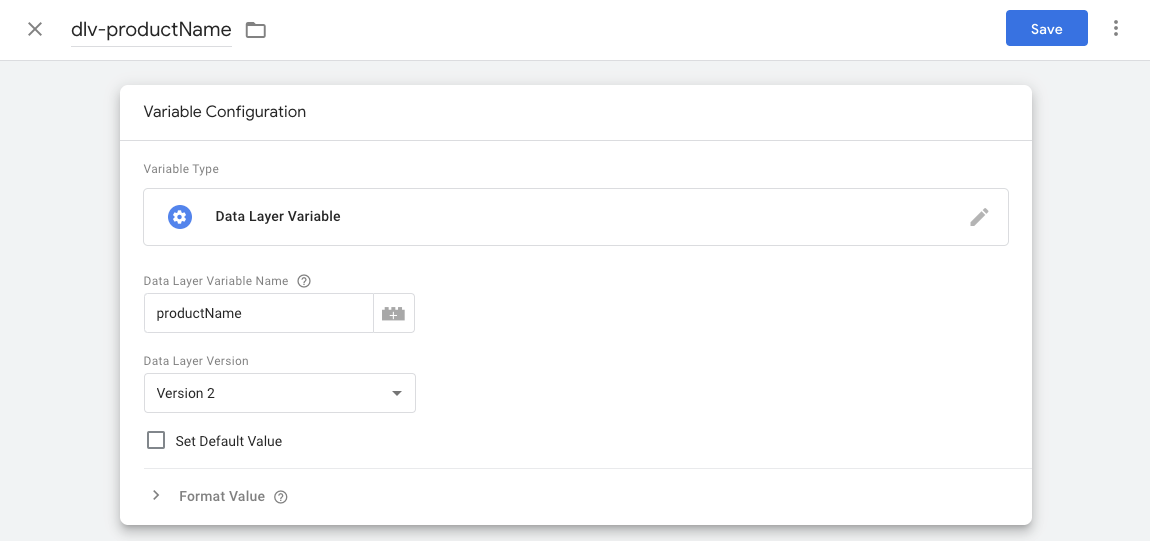
In the GTM left-hand menu, select Variables and click New under User-Defined Variables.
When adding your GTM variables, it is extremely important that the text matches your data layer exactly and that you keep naming consistent.
For example, we will create a variable for the product name. Enter the variable name “dlv-productName.”
Choose the variable type, “Data Layer variable.”
Copy and paste the exact variable from your product data layer code and save.
The screenshot below is an example of the configuration for “dlv-productName.”
Repeat this process for every variable in your product view data layer. Our example in this article has five variables:
- dlv-productID/productID.
- dlv-productName/productName.
- dlv-productBrand/productBrand.
- dlv-productCategory/productCategory.
- dlv-productPrice/productPrice.
At the end, your user-defined variables list will include both purchase and product variables and look similar to the screenshot below.
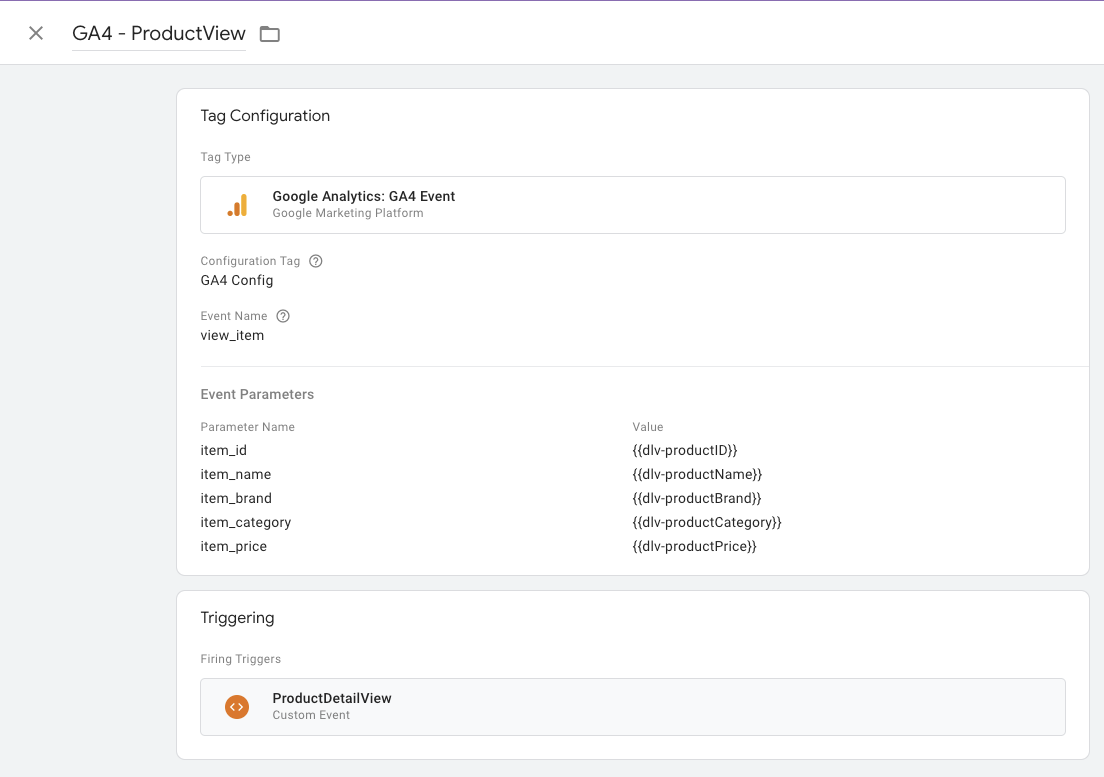
5. Create Product View Event Tag
Back to Google Tag Manager, this time, you will click Tags.
Start a new tag and name it something like “GA4 – ProductView.”
Choose the tag type “Google Analytics GA4 Event.”

Configuration tag will be your GA4 – Global Tag, which we created earlier. If you do not see a GA4 Global Tag, read SEJ’s Google Tag Manager GA4 guide.
The Event Name will be “view_item.”
With GA4 you will also need to add event parameters. This is a link to full GA4 documentation of available event parameters.
The first parameter will be item_id. For the corresponding variable, you can either click the plus icon to find your user-generated variables or use a double bracket {{ and a dropdown list will appear.

This part is case-sensitive and needs to match GA4 documentation and the data layer variable exactly.
Repeat this process until you have added all of the five parameters and their corresponding variables:
- item_id/productID.
- item_name/productName.
- item_brand/productBrand.
- item_category/productCategory.
- item_price/productPrice.
Choose the custom ProductDetailView trigger that we created in step # as the trigger.
The screenshot below is an example of what your final product view tag may look like.
GA4 Ecommerce Debugging
You are in the final stretch! It is time to make sure everything is working as expected.
Open GTM preview and enter your site URL. Once the GTM preview tool is connected, view a few products, add-to-cart, and complete a purchase.
Watching in Google Tag Assistant for the product view event tag and purchase view event tag to fire.
Under the summary, click on the custom purchase event (SEJ_purchase) and open the API call details. You want to see all of the items from your data layer variable.
For example, below is an example screenshot for product detail.
And here is an example for purchase.
This means your Shopify store is passing ecommerce product view information and transaction data to GTM. Hooray!
Next, we open GA4 Realtime reports and check that user events have recorded our product detail view and purchase event.

The final check is to confirm in GA4 Debugger that all of our event parameters and items array are working as intended.
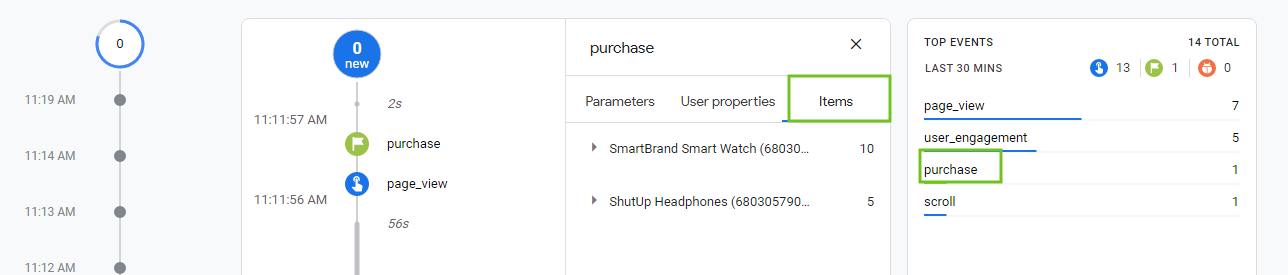
In the left-hand menu navigation, click Configure > DebugView.
It’s not super clear, but you will need to find your device in the dropdown menu for DEBUG DEVICE.
From this view, you will see a timeline of your activity on the site. In the far right column titled TOP EVENTS click on the purchase event.
Then click on items to make sure the purchase event is sending the product item information to GA4. Without “items” the full reports can not display.
It should look similar to the screenshot below.
Congratulations!
This means that your Shopify store is passing purchase and product view data perfectly. Keep in mind that standard GA4 ecommerce reports may take 24 – 48 hours to fully populate.
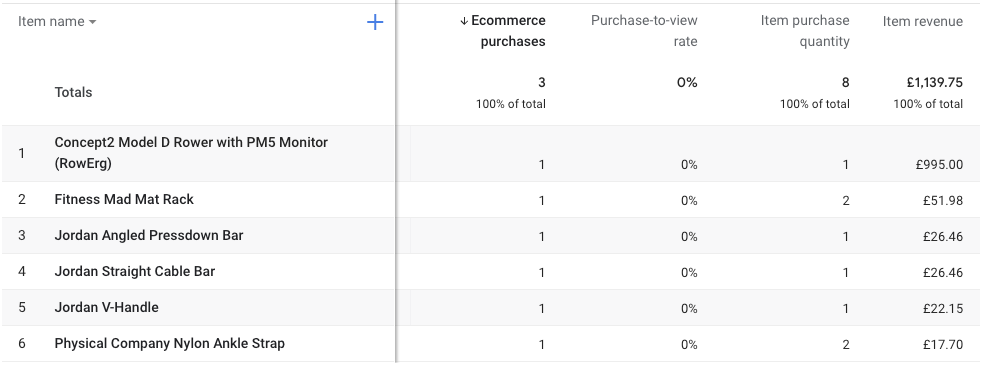
Ultimately your Monetization > Ecommerce purchases report will look similar to the screenshot below.
Final Thoughts
To use GA4 ecommerce reports, we added a Google Tag Manager container script to our online shop, s purchase data layer to our checkout page, and a product view data layer to our Shopify theme.liquid file.
Then we created a custom trigger, custom event, and data layer variables within Google Tag Manager.
Last we used GA4 tags to send information on revenue, tax, shipping, product name, brand, and category into our GA4 reports.
Don’t forget to test using GTM preview and GA4 debugger tools. Your standard reports may take 24 to 48 hours to populate.
GA4 is an evolving product, and I hope ecommerce tracking becomes easier as third-party platforms, like Shopify, make adjustments on their end.
More resources:
- Getting Started With GA4: These 4 Tips Will Get You Up & Running
- Learn GA4: 17 Top Guides & Educational Resources
- Ecommerce Marketing: The Definitive Guide
Featured Image: Paulo Bobita
