If at one point you’ve bought links, hired an SEO agency, or received a sudden decrease in website traffic, then this blog post is for you. Even if you don’t have a penalty at this time, you’ll want to review the inbound links coming into your site. It’s always better to be proactive because by the time you realize you have a penalty it’s too late. This is the 2015 process for removing a penalty and analyzing potentially hazardous links.
Tools Needed:
- Google Webmaster Tools
- Tools like Link Research Tools and URL Profiler
- Google Docs
- Website email account (@yourdomain.com)
Step 1: Gather Information
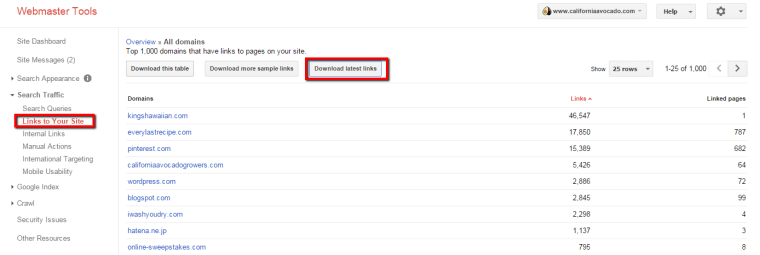
Start by pulling the freshest download of your sites total links from Google Webmaster Tools. Click on Search Traffic > Links to Your Site > Who links the most – More > Download Latest Links > Export to Google Docs

Once the links are exported into a Google doc I recommend pairing this data with a third-party tool such as Chris Cemper’s Link Research Tools (LRT). Depending on the number of links, this tool will give you more bandwidth to tackle the brunt of the spammiest links first by identifying the “most toxic” or suspicious links.
Next, you’ll want to take that initial excel sheet and format it into the following columns below. The first four columns will be pulled from GWT and LRT, and the rest of the columns will be new that we’ll be adding data to:
- Domain (From GWT)
- From URL (From LRT)
- To URL (From LRT)
- Priority (From LRT)
- Type
- Suspicious
- Indexed
- DA over 20/30
- Contact Form
- Action
- Contact Effort #1
- Screenshot
- Effort #2
- Screenshot
- Effort #3
- Screenshot
- Result
Bonus: Template to start with: http://goo.gl/TfuIFl
Step 2: Conduct Backlink Audit
Great, so now you have a big glob of rows and columns of links in an excel sheet. Don’t freak out yet, that comes later. Now is the time to comb through and filter out these links. This can be quite time-intensive so buckle in for several hours or days (depending on the number of links) as we guide you through this process.
When you’re at this stage it’s best to have two computer monitors. One screen shows the Excel spreadsheet and the other displays the suspicious link. For every domain listed in the far left column you’ll want to follow this sequence:
- Start with the highest priority links or the most toxic
- Visit the “From URL” link
- Eyeball the site and determine the “Type” of site.
- Bad Links – If yes for any of the answers below, move to #6
- Duplicate sites or blog network – link farm, link exchange, duplicate content, or etc.
- Forum/blog comments – your link is in a blog/form that is spammy looking
- Unable to display – Expired Domain, sites down/maintenance mode, 400 or 500 error, or some other reason the page cannot be displayed
- Foreign site – Site that looks spammy when translated or cannot be translated by Google.
- Directory/Article submission – Low quality directories or articles submissions sites. Unsure? Look at social shares and links back to the website or content. If it has little/none of either one then it’s a junk site.
- Spam – Doesn’t fall into a specific category but resembles some sort of spam (pop ups, automatic link acceptation, and anything else that screams “SEO”)
- Unsure Links – If yes, move to #4
- 50/50 links – Not sure if it’s a good link or a bad link?
- Ok Links – If yes, move to #4
- Looks like a real website that people would go to
- Bad Links – If yes for any of the answers below, move to #6
- Is the site indexed by Google?
- If no, skip to #6.
- If yes, move to #5
- Does the site have a domain authority greater than 20-30?
- If no, move to #6.
- If yes, move to #10
- Record the Contact form URL (if possible) – move to #7
- Record Email (if possible, otherwise we can get this later) – move to #8
- Record Twitter/Facebook handle (if possible, otherwise we can get this later) – move to #9
- Action: Remove
- Action: Keep
Here’s how your spreadsheet should begin to look:

Step 3: Collecting Outreach Information
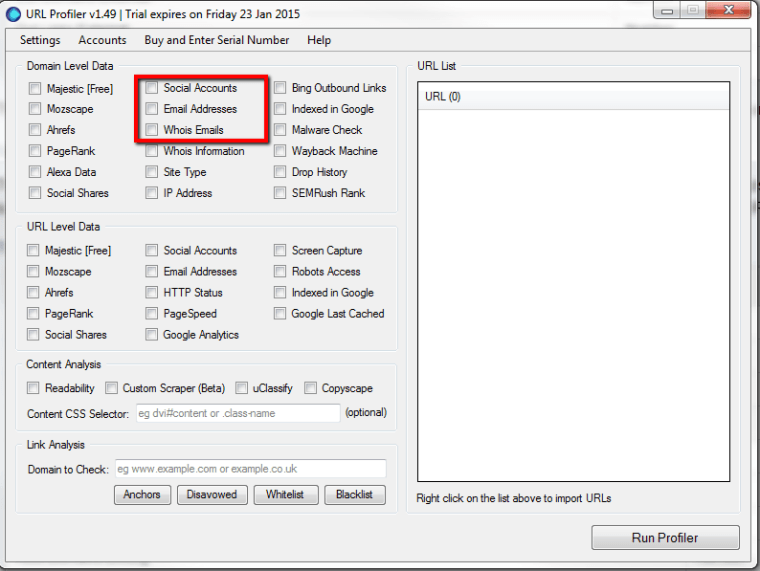
Now that you have a nice list of sites that need to be removed let’s find out how to capture email address and social media handles using URLprofiler (I am not affiliated with them; it is just an awesome, cheap tool). It allows you to dump in a bunch of links in return for tons of domain & URL level data. Once you’ve downloaded (there’s a trial version) and started the URLprofiler tool, you’ll want to add all of the URLs that have the row “Remove” and proceed by checking the following boxes when you run the application:

Once the URLprofiler completes its analysis, you’ll want to import the email, Twitter, and Facebook information into the Excel sheet columns. Move on toward the outreach portion.
Step 4: Outreach
Gmail limits you to 500 or so emails a day. If you have more than 500 I would probably look into the route of using a third party email application to send bulk emails, but the traditional method of 1-1 email is best and recommended for this instance. Once you’ve crafted your outreach email asking the website to politely remove the link, send it out to all of the websites that you marked for removal. Be prepared for the following types of responses:
- No Response – Link not removed
- Action: Try following up with another email. If to no avail after the third attempt, then add to disavow document
- No Response – Link removed
- Action: Success / you are done
- Response – Link not removed
- Action: Try following up with another email. If to no avail after the third attempt then add to disavow document
- Response – They ask for something in exchange for the link removal (i.e. money, guest post, social media shout out, or etc.)
- Action: Add to disavow document
- Response – Link removed
- Action: Success / you are done
A good rule of thumb is to reach out three times if the webmaster isn’t responsive. This shows Google you have done your due diligence in cleaning up your past mistakes. Here are some tips for each round of emails:
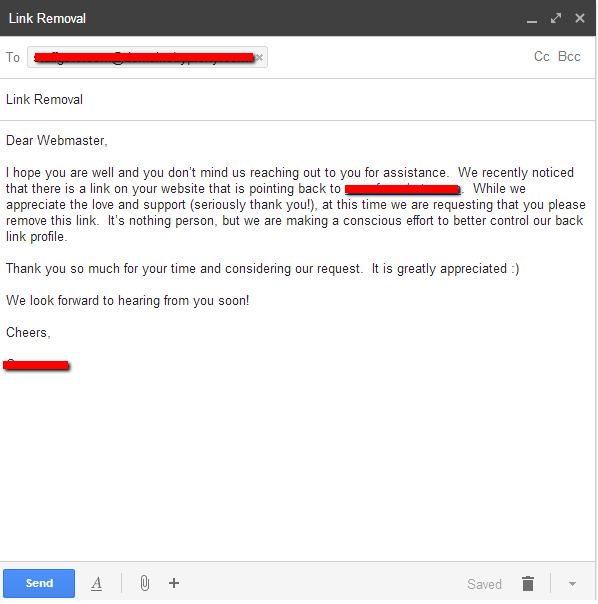
1st effort: Be nice in! This bad link was probably you or an SEO company’s wrongdoing, not the websites fault. Play nice and politely ask them to remove your link. Below is a “Nice” email that had success.

Once you’ve sent out all of your emails, let’s set expectations. If you come back the next morning hoping for a slew of respondents, don’t get depressed and give up hope when no one responds. It’s all part of the process. You are showing Google that you are remorseful and earnest in your link removal efforts. If you’re really having a difficult time you can try different variations of email body and title copy to see what works best. Remember to take a screenshots of each email and document your outreach efforts in the Google doc as well.
Wait about a 4-7 days after you sent out the first round of emails before trying the second effort.
2nd effort: Send another round of emails to those who didn’t respond. If you have their SM handles from the URLprofiler now would be the time to try these as well.
3rd effort: Send another round of emails and social outreach. If this fails to garner a response or link removal then move to the last column labeled “Results” and mark a “Disavow” in the row
I can’t urge enough the screenshots and annotation for each effort. Yes, it’s tedious, but it pays off in the end.
After the third effort (about 3-4 weeks in total) you’ll want to download the latest GWT backlink report to see if any of the efforts completed thus far are reflected in the latest report. If you removed the link but it’s still appearing in GWT then that is fine, you can move on to the next step since Google’s index is still catching up.
Step 5: Create Disavow Document
Not let’s take all of those websites that have “Disavow” in the “Results” column. Open up in notepad and list out each domain that you see. Google wants to know your efforts behind these disavowed links so comment out each category of unnatural links that you identified and segment them based on the “Type” column like this:

Tips:
- One link per line
- An opening “domain:” will indicate a link you want to disavow
- Make sure to structure each link exactly like this “domain:example.com” (don’t include www and take note of spacing)
- An opening “#” will indicate your comments
- Don’t bother cutting out specific pages, go after the domain as a whole.
After you’ve completed the file you’ll want to submit it for Google to review. It will take some time for Google to process the information you’ve provided so in the meantime let’s get you started on writing your first reconsideration request if you have a manual penalty.
Step 6: Reconsideration Request (If Manual Penalty, Otherwise Skip)
If you’ve been notified of unnatural links in Google Webmaster Tools then you have a manual penalty, versus being slapped by Penguin. For a manual unnatural link penalty, you’ll need a reconsideration request. Typically the reconsideration requests that I’ve had success with are between 800-1,200 words.
I recommended structuring the request into three parts:
Part 1 – Explain Your SEO History
Time to be honest. Transparency is key here so spill the beans and tell Google everything that you’ve done in the past that might have garnered this penalty. If you hired an SEO agency, let them know who and what their link building efforts were. Explain the tactics that were used; buying links or link exchanges (you should have a good understanding by reviewing the link audit “Type” section). Again, fess up even if you weren’t directly responsible for the penalty.
Part 2 – Explain Your Process of Removing These Unnatural Links
Explain everything in the above steps. Use the Google docs you created as documentation (make sure they are viewable and shortened via a URL shortener) and refer to them throughout this documentation. Speak on behalf of the tools used in the cleanup process, the number of unnaturally/spammy links, and etc. Include the timeframe and how long you spent cleaning up your links.
Part 3 – Explain What You Will Do Different Moving Forward
What will you do differently? Tell Google how you changed so that you’ll abide by the Webmasters Guidelines moving forward. For example, if you’re hiring an SEO manager then explain to Google how you are going to implement an SEO training process for all team members to follow and hold each other accountable.
Once you’ve finished writing the request, go ahead and proof it to make sure all of the links work. Once you’re ready, submit the reconsideration request to Google. Remember, it can take some time before you hear back, so be patient. If you’ve done everything right then you should hear back from Google with good news.
Again, reconsideration requests can be frustrating and tedious, but if you do things the right way the first time around, then this process will be much easier. Good luck!
Image Credits
Featured Image: SuslO via Shutterstock
All screenshots taken January 2015


