

2019 far exceeded my expectations in terms of Python adoption within the SEO community.
As we start a new year and I hear more SEO professionals wanting to join in the fun, but frustrated by the initial learning curve, I decided to write this introductory piece with the goal of getting more people involved and contributing.
Most SEO work involves working with spreadsheets which you have to redo manually when working with multiple brands or repeating the same analysis over time.
When you implement the same workflow in Python, you can trivially reproduce the work or even automate the whole workflow.
We are going to learn Python basics while studying code John Mueller recently shared on Twitter that populates Google Sheets. We will modify his code to add a simple visualization.
Using the Wikipedia API, I pulled in some more fields for the curious :). Spreadsheet: https://t.co/OSBENEubgt – Colab code: https://t.co/sTAb1vk8N4
— 🍌 John 🍌 (@JohnMu) January 3, 2020
Setting up the Python Environment
Similar to working with Excel or Google Sheets, you have two primary options when working with Python.
You can install and run Python on your local computer, or you can run it in the cloud using Google Colab or Jupyter notebooks.
Let’s review each one.
Working with Python on Your Local Computer
I typically choose to work on my Mac when there is software that won’t run in the cloud, for example, when I need to automate a web browser.
You need to download three software packages:
- Anaconda.
- Visual Studio Code.
- The Python bindings for Code.
Go to https://www.anaconda.com/distribution/ to download and install Python 3.7 for your operating system. Anaconda includes Python and most of the libraries that you need for data analysis.
This will take a while to complete.
Once done, search for the Anaconda Navigator and launch it.
Click to launch JupyterLab and it should open a new tab in your browser with a JupyterLab session.
Click on the big icon to start a Python 3 notebook and you are reading to start type or copy/pasting code snippets.
You can think of this notebook as similar to a new Excel sheet.
The next step is optional.
Go to https://code.visualstudio.com/download and download and install Visual Studio Code for your computer.
I personally use Visual Studio Code when I need to write code in Python and JavaScript or when writing JavaScript code. You can also use it if you want to convert your notebook code into a command-line script.
It is easier to prototype in Jupyter notebooks and when you get everything to work, you can use Visual Studio Code to put everything together in a script or app that others can use from the command line.
Make sure to install the Python extension for VSC. You can find it here.
Visual Studio Code has built-in support for Jupyter Notebooks.
You can create one by typing the keyword combination Command+Shift+P and selecting the option “Python Jupyter Notebook”.
Working with Python in the Cloud
I do most of my Python work on Google Colab notebooks so this is my preferred option.
Go to https://colab.research.google.com/ and you can skip the downloading and installations steps.
Click on the option to start a new Python 3 notebook and you will have the equivalent of a new Google Sheet.
Learning the basics of Python & Pandas
Mueller shared a Colab notebook that pulls data from Wikipedia and populates a Google Sheet with that data.
Professional programmers need to learn the ins and out of a programming language and that can take a lot of time and effort.
For SEO practitioners, I think a simpler approach that involves studying and adapting existing code, could work better. Please share your feedback if you try this and see if I am right.
We are going to review most of the same basics you learn in typical Python programming tutorials, but with a practical context in mind.
Let’s start by saving Mueller’s notebook to your Google Drive.
After you click the link. Select File > Save a copy in Drive.
Here is the example Google sheet with the output of the notebook.
Overall Workflow
Mueller wants to get topic ideas that perform better in mobile compared to desktop.
What kind of content is more useful on mobile vs via desktop? Wikipedia to the rescue! Apparently, celebrity / entertainment & medical content rules mobile.https://t.co/lvEdYmNPB2 … also, Pomeranians?
— 🍌 John 🍌 (@JohnMu) December 30, 2019
He learned that celebrity, entertainment, and medical content does best on mobile.
Let’s read through the code and comments to get a high-level overview of how he figured this out.
We have several pieces to the puzzle.
- An empty Google sheet with 6 prefilled columns and 7 columns that need to be filled in
- The empty Google sheet includes a Pivot table in a separate tab that shows mobile views represent 70.59% of all views in Wikipedia
- The notebook code populates the 7 missing columns mostly in pairs by calling a helper function called update_spreadsheet_rows.
- The helper function receives the names of the columns to update and a function to call that can return the values for the columns.
- After all of the columns are populated, we get a final Google sheet that includes an updated Pivot Table with a break down of the topic.
Python Building Blocks
Let’s learn some common Python building blocks while we review how Mueller’s code retrieves values to populate a couple of fields: the PageId and Description.
# Get the Wikipedia page ID -- needed for a bunch of items. Uses "Article" column

def get_PageId(title):

# Get page description from Wikipedia

def get_description(pageId):
We have two Python functions to retrieve the fields. Python functions are like functions in Google Sheets but you define their behavior in any way you want. They take input, process it and return an output.
Here is the PageId we get when we call get_PageId(“Avengers: Endgame”)
'44254295'Here is the Description we get when we call get_description(pageId)
'2019 superhero film produced by Marvel Studios'Anything after the # symbol is considered a Python comment and is ignored. You use comments to document the intention of the code.
Let’s step through, line by line, the get_PageId function to learn how it gets the ID of the title of the article that we are passing on.
# call the Wikipedia API to get the PageId of the article with the given title.

  q = {"action": "query", "format": "json", "prop": "info", "titles": title}
q is a Python dictionary. It holds key-value pairs. If you look up the value of “action”, you get “query” and so on. For example, you’d perform such a lookup using q[“action”].
“action” is a Python string. It represents textual information.
“titles”: title maps the “titles” key to the Python variable title that we passed as input to the function. All keys and values are hardcoded and explicit, except for the last one. This is what the dictionary looks like after we execute this function.
q = {"action": "query", "format": "json", "prop": "info", "titles": "Avengers: Endgame"}In the next line we have.
url = "https://en.wikipedia.org/w/api.php?" + urllib.parse.urlencode(q)Here we have a Python module function urllib.parse.urlencode. Module functions are just like Google sheet functions that provide standard functionality.
Before we call module or library functions, we need to import the module that contains them.
This line at the top of the notebook does that.
import urllib.parseLet’s clarify the call and see the output we get.
urllib.parse.urlencode({"action": "query", "format": "json", "prop": "info", "titles": "Avengers: Endgame"})You can find detailed documentation on the urlencode module function here. Its job is to convert a dictionary of URL parameters into a query string. A query string is the part of the URL after the question mark.
This is the output we get after we run it.
"action=query&format=json&prop=info&titles=Avengers%3A+Endgame"This is what our URL definition line looks like after we add the result of urlencode.
url = "https://en.wikipedia.org/w/api.php?" + "action=query&format=json&prop=info&titles=Avengers%3A+Endgame"The + sign here concatenates the strings to form one.
url = "https://en.wikipedia.org/w/api.php?action=query&format=json&prop=info&titles=Avengers%3A+Endgame"This resulting string is the API request the notebook sends to Wikipedia.
In the next line of code, we open the dynamically generated URL.
response = requests.get(url)requests.get is a Python third-party module function. You need to install third-party libraries using the Python tool pip.
!pip install --upgrade -q requestsYou can run command line script and tools from a notebook by prepending them with !
The code after ! is not Python code. It is Unix shell code. This article provides a comprehensive list of the most common shell commands.
After you install the third-party module, you need to import it like you do with standard libraries.
import requestsHere is what the translated call looks like.
response = requests.get("https://en.wikipedia.org/w/api.php?action=query&format=json&prop=info&titles=Avengers%3A+Endgame")You can open this request in the browser and see the API response from Wikipedia. The function call allows us to do this without manually opening a web browser.
The results from the requests.get call gets stored in the Python variable response.
This is what the result looks like.
| {“batchcomplete”: “”, | |
| “query”: {“pages”: {“44254295”: {“contentmodel”: “wikitext”, | |
| “lastrevid”: 933501003, | |
| “length”: 177114, | |
| “ns”: 0, | |
| “pageid”: 44254295, | |
| “pagelanguage”: “en”, | |
| “pagelanguagedir”: “ltr”, | |
| “pagelanguagehtmlcode”: “en”, | |
| “title”: “Avengers: Endgame”, | |
| “touched”: “2020-01-03T17:13:02Z”}}}} |
You can think of this complex data structure as a dictionary where some values include other dictionaries and so forth.
The next line of code slices and dices this data structure to extract the PageId.
result = list(response.json()["query"]["pages"].keys())[0]Let’s step through it to see how it gets it.
response.json()["query"]When we look up the value for the key “query”, we get a smaller dictionary.
| {“pages”: {“44254295”: {“contentmodel”: “wikitext”, | |
| “lastrevid”: 933501003, | |
| “length”: 177114, | |
| “ns”: 0, | |
| “pageid”: 44254295, | |
| “pagelanguage”: “en”, | |
| “pagelanguagedir”: “ltr”, | |
| “pagelanguagehtmlcode”: “en”, | |
| “title”: “Avengers: Endgame”, | |
| “touched”: “2020-01-03T17:13:02Z”}}} |
Then, we look up the value of “pages” in this smaller dictionary.
response.json()["query"]["pages"]We get an even smaller one. We are drilling down on the big response data structure.
| {“44254295”: {“contentmodel”: “wikitext”, | |
| “lastrevid”: 933501003, | |
| “length”: 177114, | |
| “ns”: 0, | |
| “pageid”: 44254295, | |
| “pagelanguage”: “en”, | |
| “pagelanguagedir”: “ltr”, | |
| “pagelanguagehtmlcode”: “en”, | |
| “title”: “Avengers: Endgame”, | |
| “touched”: “2020-01-03T17:13:02Z”}} |
The PageId is available in two places in this slice of the data structure. As the only key, or as a value in the nested dictionary.
John made the most sensible choice, which is to use the key to avoid further exploration.
response.json()["query"]["pages"].keys()The response from this call is a Python dictionary view of the keys. You can learn more about dictionary view in this article.
dict_keys(["44254295"])We have what we are looking for, but not in the right format.
In the next step, we convert the dictionary view into a Python list.
list(response.json()["query"]["pages"].keys())This what the conversion looks like.
["44254295"]Python lists are like rows in a Google sheet. They generally contain multiple values separated by commas, but in this case, there is only one.
Finally, we extract the only element that we care about from the list. The first one.
list(response.json()["query"]["pages"].keys())[0]The first element in Python lists starts at index 0.
Here is the final result.
"44254295"As this is an identifier, is better to keep as a string, but if we needed a number to perform arithmetic operations, we would do another transformation.
int(list(response.json()["query"]["pages"].keys())[0])In this case, we get a Python integer.
44254295The main differences between strings and integers are the types of operations that you can perform with them. As you saw before we can use the + operator to concatenate two strings, but if we used the same operator in two numbers, it would add them together.
 "44254295" + "3" = "442542953"

44254295 + 3 = 44254298
As a side note, I should mention jq, a cool command line tool that allows you to slice and dice JSON responses directly from curl calls (another awesome command line tool). curl allows you to do the equivalent of what we are doing with the requests module here, but with limitations.
So far we’ve learned how to create functions and data types that allow us to extract data and filter data from third-party sites (Wikipedia in our case).
Let’s call the next function in John’s notebook to learn another important building block: flow control structures.
get_description("442542953")This is what the API URL looks like. You can try it in the browser.
"https://en.wikipedia.org/w/api.php?action=query&format=json&prop=pageterms&pageids=44254295"Here what the response looks like.
| {“ns”: 0, | |
| “pageid”: 44254295, | |
| “terms”: {“alias”: [“Avengers Endgame”, “Avengers End Game”, “Avengers 4”], | |
| “description”: [“2019 superhero film produced by Marvel Studios”], | |
| “label”: [“Avengers: Endgame”]}, | |
| “title”: “Avengers: Endgame”} | |
This is the code that will step through to understand control flows in Python.
  # some pages don't have descriptions, so we can't blindly grab the value

  if "terms" in rs and "description" in rs["terms"]:

    result = rs["terms"]["description"][0]

  else:

    result = ""

  return result
This part checks if the response structure (above) includes a key named “terms”. It uses the Python If … Else control flow operator. Control flow operators are the algorithmic building blocks of programs in most languages, including Python.
if "terms" in rsIf this check is successful, we look up the value of such key with rs[“terms”]
We expect the result to be another dictionary and check it to see if there is a key with the value “description”.
"description" in rs["terms"]If both checks are successful, then we extract and store the description value.
result = rs["terms"]["description"][0]We expect the final value to be a Python list, and we only want the first element as we did before.
The and Python logical operator combines both checks into one where both need to be true for it to be true.
If the check is false, the description is an empty string.
result = ""Populating Google Sheets from Python
With a solid understanding of Python basic building blocks, now we can focus on the most exciting part of Mueller’s notebook: automatically populating Google Sheets with the values we are pulling from Wikipedia.
# helper function to update all rows in the spreadsheet with a function

def update_spreadsheet_rows(fieldName, parameterName, functionToCall, forceUpdate=False):

  # Go through spreadsheet, update column 'fieldName' with the data calculated

  # by 'functionToCall(parameterName)'. Show a progressbar while doing so.

  # Only calculate / update rows without values there, unless forceUpdate=True.
Let’s step through some interesting parts of this function.
The functionality to update Google Sheets is covered by a third-party module.
We need to install it and import it before we can use it.
!pip install --upgrade -q gspread

import gspread
Mueller chose to convert the sheets into pandas data frame and while, as he mentions in the comments, it was not necessary, but we can take the opportunity to learn a little bit of pandas too.
update_spreadsheet_rows("PageId", "Article", get_PageId)At the end of every helper function that fills a column, we have a call like the one above.
We are passing the relevant columns and the function that will get the corresponding values.
When you pass the name of a function without parameters in Python, you are not passing data but code for the function to execute. This is not something that, as far as I know, you can do in a spreadsheet.
columnNr = df.columns.get_loc(fieldName) + 1 # column number of output fieldThe first thing we want to know is which column we need to update. When we run the code above we get 7, which is the column position of the PageId in the sheet (starting with 1).
for index, row in df.iterrows():
In this line of code, we have another control flow operator, the Python For Loops. For loops allow you to iterate over elements that represent collections, for example, lists and dictionaries.
In our case above, we are iterating over a dictionary where the index variable will hold the key, and the row variable will hold the value.
To be more precise, we are iterating over a Python dictionary view, a dictionary view is like a read-only and faster copy of the dictionary, which is perfect for iteration.
<generator object DataFrame.iterrows at 0x7faddb99f728>
When you print iterrows, you don’t actually get the values, but a Python iterator object.
Iterators are functions that access data on demand, require less memory and perform faster than accessing collections manually.
INDEX:

2

ROW:

Article                                     César Alonso de las Heras

URL                 https://en.wikipedia.org/wiki/César_Alonso_de_...

Views                                                       1,944,569

PartMobile                                                     79.06%

ViewsMobile                                                 1,537,376

ViewsDesktop                                                  407,193

PageId                                                       18247033

Description

WikiInLinks

WikiOutLinks

ExtOutLinks

WikidataId

WikidataInstance

Name: 2, dtype: object


sdsdsds
This is an example iteration of the for loop. I printed the index and row values.
# if we already did it, don't recalculate unless 'forceUpdate' is set.

    if forceUpdate or not row[fieldName]:

      result = functionToCall(row[parameterName])
forceUpdate is a Python boolean value which defaults to False. Booleans can only be true or false.
row[“PageId”] is empty initially, so not row[“PageId”] is true and the next line will execute. The or operator allows the next line to execute for subsequent runs only when the flag forceUpdate is true.
result = functionToCall(get_PageId)This is the code that calls our custom function to get the page ids.
The result value for the example iteration is 39728003
When you review the function carefully, you will notice that we use df which is not defined in the function. The code that does that is at the beginning of the notebook.
# Convert to a DataFrame and render.

# (A DataFrame is overkill, but I wanted to play with them more :))

import pandas as pd

df = pd.DataFrame.from_records(worksheetRows)
The code uses the third-party module pandas to create a data frame from the Google Sheet rows. I recommend reading this 10 minutes to pandas article to get familiar. It is a very powerful data manipulation library.
Finally, let’s see how to we update the Google Sheet.
      row[fieldName] = result # save locally

      worksheet.update_cell(index+1, columnNr, result) # update sheet too
This code can be translated to.
      row["PageId"] = 39728003 # save locally

      worksheet.update_cell(3+1, 7, 39728003) # update sheet too
This is the code that updates the Google sheet. The variable worksheet is also not defined in the update_spreadsheet_rows function, but you can find it at the beginning of the notebook.
# Authenticate (copy & paste key as detailed), and read spreadsheet

# (This is always confusing, but it works)

from google.colab import auth

auth.authenticate_user()

import gspread

from oauth2client.client import GoogleCredentials

gc = gspread.authorize(GoogleCredentials.get_application_default())

# get all data from the spreadsheet

worksheet = gc.open(spreadsheetName).sheet1

worksheetRows = worksheet.get_all_values()
I left this code for last because it is the last thing that gets executed and it is also more complicated than the previous code. However, it is the first thing you need to execute in the notebook.
First, we import the third-party module gspread, and complete an Oauth authentication in Chrome to get access to Google Sheets.
# get all data from the spreadsheet

worksheet = gc.open("Wikipedia-Views-2019").sheet1

worksheetRows = worksheet.get_all_values()
We manipulate the Google sheet with the worksheet variable and we use the worksheetRows variable to create the pandas Dataframe.
Visualizing from Python
Now we get to your homework.
I wrote code to partially reproduce John’s pivot table and plot a simple bar chart.
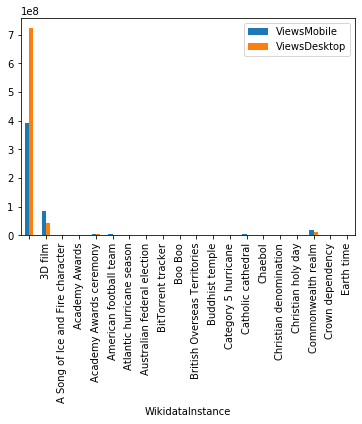
Your job is to add this code to your copy of the notebook and add print(varible_name) statements to understand what I am doing. This is how I analyzed John’s code.
Here is the code.
#Visualize from Python

df.groupby("WikidataInstance").agg({"ViewsMobile": np.sum, "ViewsDesktop": np.sum})

# the aggregation doesn't work because the numbers include commas

# This gives an error ValueError: Unable to parse string "1,038,950,248" at position 0
#pd.to_numeric(df["ViewsMobile"])

# StackOverflow is your friend :)

#https://stackoverflow.com/questions/22137723/convert-number-strings-with-commas-in-pandas-dataframe-to-float
import locale

from locale import atoi
locale.setlocale(locale.LC_NUMERIC, '')

#df[["ViewsMobile", "ViewsDesktop"]].applymap(atoi)

df["ViewsMobile"] = df["ViewsMobile"].apply(atoi)

df["ViewsDesktop"] = df["ViewsDesktop"].apply(atoi)

# We try again and it works
totals_df = df.groupby("WikidataInstance").agg({"ViewsMobile": np.sum, "ViewsDesktop": np.sum})

totals_df

#Here we plot
totals_df.head(20).plot(kind="bar")
Resources to Learn More
If you got this far and want to learn more, I recommend you follow the links I included in the article and practice the code snippets in this guide.
At the end of most of my columns, I share interesting Python projects from the SEO community. Please consider checking out the ones that interest you and consider studying them as we did here.
But, even better, see how you might be able to add something simple but valuable that you can share back!
More Resources:
- An Introduction to Python for Technical SEO
- How to Uncover Powerful Data Stories with Python
- How to Use Python to Analyze SEO Data: A Reference Guide
Image Credits
Screenshot taken by author, January 2020
