

Now it is more critical than ever to truly understand JavaScript for SEOs.
Here is a horror story that Mark Williams-Cook shared on Linkedin.
“The developer insisted they knew what they were doing and that “Google can index the content”. The result is people have been laid-off with the subsequent damage it has done to the business.”
Now, imagine that you are the SEO at this company or similar ones making this transition to JavaScript.
After you are armed with deep JavaScript knowledge, you could provide them with experimental data that shows, without a doubt, that they will have big problems if they move forward without adjustments.
You’d be a big hero.
In this guide, we will learn modern JavaScript building blocks while we code a simple single-page app and optimize it with structured data.
Here’s the plan:
- Create a single page app using an HTML5 template.
- Add dynamic behavior with ReactJs.
- Use the Chrome JavaScript Debugger to fix errors.
- Optimize the app for structured data.
- Use the structured data testing tool to validate the markup.
- Dynamically generate the JSON-LD markup using JavaScript.
I’ve been a strong advocate of SEOs learning developer skills.
Python is very useful if you spend a lot of time doing data analysis and automation.
JavaScript is crucial if you have to deal with a growing number of clients where the frontend is built in ReactJs, AngularJs, VueJs, etc.
Create a Single Page App Using an HTML5 Template
We are going to use Visual Studio Code to write and Chrome to test our JavaScript code.
We are going to leverage this Google codelab that shows how to implement structured data to a simple recipe page.
Here is what our final result looks like.

When going through the codelab we will find a single page app using an HTML5 template. We will borrow the code so we don’t have to write it from scratch.
This is what the page looks like.

This is what the code looks like.
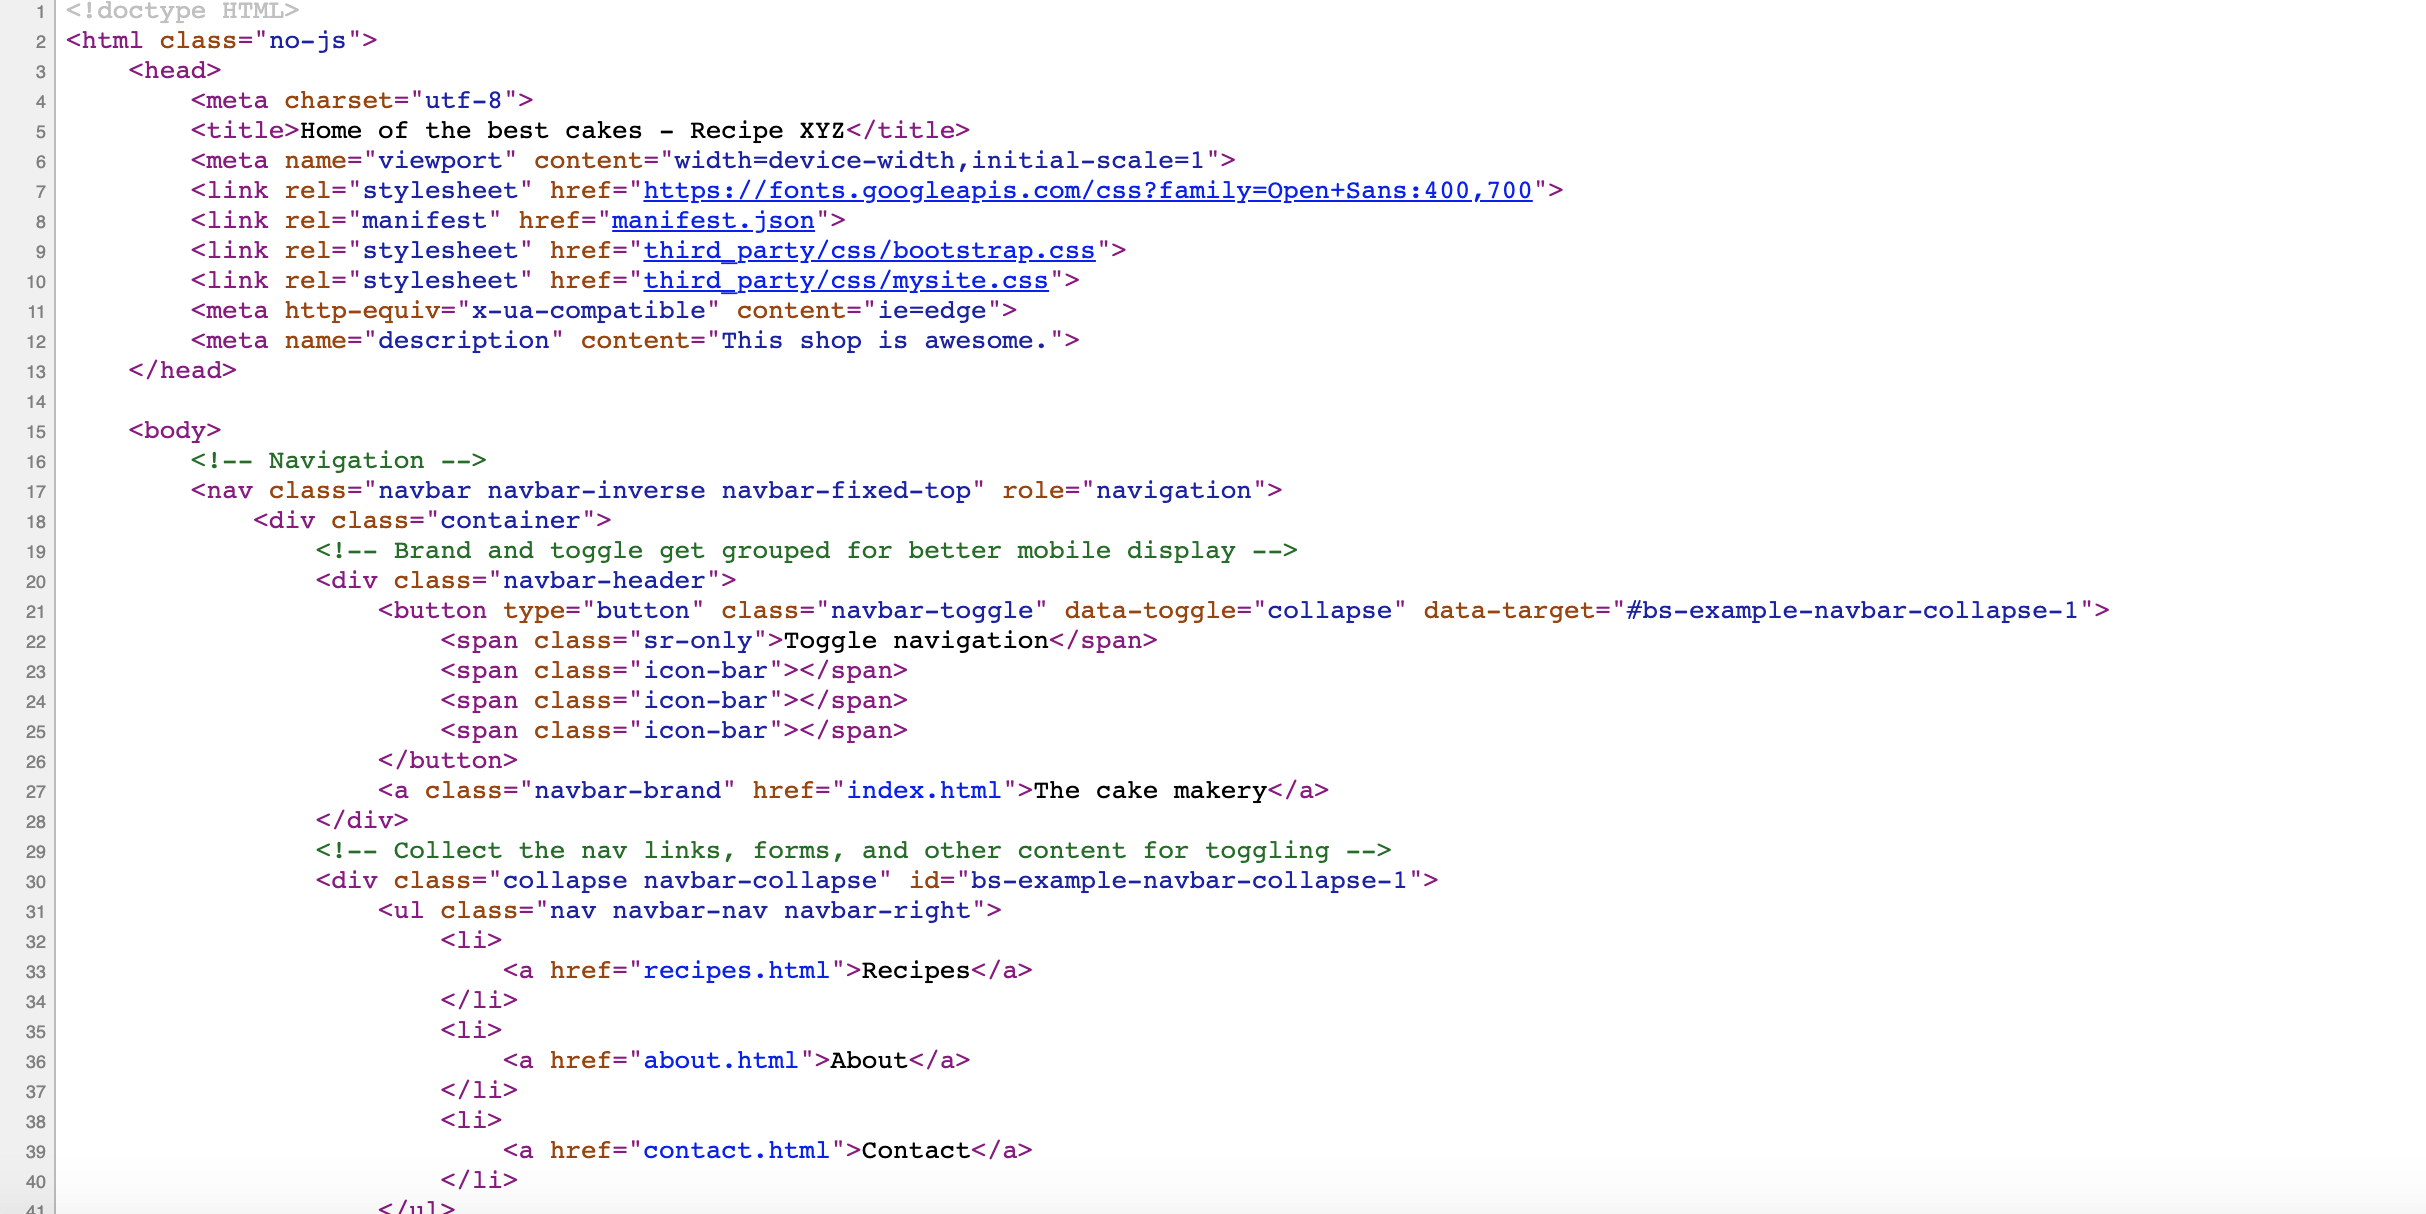
It includes semantic HTML5 tags like <nav> and <button> to indicate which part of the page is the navigation or where to place buttons. We will review the code in more detail soon.
Now, scroll to the bottom of semantic HTML5 tags and try adding a review. You’ll get nothing.
There is not dynamic functionality. Let’s fix that with JavaScript, more specifically with ReactJs.
ReactJs is one of the most popular JavaScript frameworks that simplify the work of building modern web applications. Our goal is not to dive too deep into the framework or JavaScript language, but get familiar with the basic concepts so we can more easily debug SEO and performance issues.
We are going to follow the instructions here which are the easiest steps to get started with ReactJs.
“React has been designed from the start for gradual adoption, and you can use as little or as much React as you need. Perhaps you only want to add some “sprinkles of interactivity” to an existing page. React components are a great way to do that.
The majority of websites aren’t, and don’t need to be, single-page apps. With a few lines of code and no build tooling, try React in a small part of your website. You can then either gradually expand its presence, or keep it contained to a few dynamic widgets.”
We will use React to get the Submit Review button to work. Here is what the working button looks like.
First, let’s download the page and resources using this command.
!wget -E -k -p https://googlecodelabs-structured-data.glitch.me/index.html
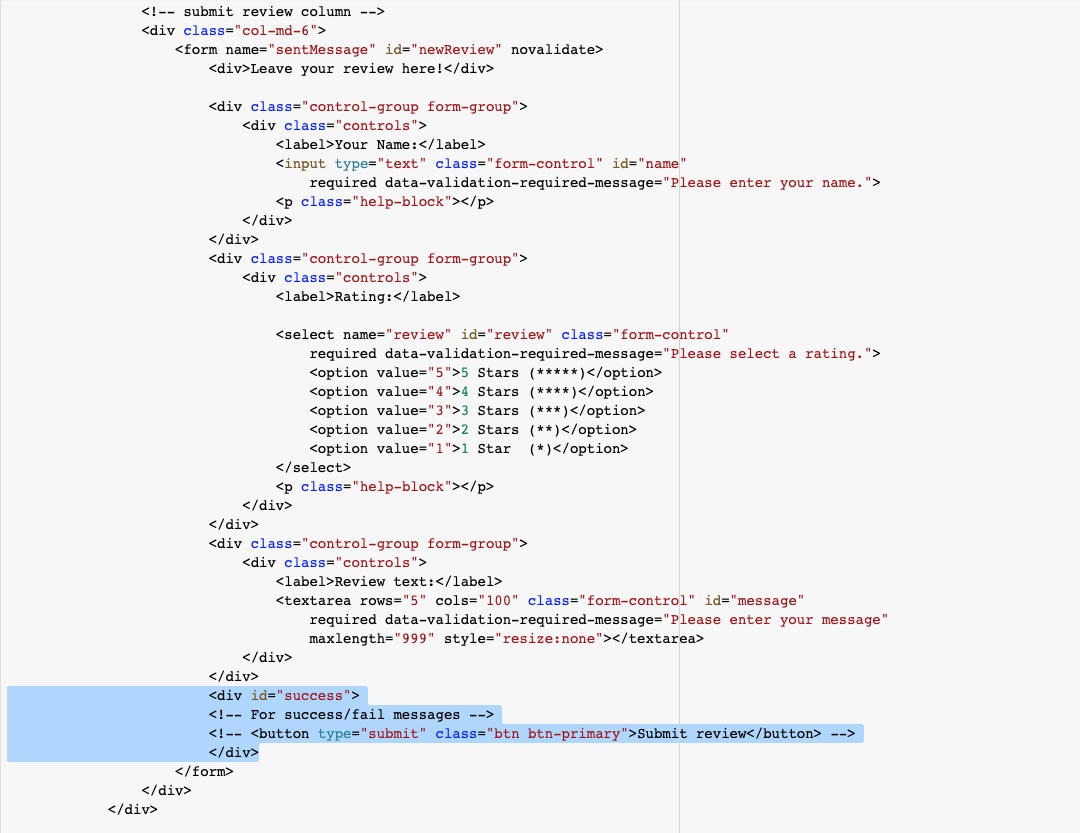
                        <div id="success">

                        <!-- For success/fail messages -->

                        <!-- <button type="submit" class="btn btn-primary">Submit review</button> -->

                        </div>
Step 2: We need to add the JavaScript tags to import ReactJs.
        <!-- Load React. -->

          <!-- Note: when deploying, replace "development.js" with "production.min.js". -->

          <script src="https://unpkg.com/react@16/umd/react.development.js" crossorigin></script>

          <script src="https://unpkg.com/react-dom@16/umd/react-dom.development.js" crossorigin></script>
The unpkg.com is a very cool CDN service that takes packages from the NPM registry and makes any file in the packages available to embed in websites and applications.
Step 3: We are going to create a React component to support the submit review feature. We will include it in the HEAD as instructed in the tutorial.
          <!-- Load our React component. -->

          <script src="submit_review.js"></script>
In the tutorial, we are recommended to use some starter code. The code’s purpose is to add a Like button to a page. We are going to make some slight modifications to add a Submit Review button instead.
'use strict';

const e = React.createElement;

class SubmitReview extends React.Component {

  constructor(props) {

    super(props);

    this.state = { submitted: false};

  }

  render() {

    if (this.state.submitted) {


      return "You submitted a review";

    }

    return e(

      'button',

      { onClick: () => { this.setState({ submitted: true });

      }

       },

      'Submit Review'

    );

  }

}
This code defines the behavior of the button. It maintains the state of the button, submitted or not and when we click on it, it will display the text “You submitted a review”.
Next, we need to connect it to the relevant HTML code and we are ready to test it.
const domContainer = document.querySelector("#success");

ReactDOM.render(e(SubmitReview), domContainer);
The first line selects the <div> element with id “success”. The second line displays the React control we are creating inside the <div> element.
Here is what it looks like.
Leveraging the React Component State
This work above is good for illustration purposes, but not particularly useful.
Let’s capture the user name and review. Then, display it back when you submit the button.
Here are the relevant changes to accomplish that.
  constructor(props) {

    super(props);

    this.state = { submitted: false, name: "", review: ""};

  }
    if (this.state.submitted) {


        if(this.name == ""){

      return `You submitted ${this.state.review}`;

        }else{

            return `${this.state.name}, you submitted ${this.state.review}`;

        }

    }
Inside the change state check, we add a control flow to present two alternative texts.
One if the name was left empty and another if the user provided a name.
Please note that we are using special strings that allow to easily interpolate the values of variables. We use the backtick delimiter ` for that.
The operator ${variable name} returns the value of the variable in place.
     return e( 'button',

      { onClick: () => { this.setState({ submitted: true });

                      const name = document.querySelector("#name").value;

                      const review = document.querySelector("#message").value;

                      this.setState({name: name, review: review});

                      }

       },

      'Submit Review'

    );
Here are the most important changes.
We first capture in temporary variables the submitted values for the name and review using relevant CSS selectors.
Then, we change the state of the internal variables using the call to this.setState.
After these changes, you can see that submitting reviews works as we planned.
We could continue adding more functionality to manage all the reviews, etc. but we will stop here so we can move to add structured data to the page.
How to Identify & Fix Issues Using the Chrome Debugger
When I initially placed the React component script in the HTML HEAD, I go this error in the JavaScript Console.
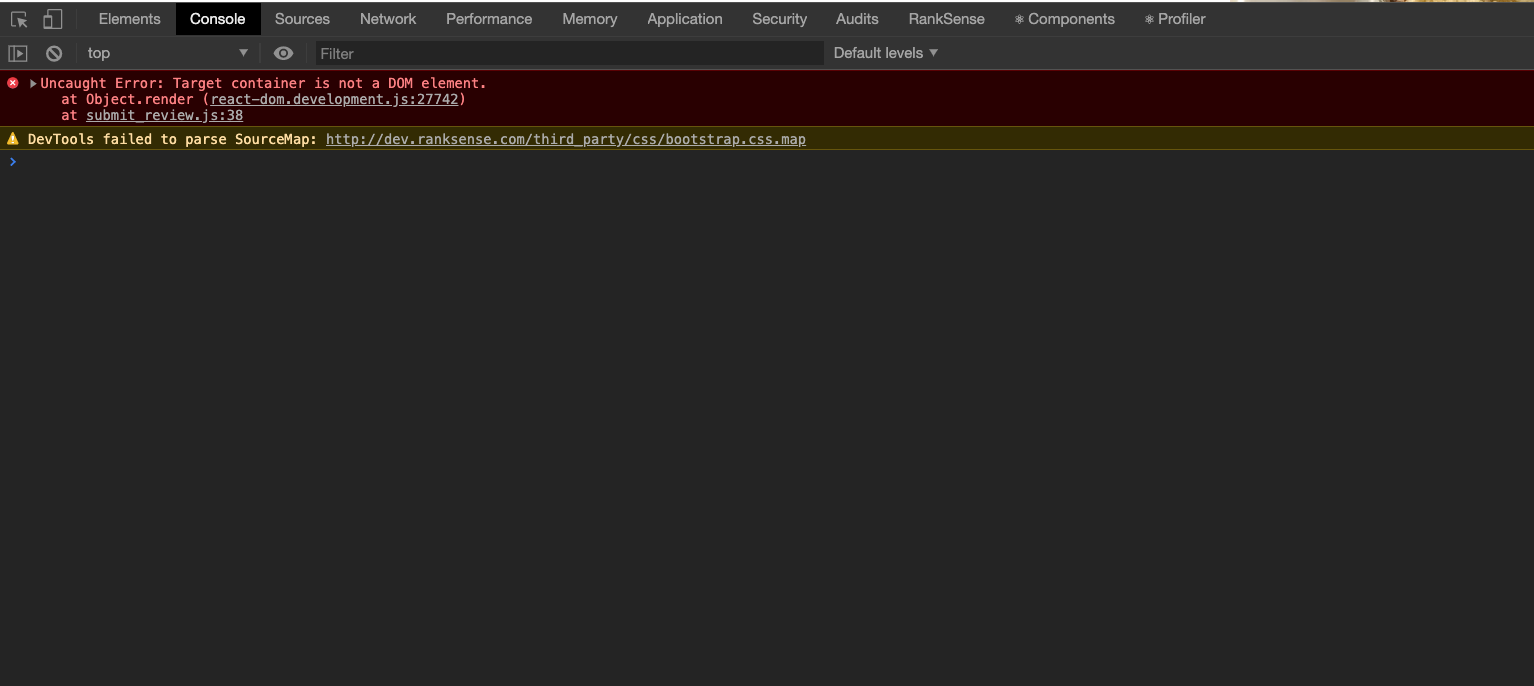
When I clicked on the error line reported submit_review.js:38, I was presented with the problematic code.
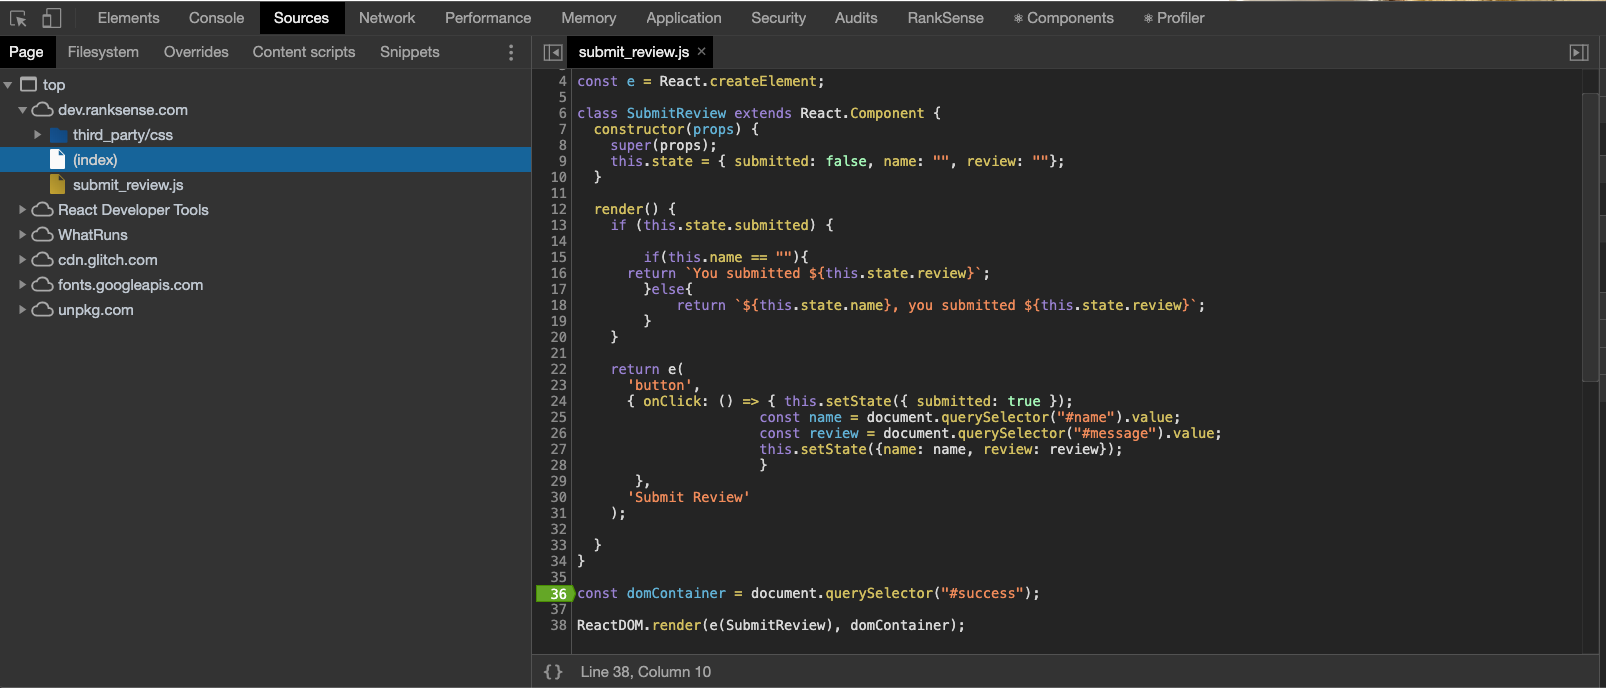
I suspected the selector wasn’t working, so I set a breakpoint (green highlighted line 36) and refreshed the page. This halts the page rendering on this line and brings up the Chrome JavaScript debugger. I can click to step through the line and mouse over the variable domContainer, and it was null, which means there was no value.
I typed the selector line of code in the JavaScript Console and I got the value as expected. What was happening here?
In order to understand the issue, we need to read about the lifecycle of an HTML page.
When browser loads a page it goes through different phases and not all parts of the page are available. Everything is available when the page is fully loaded.
I am executing JavaScript code in the head that is trying to find content in the BODY, which has yet to fully load.
So, to fix this issue, I simply moved my component script to the bottom of the page. Right before the closing HTML BODY tag.
<!-- Footer -->
<footer>
<div class="row">
<div class="col-lg-12">
<p>Copyright © Home of the best cakes, 2018 |
<a href="http://html5-templates.com/" target="_blank" rel="nofollow">HTML5 Templates</a></p>
</div>
</div>
</footer>
</div>
<!-- /.container -->
<!-- Load our React component. -->
<script src="submit_review.js"></script>
</body>
</html>
Adding Structured Data to our Recipe Page
Now that we have a basic recipe page with a barely functioning button, let’s add some structured data to help make our page stand out in the SERPs.
We are going to follow the steps in this codelab.
“Since our sample site is a recipe blog, we’re going to start with recipe structured data. Recipe structured data can provide a rich result that can include rich information, like a description of your recipe, cooking and preparation times, and nutrition information. Your content may also automatically enable a recipe badge for Google Images on mobile devices, voice guidance on the Google Home, and a content action on the Google Assistant.”
Google’s preferred format for structured data is JSON-LD. This is good because it dramatically simplifies implementation.
We can add all markup in a single place on the page and avoid the complication of nesting values.
<script type="application/ld+json">
{
"@context": "http://schema.org/",
"@type": "Recipe",
"name": "Party Coffee Cake"
}
</script>
This is our work in progress implementation. We are specifying the page contains a recipe for a Party Coffee Cake. This page contains all the details we need to complete our implementation.
Please note that we need to specify the type as “application/ld+json”. By default, browsers assume “application/javascript”. We are also specifying schema.org as the markup type.

After we add the remaining required properties, we can test them in the Structured Data Testing Tool. We can see all values organized and displayed nicely.
However, we can see a warning about a missing optional attribute.
| warning
aggregateRating
|
The aggregateRating field is recommended. Please provide a value if available.
|
We are going to improve the markup by adding a nested Review element.
        "review": {

          "@type": "Review",

          "reviewRating": {

            "@type": "Rating",

            "ratingValue": "4",

            "bestRating": "5"

          },

          "author": {

            "@type": "Person",

            "name": "Mary Stone"

          },

          "datePublished": "2018-05-01",

          "reviewBody": "This cake is delicious!",

          "publisher": "The cake makery"

        }
        "aggregateRating": {

            "@type": "AggregateRating",

            "ratingCount": "18",

            "ratingValue": "4"

        }

Generate JSON-LD Markup with JavaScript
It is good that we produced valid markup, but as the data is hardcoded, it won’t update the number of reviews as we add them.
Let’s put our new JavaScript skills to good use and fix this!
For illustration purposes, we will simply increase the number of reviews on the web page and the JSON-LD object when we submit a new review.
The same approach can be used to populate the JSON-LD object with data from the page. However, in practice the data for the JSON-LD object will come from a database, the same way as the content for the page is.
var json_str = `{

    "@context": "http://schema.org/",

    "@type": "Recipe",

  "review": {

    "@type": "Review",

    "reviewRating": {

      "@type": "Rating",

      "ratingValue": "4",

      "bestRating": "5"

    },

// Plus other elements

  }`;
The important technique here is that I saved the whole hard-coded JSON-LD code in a JavaScript string variable. I used backticks to handle multiple lines of text.
function update_ratingCount(ratingCount){


    var jsonld = JSON.parse(json_str);

    jsonld.aggregateRating.ratingCount = ratingCount;

    return JSON.stringify(jsonld);

}
I used JSON.parse to convert the string to an object that makes it easy to reference any element in the JSON-LD structure.
See how I can navigate nested levels using dots in jsonld.aggregateRating.ratingCount. Then, after I update the ratingCount value, I need to convert the object back to a string for insertion into the page.
Finally, we need to update the render() function of our React component. It should perform the following additional steps:
- Extract the current number of reviews
- Increase them by one
- Update the page with the increased reviews
- Update the JSON-LD as well, but it will replace the whole script with the one generated by the function we created.
    if (this.state.submitted) {


        //get current reviews

        var review_count = document.querySelector("body > div > div:nth-child(4) > div.col-lg-12 > h2").textContent;

        review_count = review_count.split(" ")[0]

        //increase current rating count by one

        var count = parseInt(review_count);

        count++;

        review_count = count.toString();

        //now that we have the new number of reviews. We can update the page and the JSONLD

        document.getElementById("user_reviews").innerHTML = `${review_count} user reviews`;

        document.getElementById("jsonld").innerHTML = update_ratingCount(review_count);


        if(this.name == ""){

      return `You submitted ${this.state.review}`;

        }else{

            return `${this.state.name}, you submitted ${this.state.review}`;

        }

    }
I tested this in Chrome and I can see the values updated under the developer tool’s element tab. It won’t work with the Structured Data Testing Tool because the changes are not permanent.
And there you have it. If you try these code snippets and the codelab yourself, you should have learned enough JavaScript to be dangerous!
Community Projects & Resources to Learn More
The best way to learn programming and JavaScript, in particular, is by practicing it. The more you do it, the better you get at it.
Don’t get discouraged by the initial obstacles, come back to them later with fresh ideas.
Here are some tutorials to get you warmed up.
- JavaScript Tutorial from W3C Schools
- The Modern JavaScript Tutorial
- CSS Selectors reference from W3C
- Getting Started with JavaScript Debugging
This year started with so much excitement around Python, coding, and automation in the SEO community.
So many cool projects, articles, videos and introduction guides.
I’m so glad that everybody is building off the work of each other and making the community stronger and more fun every day.
Here are some projects that I want to highlight.
How to Aggregate & Automate Performance Reporting With Lighthouse & Google Data Studio https://t.co/KXYH7Ndb3I /by @DanLeibson #measure pic.twitter.com/uibiGvEwQw
— Google Analytics (@googleanalytics) January 23, 2020
Dan Leibson and gang not only created an amazing Lighthouse automation tool in Nodejs. They open-sourced it and got it featured by the Google Analytics Twitter account!
🤯🤯🤯Rory just blew my mind 10X with this beautifully detailed notebook covering so many advanced concepts 👏🏻👏🏻👏🏻. He started learning #Python last year! So proud of our growing 🐍🔥SEO community! #DONTWAIT https://t.co/yuJzEWLIJI
— Hamlet 🇩🇴 🇺🇸 (@hamletbatista) January 24, 2020
Rory Truesdale from Conductor just started learning Python last year and put together a crazily advanced notebook with so many valuable features. Very impressive!
Clustering/text mining w/ BERT. was very lucky to be exposed to very smart people/projects and putted together this experimental code, apologize ahead the code has no comments and its super beta, yet, think this can be good to share. @hamletbatista @jroakes @RoryT11 @fighto pic.twitter.com/wA2HdXgzQL
— Gefen Hermesh (@Ghermesh) January 24, 2020
Gefen Hermesh created a sophisticated clustering solution that leverages BERT.
@jroakes makes amazing things. https://t.co/CLk6YsmCMI
— 🍌 John 🍌 (@JohnMu) December 10, 2019
JR Oakes has been coding incredible things. A mini internet that got big praise from John Muller and more recently an advanced keyword clustering algorithm.
Hülya Çoban put together this amazing notebook that helps plot Google Trends in Google Data Studio.
This is going to be an exciting year for sure.
More Resources:
- Understanding JavaScript Fundamentals: Your Cheat Sheet
- SEO Guide to Angular: Everything You Need to Know
- Advanced Technical SEO: A Complete Guide
Image Credits
All screenshots taken by author, February 2020
