

Moving toward a more secure web is a well-known Google initiative. Every now and then, Google finds a new way to encourage website owners to go secure by:
- Declaring HTTPS a ranking signal (a lightweight one, but that may not be the case in future).
- Starting to index HTTPS pages first.
- Showing how it has never been as cheap and as easy to move to HTTPS.
- Marking all HTTP sites carrying sensitive data as ‘non-secure’ in Chrome.
While Google is giving you a nudge and trying to be as helpful as possible, so many things can go wrong when switching a site from HTTP to HTTPS. Underestimating the challenge can lead to a disaster.
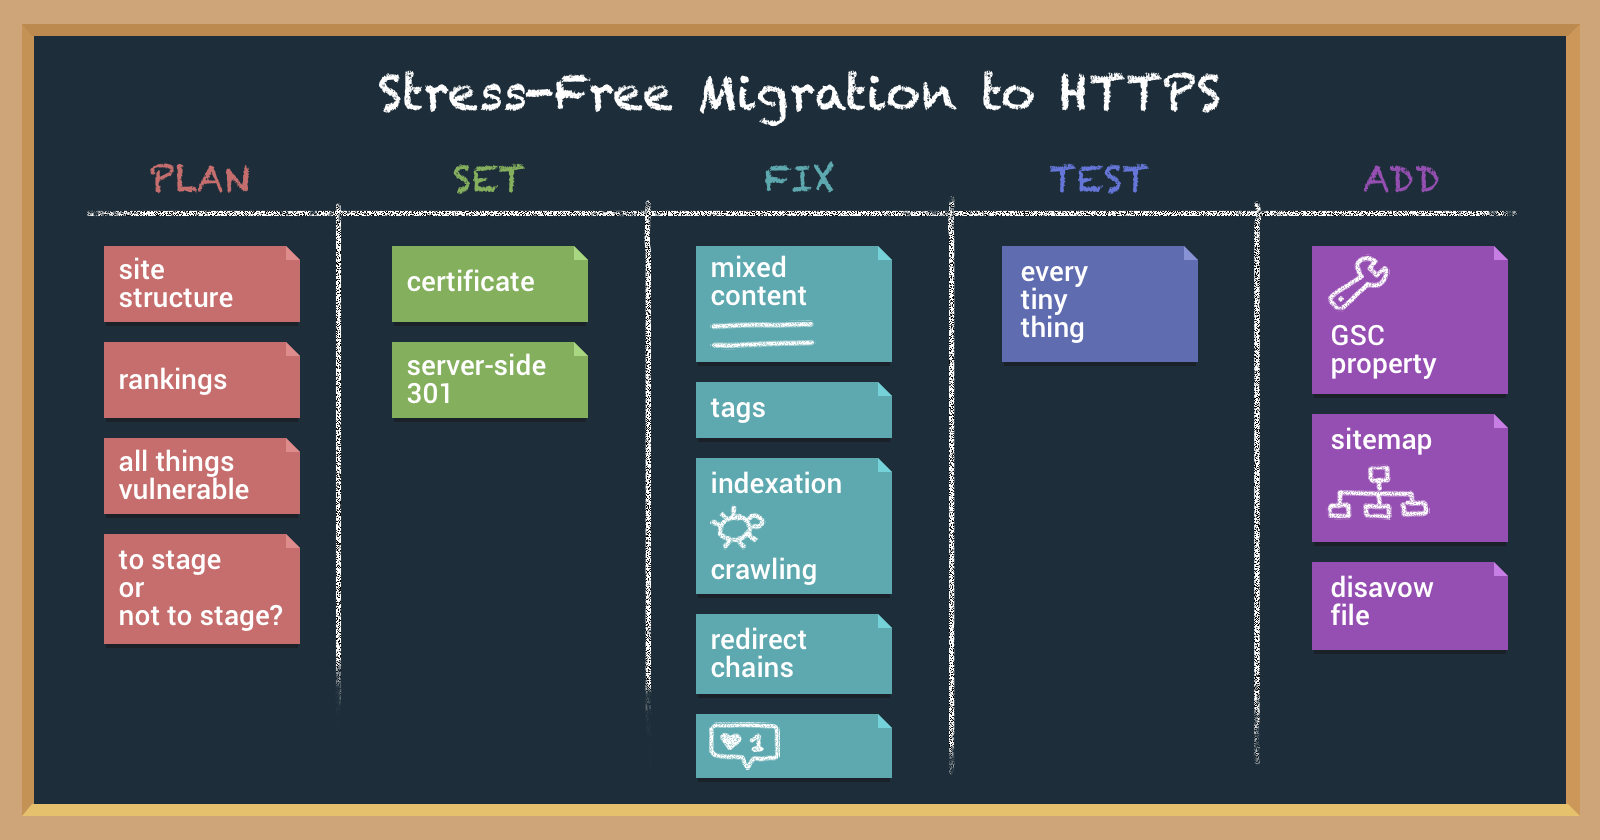
You must plan each and every step and test thoroughly for a smooth landing. This post will teach you the best practices and common pitfalls you need to know for a stress-free HTTPS migration.
What Is HTTPS?
HTTPS is being used for communication over Hypertext Transfer Protocol (HTTP) with an ‘S’ in the end that stands for ‘Secure.’ Adopting HTTPS, you provide your users with three key layers of protection:
- Authentication prevents ‘man-in-the-middle’ attacks and provides a guarantee one is communicating with the exact website that was intended.
- Encryption provides privacy by encrypting the exchanged data. This ensures that conversations won’t be eavesdropped and the information won’t be stolen.
- Data integrity prevents data from being unnoticeably modified or corrupted during the transfer.
Why Migrate to HTTPS?
Apart from security as the key priority, there are several more things to consider:
- Private and secure online experience is what users expect while visiting your site, and user trust is a truly valuable asset for a business.
- Some awesome updates like HTTP/2 (which you can really benefit from, speed-wise) are only supported over HTTPS in some browsers.
- Ranking boost may be a good incentive, as Google hints on strengthening HTTPS signal in the future.
At this point, you might move on from having doubts to planning a migration. You need a well thought-out plan to make your HTTPs migration painless.
Before You Migrate to HTTPS
Crawling the Website and Drafting a Plan
Initial conditions may vary: You may have a 5-page fresh website built with one CMS or a huge website with 10+ years of changes behind the shoulders and several independent units to migrate (for our team, that was the case). Either way, the first step to take is to carefully crawl your website in full. This will help you evaluate the current state of the site and visualize its structure.
While doing that, consider all the technologies or CMSs underlying each area of your website, and make a list of all the units that need to be approached separately. In addition, make a list of all things that may break upon migration (these may be payment gateways, downloadables, external scripts, APIs, and others). Before even starting, you should identify the most vulnerable things to check on, first thing after migration.
Checking the Rankings
While Google works out the changes, you’ll inevitably hit some ranking turbulence. There’s no cure to that, but nothing to worry about either, as things should get back to normal shortly if everything’s done right.
Yet, to be able to check the impact carefully and make sure it was just a short-term fluctuation, you need to have some pre-migration history at hand. While planning a switch, make sure to check the rankings daily for around a week to get the comprehensive picture of where your website normally stands.
To avoid googling for ‘why have my rankings dropped‘ later, you can do one more handy thing: Check all the keywords your website is ranking for and group the ranking pages by the website areas they belong to. This will help you track down the reason in case of any significant decline in rankings afterward by detecting the troublesome area at a glance.
Choosing the Right Deployment Option
Once you have a draft of your website and a primary plan, you may move on to choosing the right deployment option.
- If you’re lion-hearted, you may deploy the changes to the production environment directly. This way all the changes will be available to users at once, but any overlooked bugs will come along with it, live.
- A more deliberate move is to deploy the changes to the development environment and then, once you over-test it, to the production website.
- The most expensive and time-consuming option is setting up a staging environment to test the changes on the fully functional ‘mirror’ of your website before merging it with the production website.
You can choose any of the options depending on the complexity and other specifics of your site, but you probably won’t regret choosing the last option if the potential bugs that may pop up cannot be counted on the fingers of one hand.
The most expensive and time-consuming option is setting up a staging environment to test the changes on the fully functional “mirror” of your website before merging it with the production website. You can choose any of the options depending on the complexity and other specifics of your site, but you probably won’t regret choosing the latter if the potential bugs that may pop up cannot be counted on the fingers of one hand.
Getting the HTTPs Certificate
To enable HTTPS for your website you’ll need to get and configure the required SSL/TLS certificates on your server.
Start with choosing a trusted certificate provider (ideally, the one that offers tech support). Then, make sure to choose the right level of security: Google recommends getting a certificate with a 2048-bit key, or upgrading to it, in case you have one with a weaker 1024-bit key at the moment.
Depending on your website, decide between a single (for a single domain), multi-domain (multiple well-known subdomains), or wildcard certificate (many dynamic subdomains). Once you get the certificate, make sure to deploy it properly and configure it following the best practices.
SEO Considerations & Best Practices Before Deployment
Once the certificate is deployed, configured, and tested (and surely is working great), it’s time to set server-side 301 redirects to the HTTPS version of your website to prevent anyone (either a user or a search engine bot) from landing on an HTTP page from now on. Once you finish with the migration, none of the pages or resources should be available in both versions, as this may lead to duplicate content issues and, ultimately, will send confusing signals to search engines.
After the redirects are implemented, there goes a list of things to check and fix respectively.
Preventing Crawling & Indexing Issues
You want Google to know that you’re migrating to HTTPs. So next you should:
- Revise your robots.txt and make sure you haven’t restricted your HTTPS pages.
- Check the HTTPS pages for any unmeant noindex tags.
Once everything seems to be in order, double check it. At this point, it would be wise to scan your website with any site audit tool that allows crawling on behalf of Googlebot, and glance over your site like you’re Google.
Getting Rid of Unnecessary Redirect Chains
Your website probably has a bunch of redirects already; as you migrate and enforce HTTPS, some may become unnecessary. If you have a www page redirected to non-www and now, additionally, to https non-www, you can see which link of the chain may be eliminated to improve the speed.
Slow load times due to excessive redirects may cause users to leave your site and hurt your rankings, so don’t neglect that step. While you’re there, you may as well check on whether all redirects lead to the relevant pages.
Canonicals, Alternates, Hreflangs
Misleading tags are a more potential source of confusion for Google. Therefore, you should take special care with the tags across your pages and make sure none is referencing HTTP anymore.
After the migration, all rel=canonical tags should point to proper HTTPS URLs. If your website is using rel=alternate or hreflang tags, all of those should be taken care of before going live, too.
Fixing Mixed Content Issues
By now you have the pages forced to load over HTTPS.
However, let’s say a user is visiting an HTTPS page which features an image, a script, or any other kind of content that is being retrieved through HTTP. Initially, the page was supposed to be secure, but any unencrypted resource present on it serves as an open door for sniffers and man-in-the-middle attackers.
That’s what mixed content is. Apart from causing an unattractive warning in a browser, it can actually render the protection worthless.

Commonly, mixed content is being divided into passive and active, depending on the impact of the worst-case scenario. In a nutshell, an image or a video (passive) can be swapped, or simply load broken; a link, a script, or other kinds of active mixed content may enable an attacker to intercept the request and rewrite the contents or steal sensitive user data.
To be safe and sound, you should revise all the internal links and all the assets your website relies on, and make sure they are only referencing HTTPS. Each of the following resources should either have an absolute HTTPS URL or a relative path:
- Internal images, videos or audios
- Web fonts
- Iframes
- Internal JS and CSS files inside the HTML code
- Images, fonts, and any other internal URLs inside the JS and CSS files
- Open Graph tags
- Any absolute URL references in the Structured Data used on the website (as well as Schema.org references)
- Any other internal links
Fixing mixed content all over the website can be a whole lot of work to do. However, it’s crucial to arm yourself with patience and not to overlook any tiny thing, as you totally wouldn’t want to end up in a scenario where the operation was a success but the patient died.
Social Media Counters
On some of your pages, you probably have the social sharing buttons implemented. On the newly created pages, they will work just fine, but you may probably want to preserve the social proof your older pages earned in their HTTP past.
What you should keep in mind is that after the migration some of the counters will turn out to be totally HTTPS-friendly while others may reset to zero. This may force you to either look for an elegant hack or abandon the old numbers altogether.
Getting Ready & Steady
Test everything thoroughly again. Crawl the website anew with all the pages, resources, and links, and make sure nothing got hurt. Look for any pages or resources that could have got broken accidentally or still load over HTTP, for any mistaken redirects that lead to HTTP URLs, or just improper pages.
Finally, be wise choosing the time to deploy the changes. You don’t want to do it on the first day of your annual sale or a Friday evening. Once your new site goes live, you should be ready to react immediately to whatever bugs may pop up.
Best Practices After Deployment
Congratulations, your new HTTPS site went live with a shiny green lock on it! Now it’s time to go through a basic quality assurance list:
- Re-crawl the website again and make sure all pages and resources return the 200 Successful Status Code and are served over HTTPS.
- Get back to the vulnerabilities checklist formed during the preparation. Test all of them closely.
Let Google Know You’ve Moved
Google views an HTTPS migration as a site move with a URL change. So now you should add the new HTTPS property to your Google Search Console. HTTP and HTTPS are treated separately and don’t share the data.
Next, generate a fresh new sitemap featuring the HTTPS URLs and submit it to Google.
Finally, transfer the other settings to the new property, such as URL parameters list and disavow file.
Bottom Line
If you follow this guide, you’l be able to mark all these crucial tasks as “done” while staying away from the common pitfalls.
Before you move on to the long-awaited champagne part, just let things settle a bit. Continue testing.
Watch out for bugs and fix any instantly. Monitor the changes closely to make sure the indexation process is going well and traffic/rankings are getting back to normal.
You shouldn’t expect any perceptible ranking boost due to the switch; nevertheless, if you make it through the migration with no drama, no harm to rankings and no drastic traffic drop, you already are a champion.
So, good luck, and may the traffic curve be stable!
More on HTTPS:
- Migrating a WordPress Website from HTTP to HTTPS: A Complete Guide
- Google Sets Deadline for HTTPS and Warns Publishers to Upgrade Soon
- What Type of SSL Certificate Does Your Website Need?
- Google Engineer Lists 4 Powerful Reasons Why Sites Should Upgrade to HTTPS
- The State of HTTPS
Image Credits
Featured Image and in-post photos 1 & 2: DepositPhotos
In-post image 3 is by the author.
