

You are probably familiar with this scenario.
You put a lot of work to drastically improve the page speed and PageSpeed Insights scores of your client’s site.
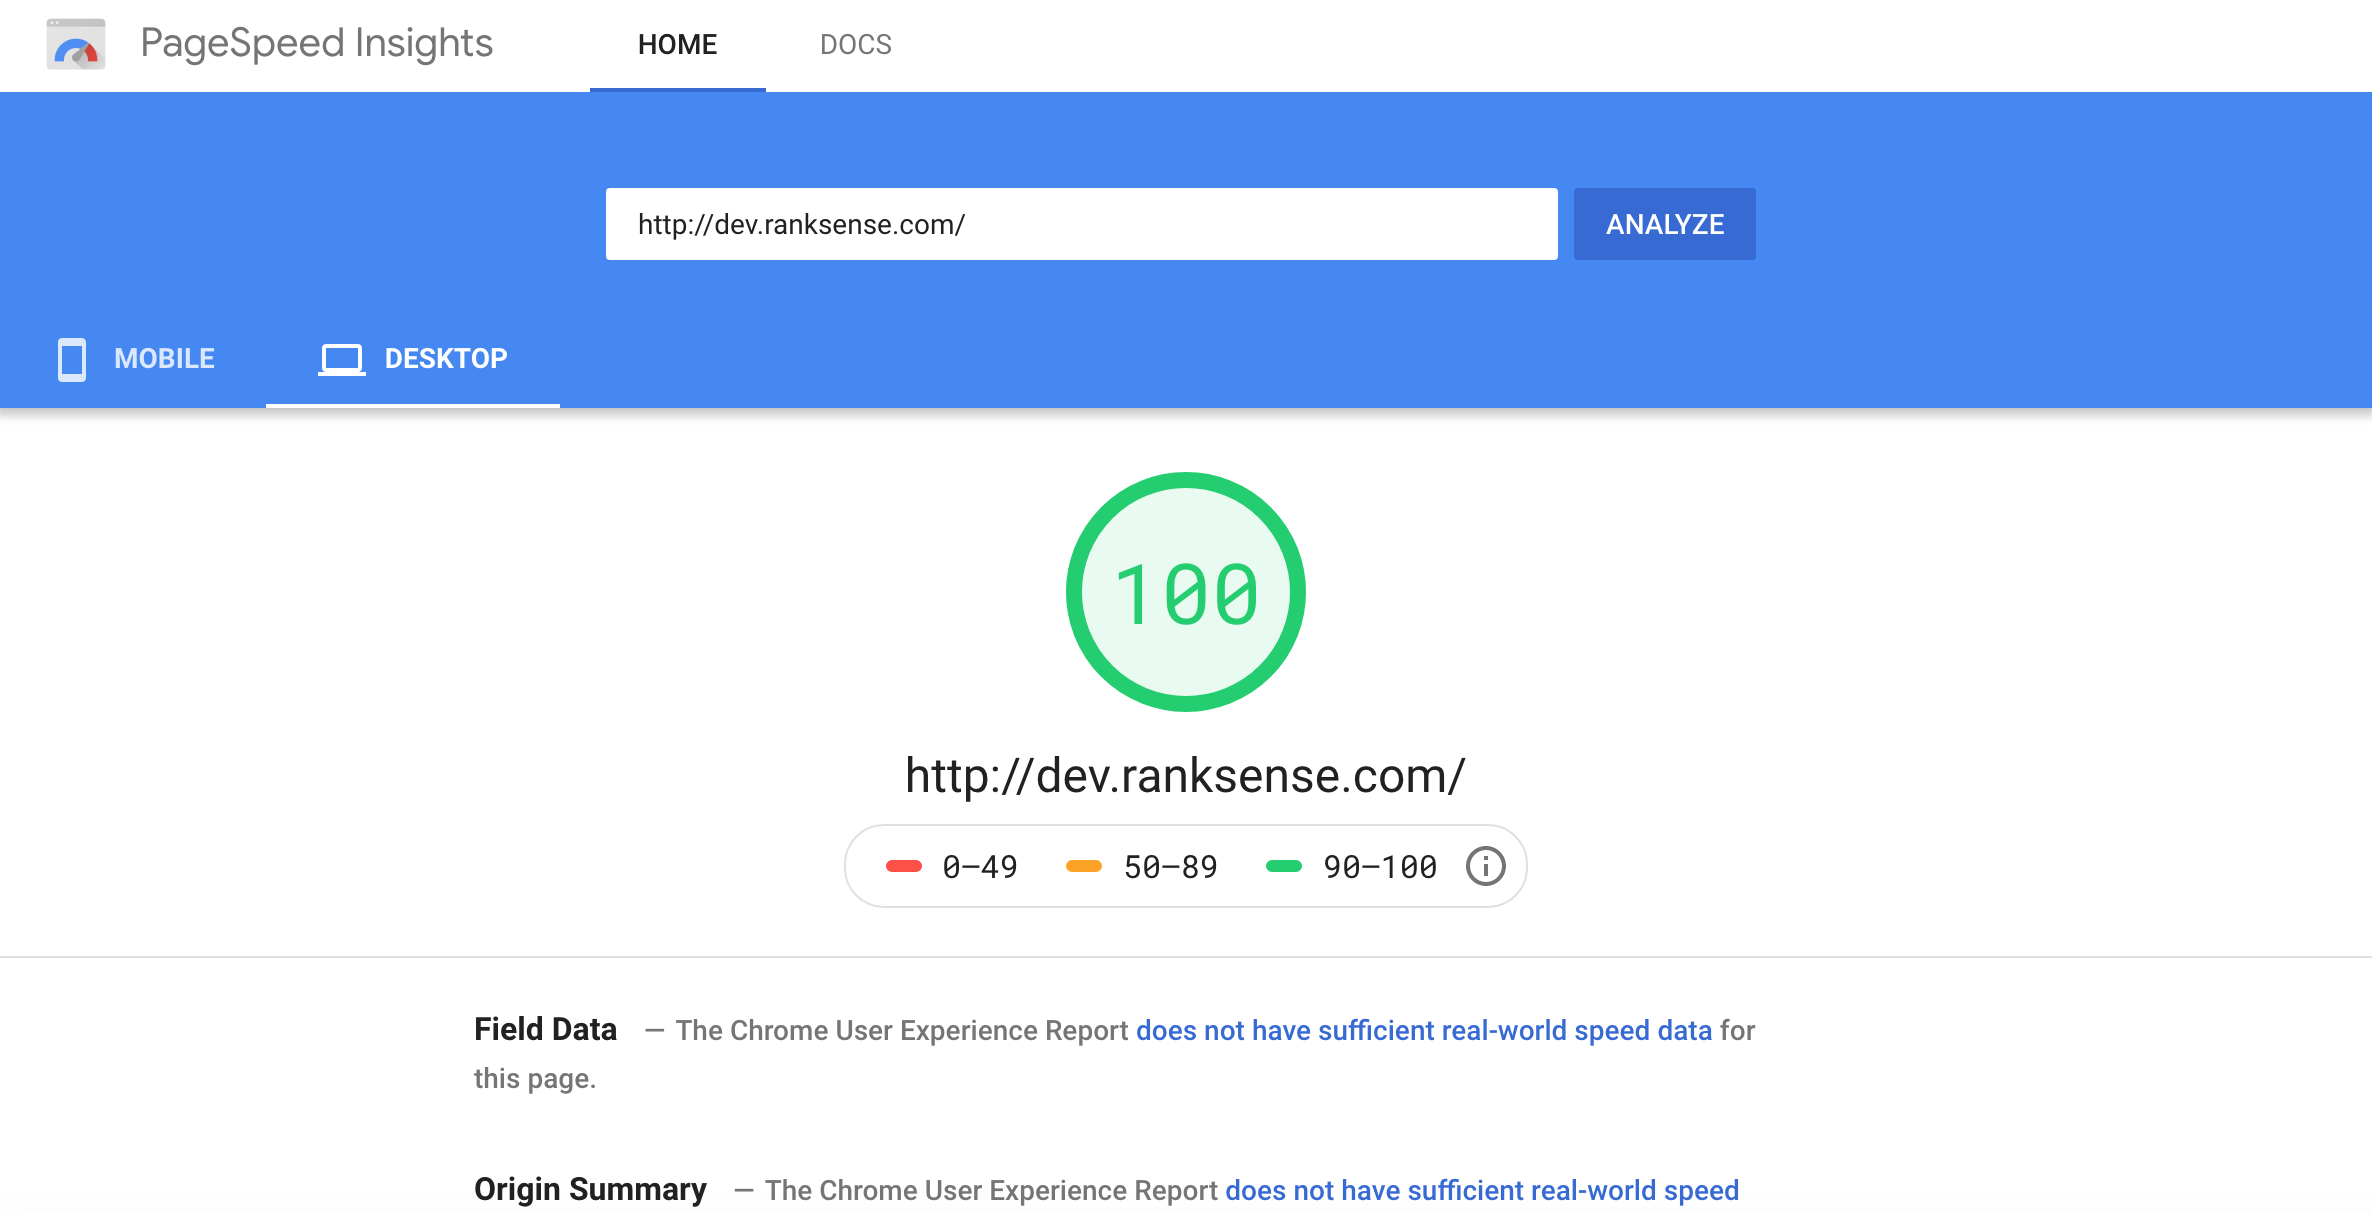
Mobile scores are particularly challenging to improve!

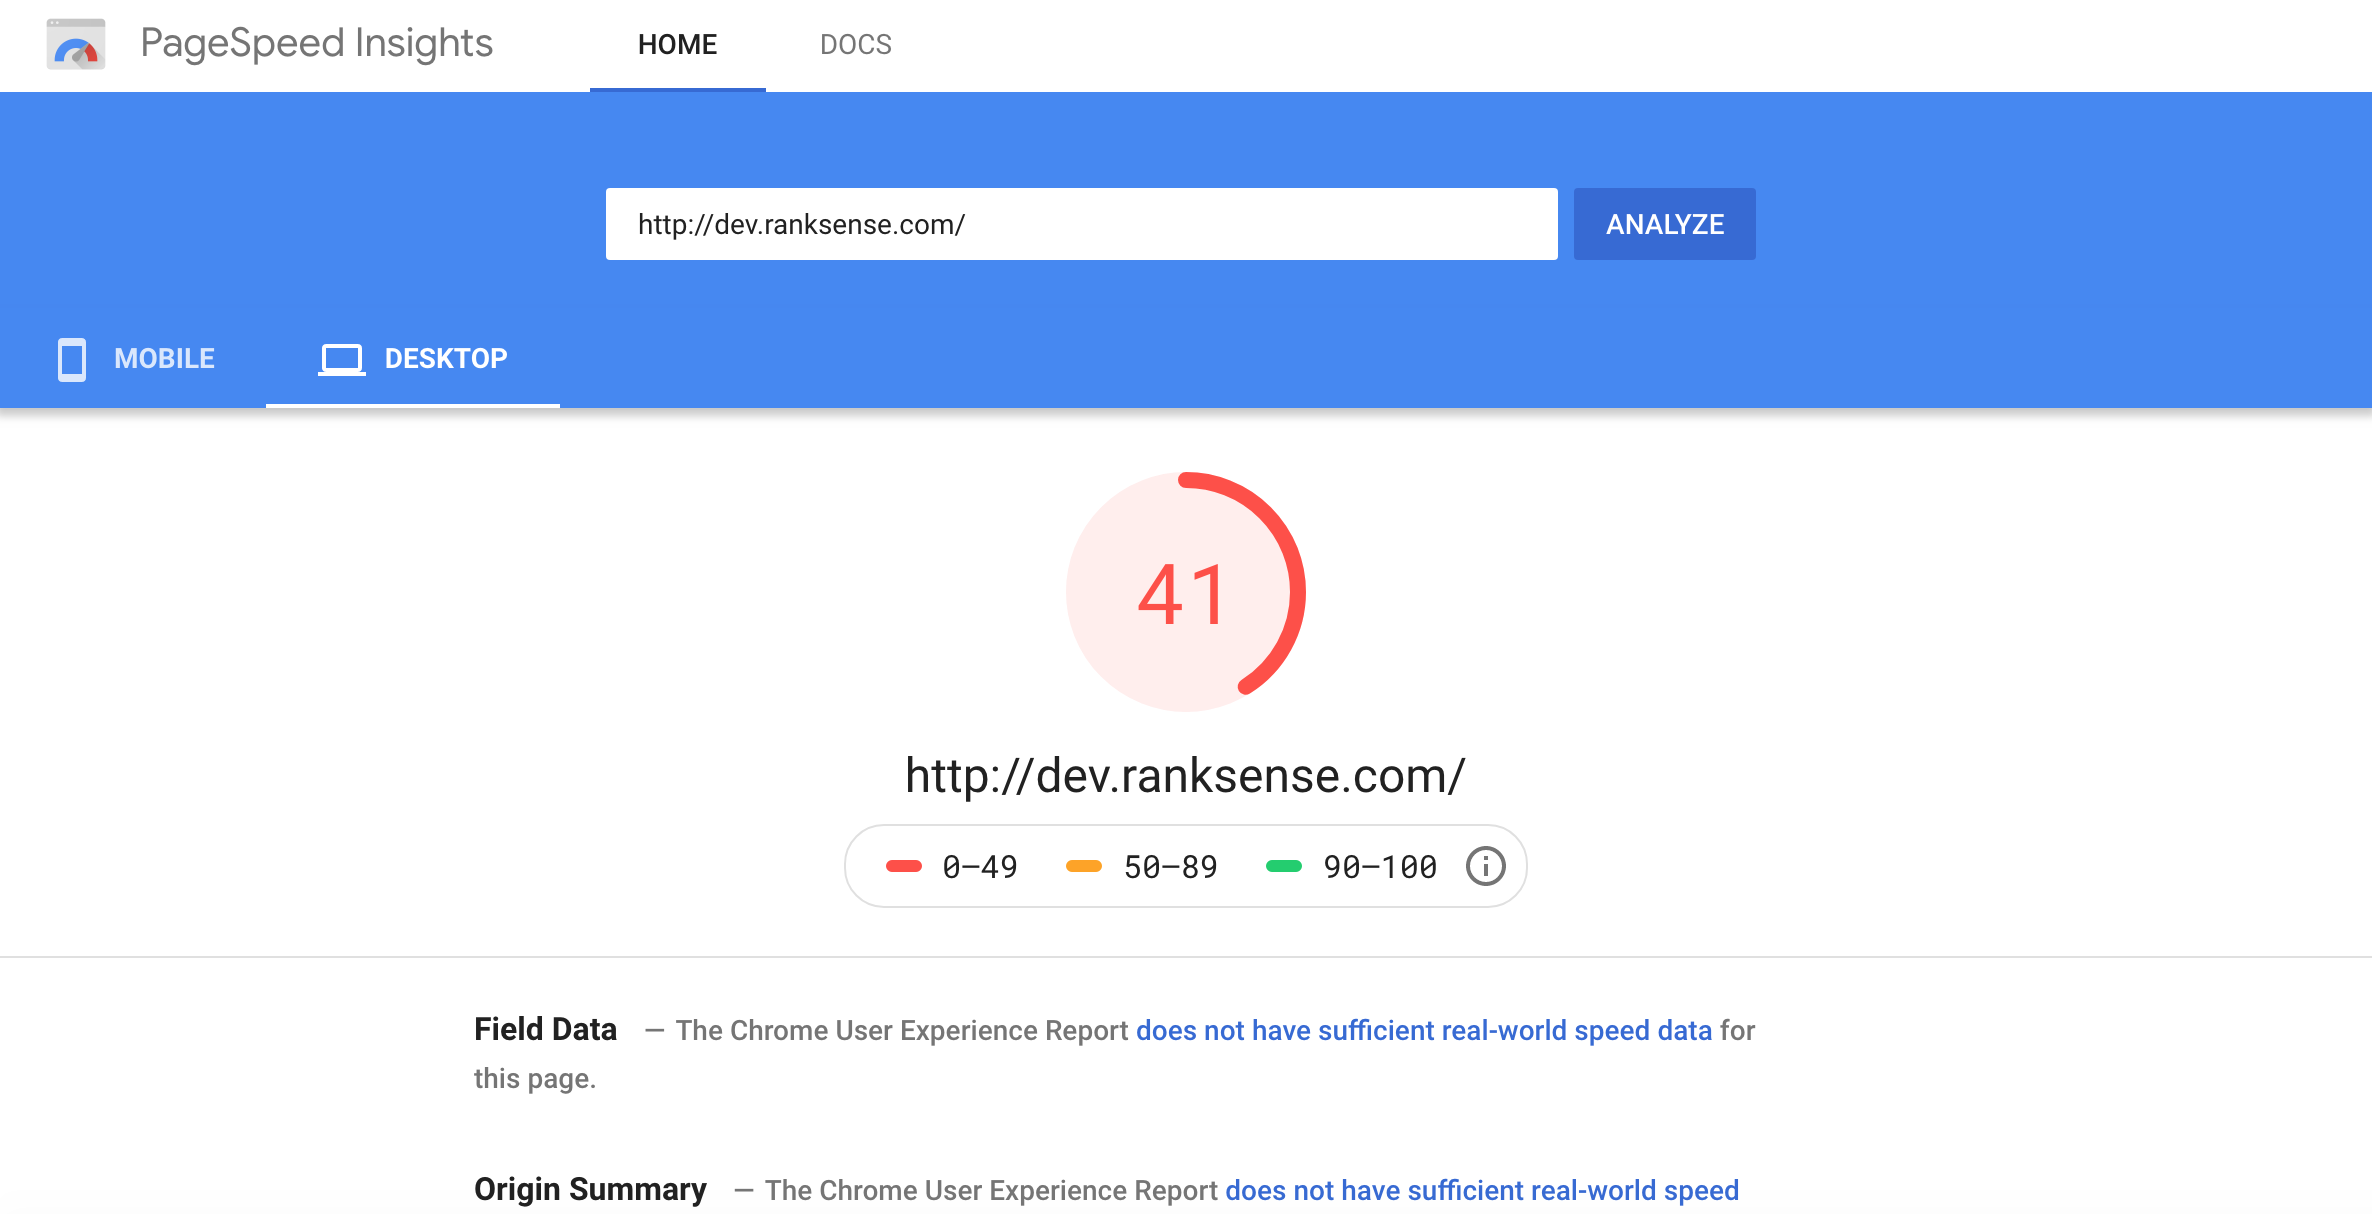
Your client installs a new app or plugin and all your work goes down the drain.
Can we go lower than 1?

This is a frustrating, but sadly common situation.
Fortunately, there is a version of Google Lighthouse that can perform audits on demand.
It is called Lighthouse CI.
CI stands for Continuous Integration, which is a common practice in software development where changes from different developers are merged into a central codebase (repository).
One interesting aspect of CI is that you can run automated checks when changes are merged. This is a great place to perform page speed and SEO automated QA (quality assurance).
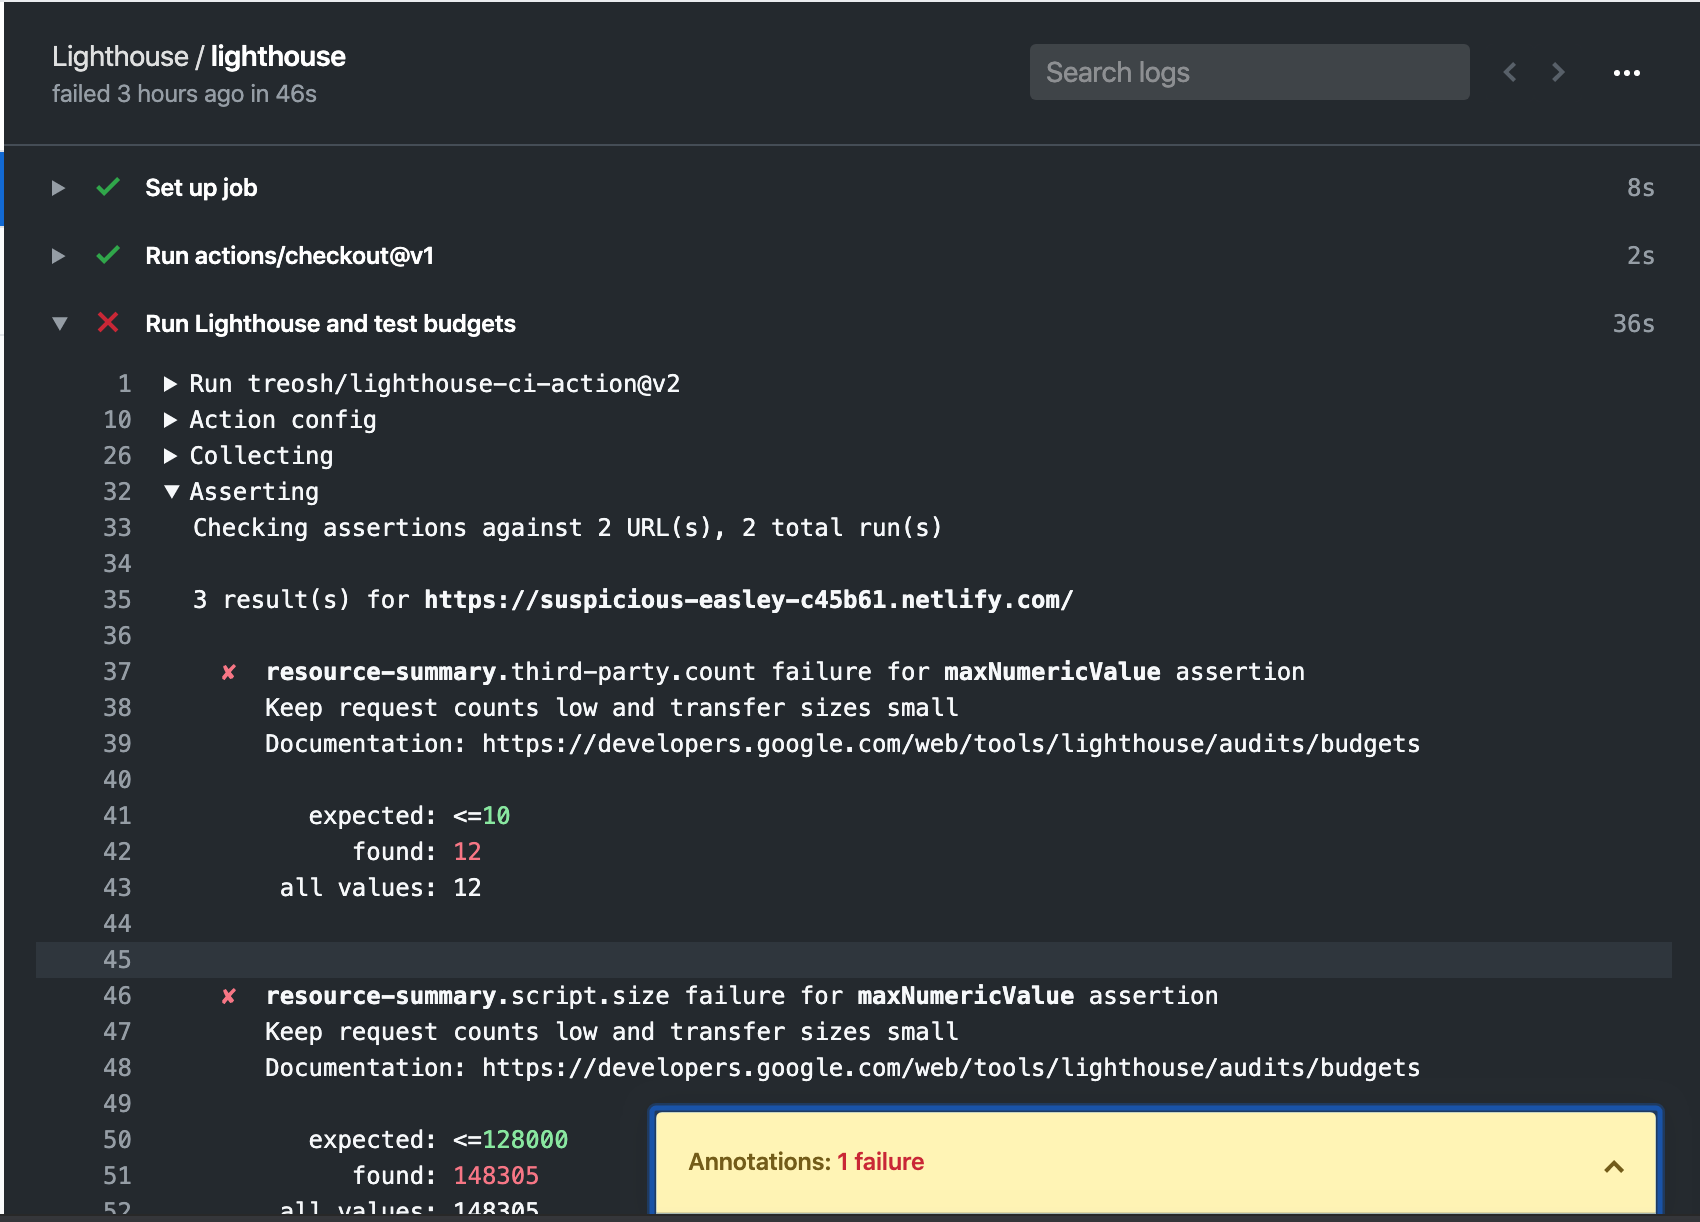
In the screenshot above, I defined a Lighthouse Performance Budget and when I merged a change to the codebase, Lighthouse CI ran automatically and detected the change would lower the speed performance.
This QA failure could actually prevent the change from getting deployed to production.
Really cool. Right?
I set up a website using a modern stack, the JAMstack, that supports CI out of the box.
However, taking advantage of this requires completely changing platforms if you are using WordPress or similar.
In this article, you will learn how to accomplish the same, but with a traditional website.
Specifically, we will use plain old WordPress, the most popular CMS on the planet.
Here is our technical plan:
- We are going to create a GitHub repository to track WordPress changes.
- We are going to install a Lighthouse CI action to check changed URLs.
- We are going to create a Google Cloud Function that runs on WordPress updates and does the following:
- Gets the most recently changed URLs from the XML sitemaps.
- Updates the Lighthouse CI action configuration to check these URLs.
- Commits our updated configuration to the GitHub repository.
- We are going to create and add a Lighthouse Performance Budget to find out when changes hurt performance.
- We will review resources to learn more.
Creating a GitHub Repository
When your site is built using JAMstack technologies, you need a source control repository for the website code and content.
In our case, WordPress content resides in a database, so we will use the repository just for configuring Lighthouse and tracking changes.
One of the most valuable features of source control repositories is that all your changes are versioned. If your code stops working after new changes, you can always go back to previous versions.
GitHub is the most popular option and the one we will use here.
Once you create a repository, you will need to update it remotely from your local computer or scripts.
You can do this using the git command line tool.
Install it on your computer if you don’t have it.
As we will update the repo, we need to get an authentication token.
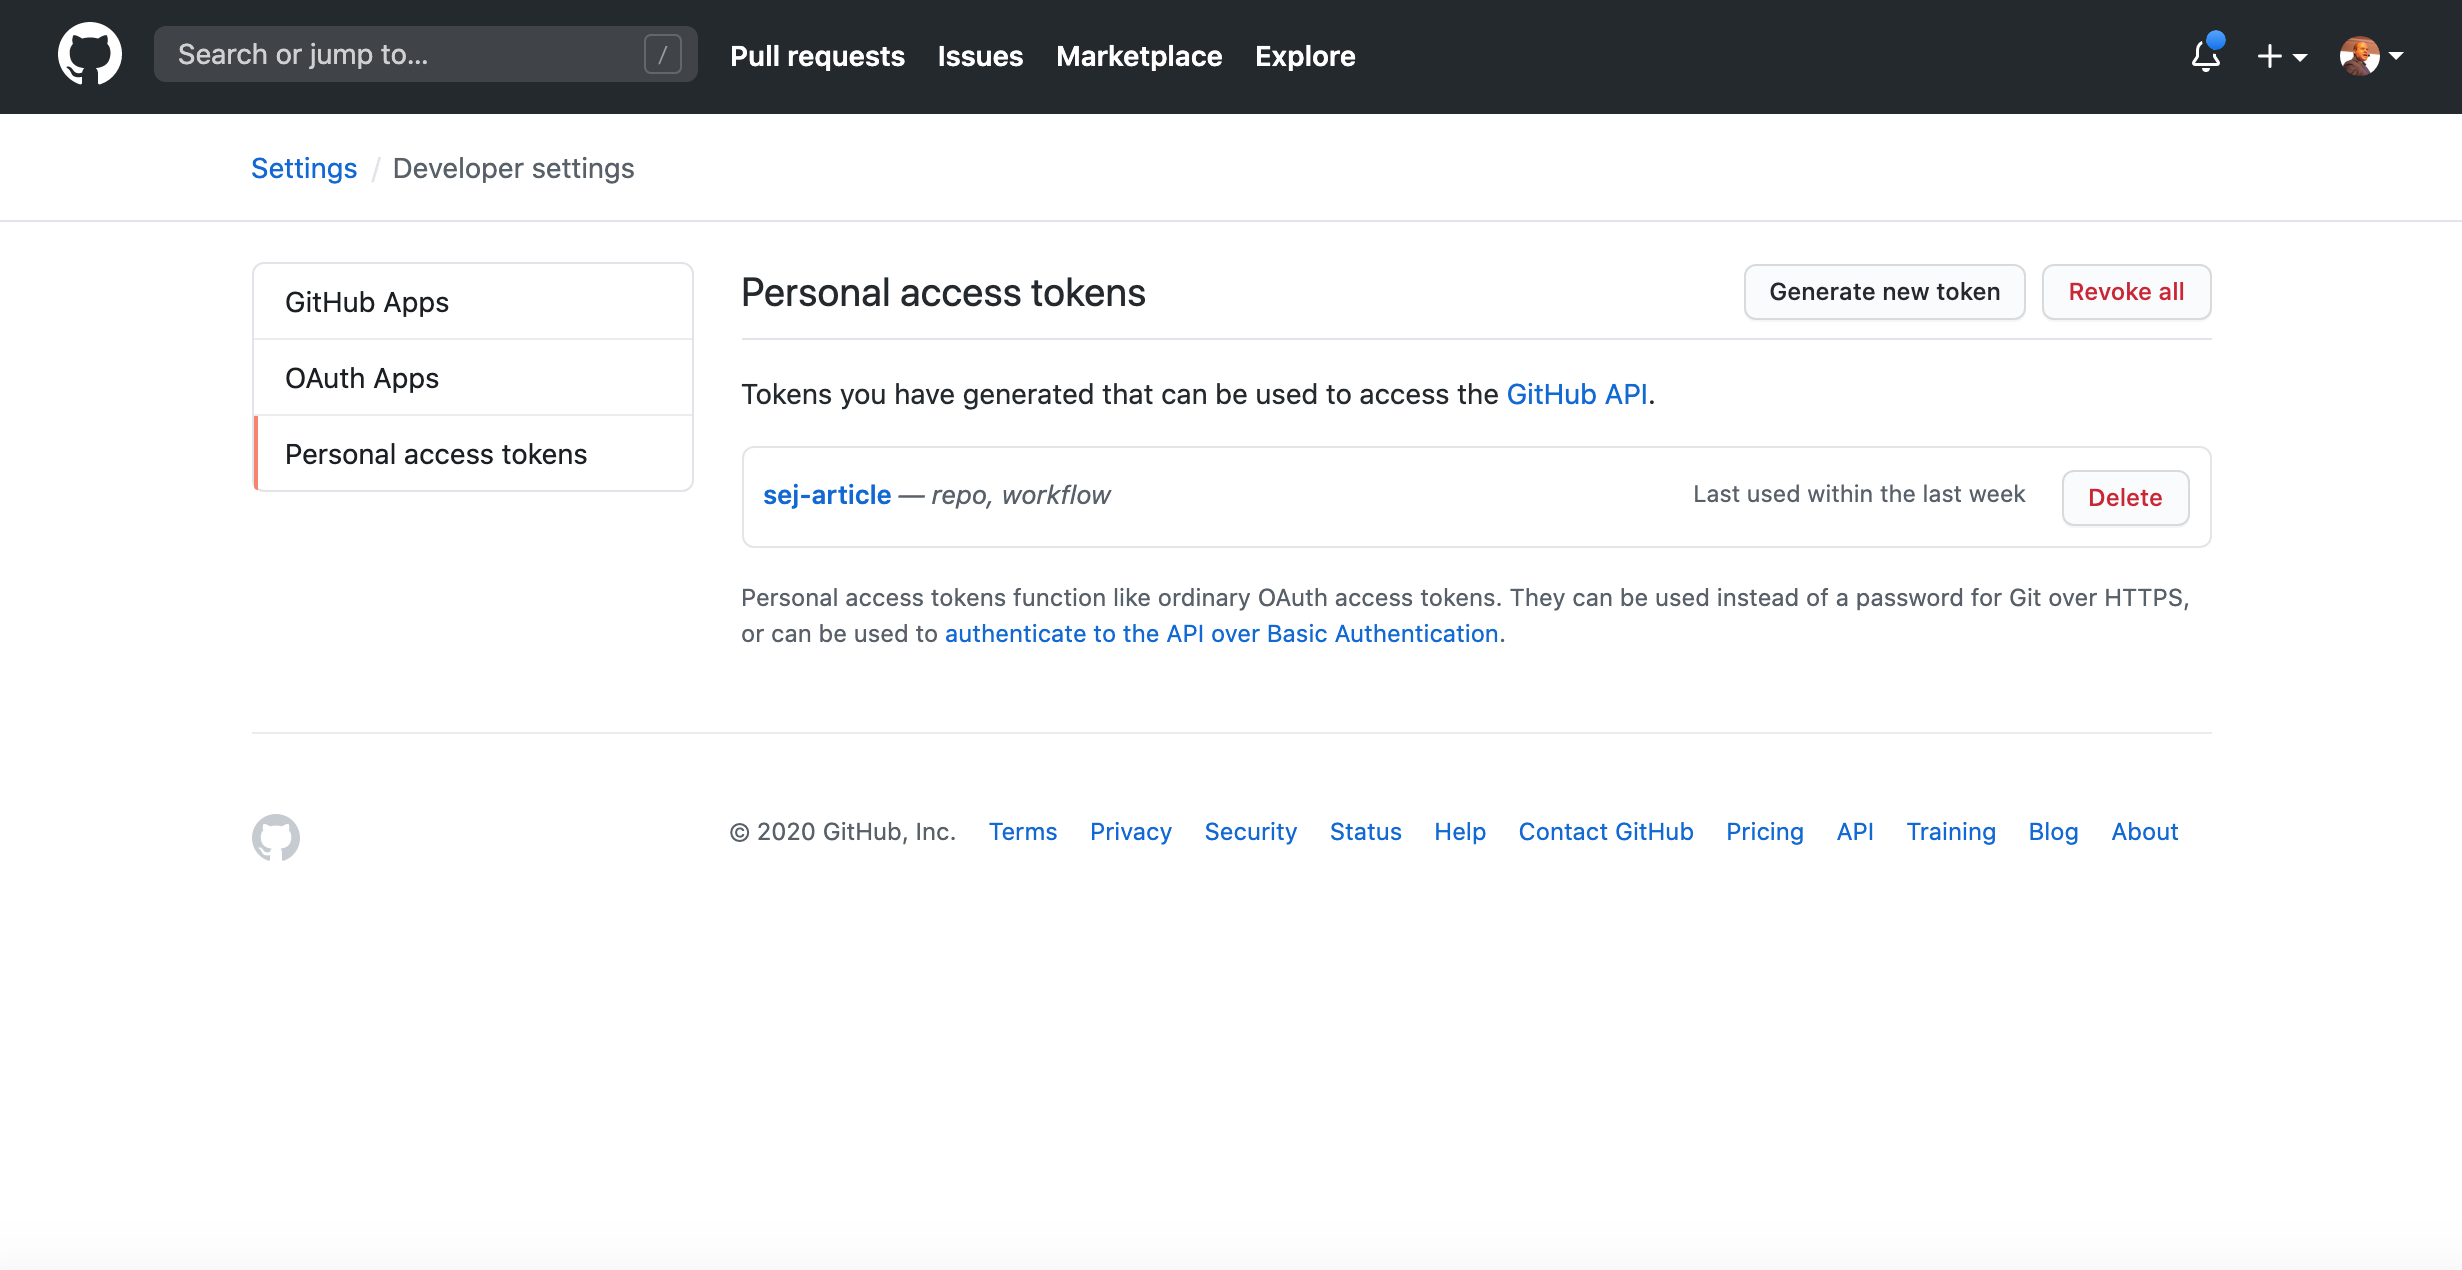
When you create the access token, select the scopes repo and workflow.
GitHub Actions
GitHub Actions allows for automating workflows using very simple configuration files.
One of the actions available is the Lighthouse CI Action that we will use here.
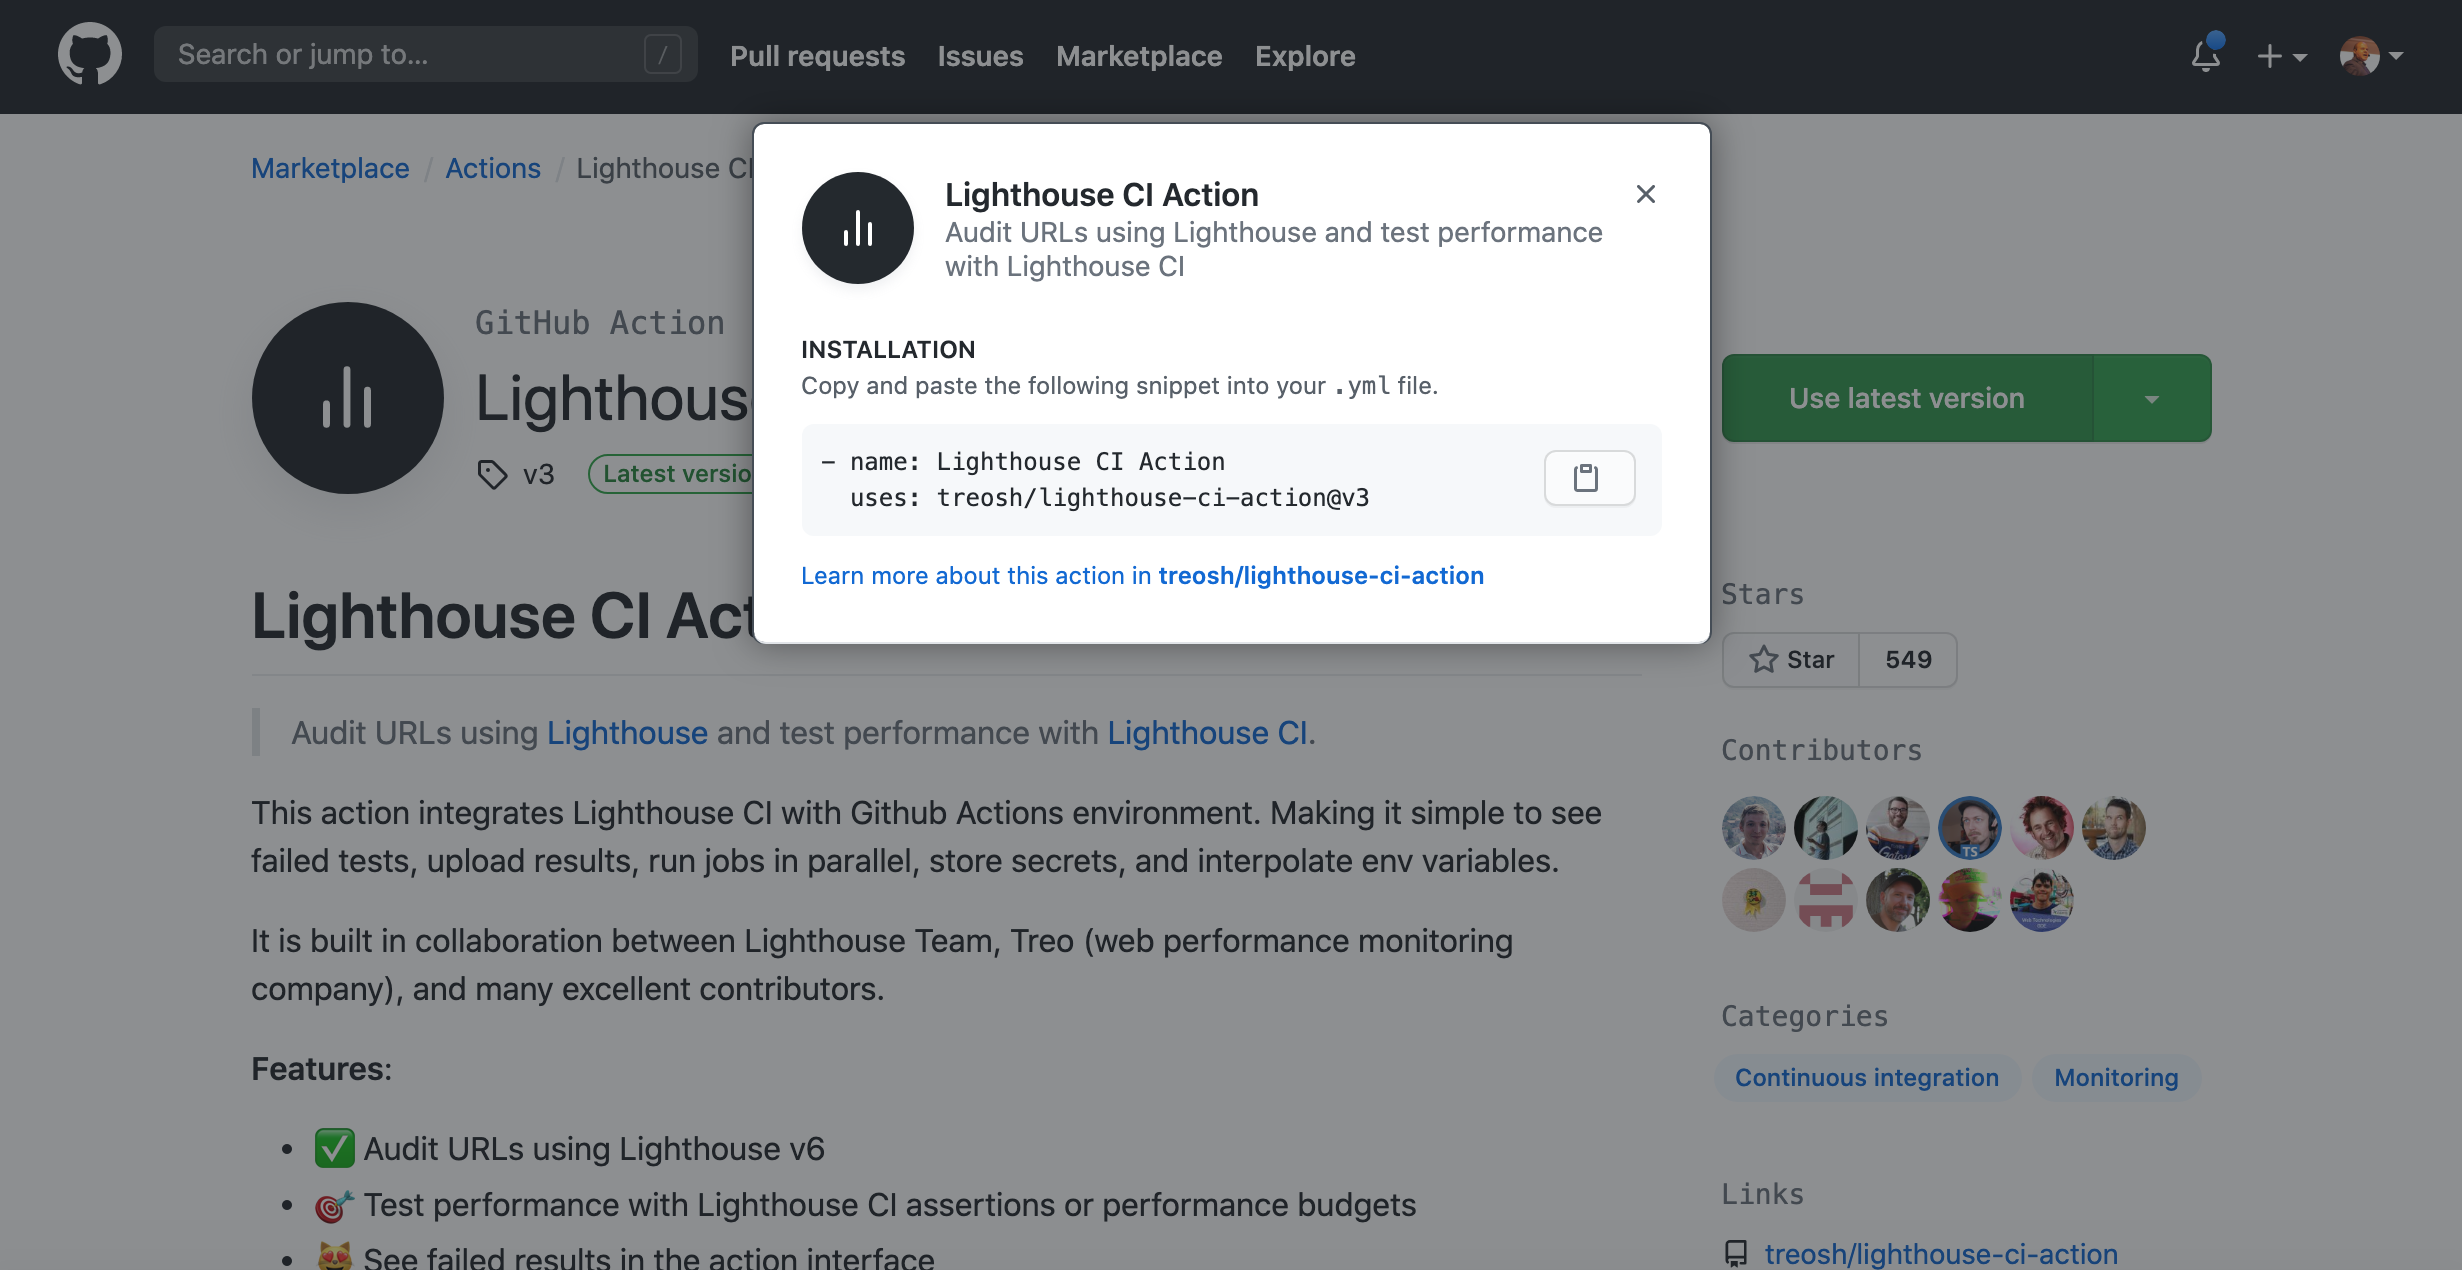
In order to activate the action, we simply need to:
- Create a folder (.github/workflows) in the root of the repository.
- Add a YAML configuration file.
Let’s review the technical steps to do that.
We could perform the steps manually using the desktop GitHub app or the command line.
We will perform them from Python instead so we can automate the process.
Cloning a GitHub Repository
Before we can make changes, we need to clone/copy the repository locally.
Let’s install the Python library we will need to issue Git commands.
pip install gitpython
Next, I define some variables to indicate the repo, access token we created above and local folder to store the cope.
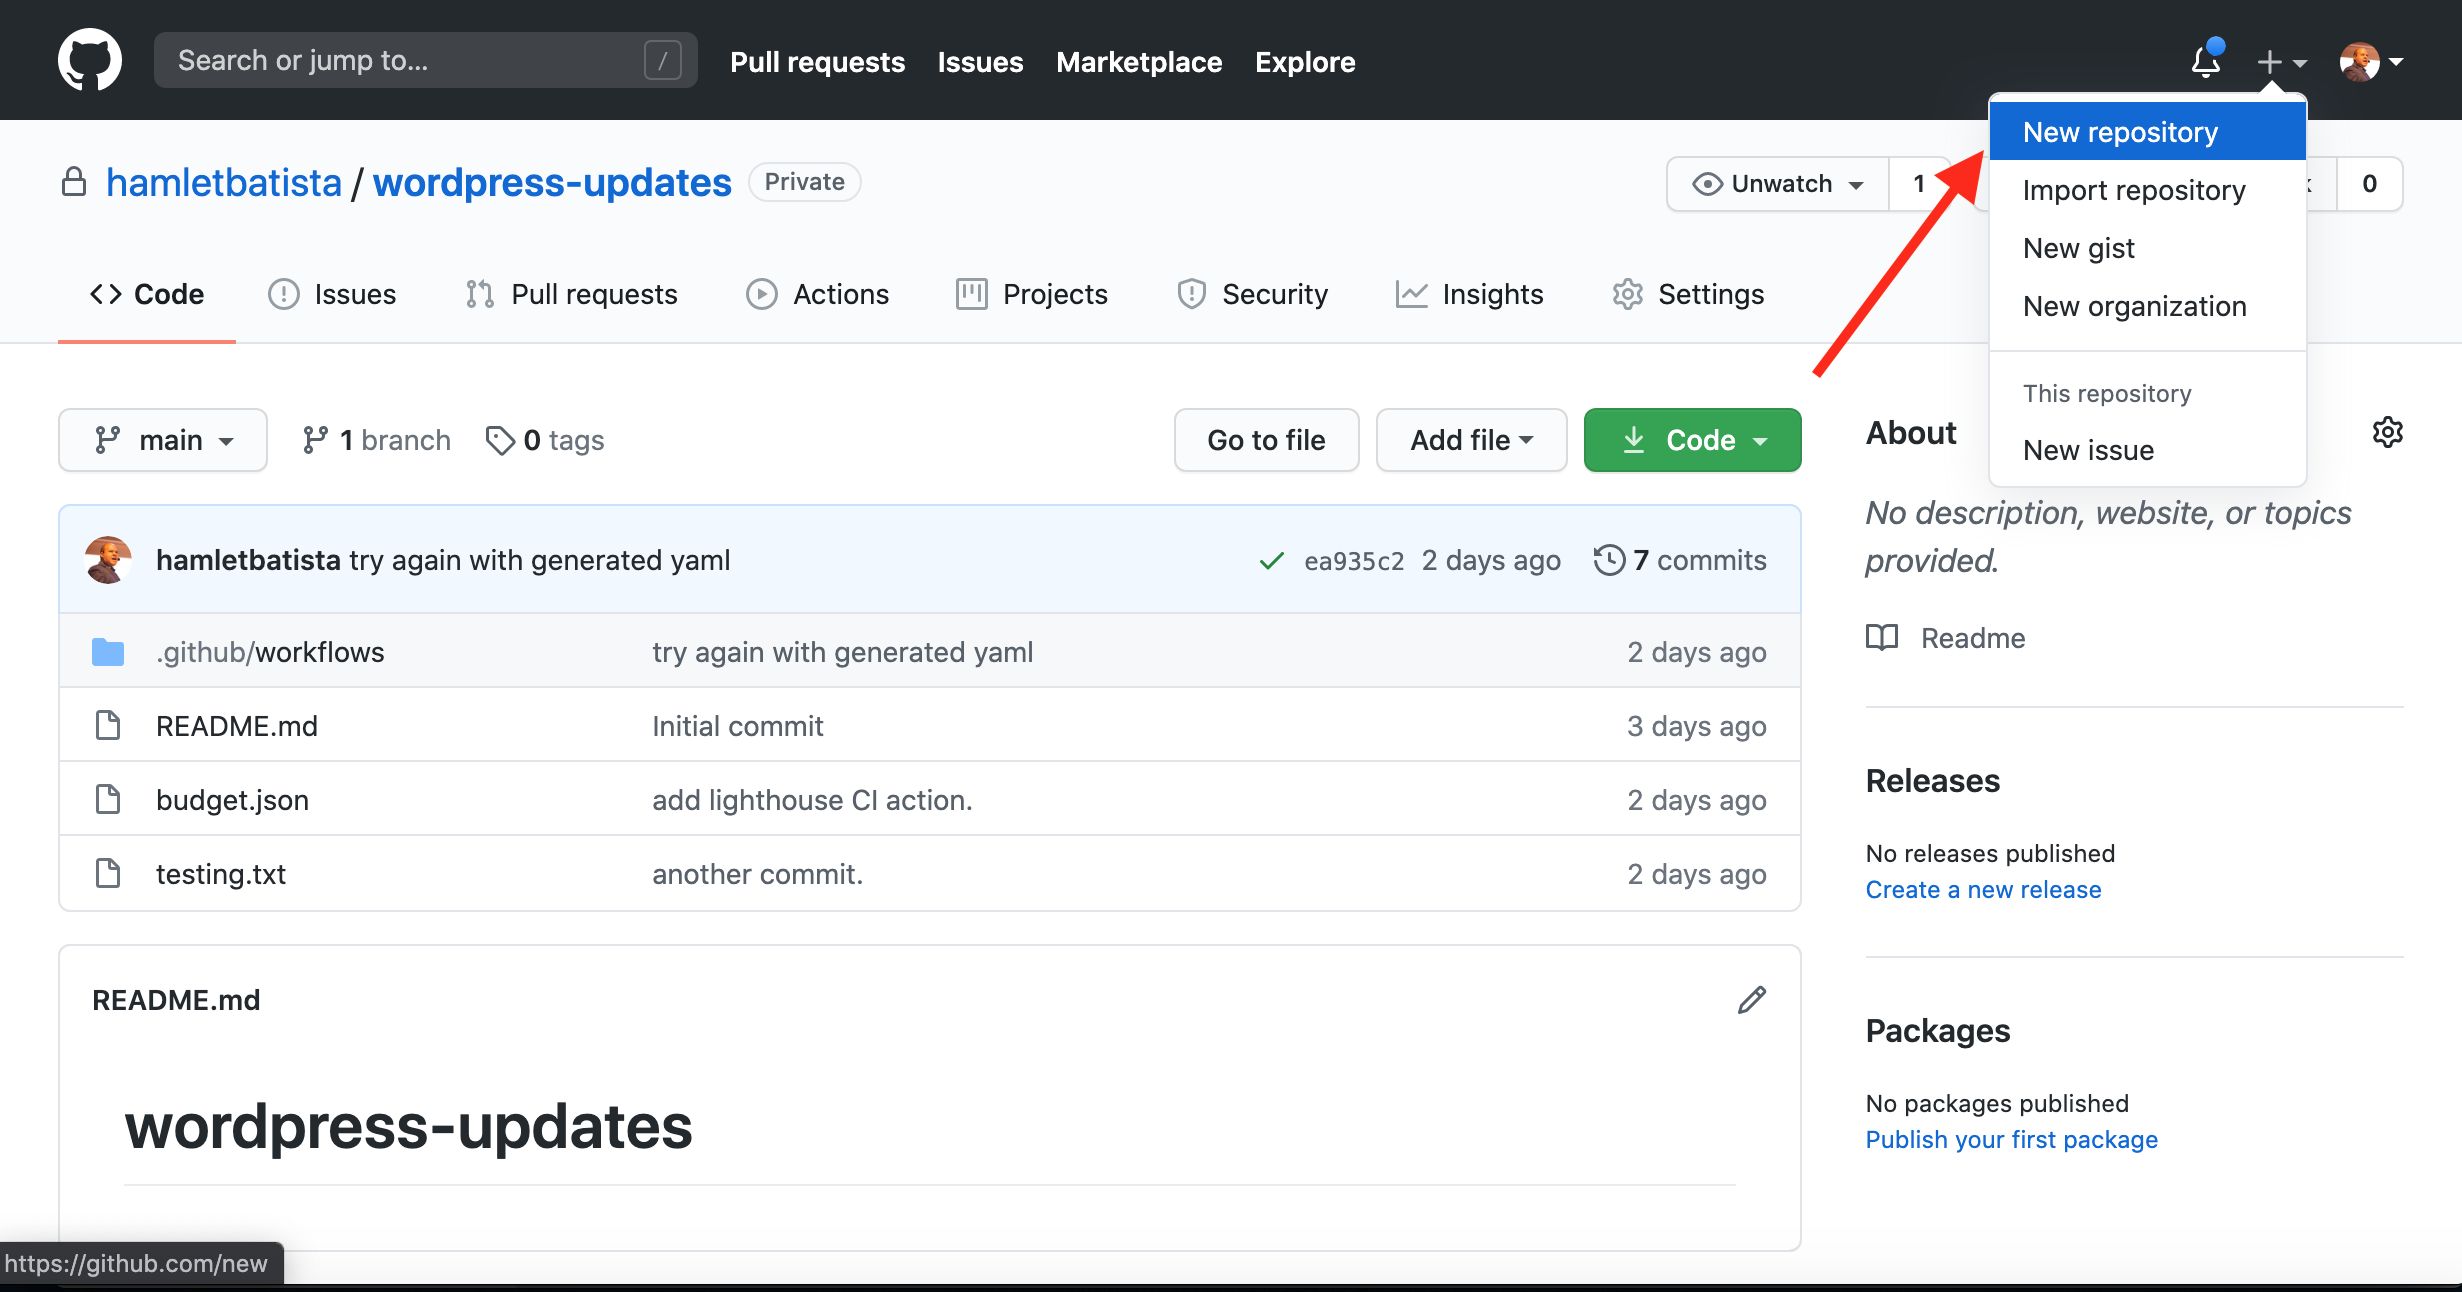
I created a private repo called wordpress-updates.
full_path="/content/wordpress-updates"

username="hamletbatista"

password="<COPY YOUR ACCESS TOKEN>"

remote=f"https://{username}:{password}@github.com/hamletbatista/wordpress-updates.git"
Cloning from Python is almost as simple as from the command line.
from git import Repo

Repo.clone_from(remote, full_path)
Updating the Cloned Repository
Once we have a local copy, we can edit files, create new ones, remove, etc.
Let’s create a directory for our Lighthouse CI workflows.
%cd wordpress-updates/
!mkdir -p .github/workflows
Then, we can create the configuration YAML.
In Google Colab or Jupyter, I can use %%writefile
%%writefile .github/workflows/main.yml

name: Lighthouse CI

on: push

jobs:

lighthouse:

runs-on: ubuntu-latest

steps:

- uses: actions/checkout@v2

- name: Audit URLs using Lighthouse

uses: treosh/lighthouse-ci-action@v3

with:

urls: |

https://www.ranksense.com/

https://www.ranksense.com/blog

uploadArtifacts: true # save results as an action artifacts

temporaryPublicStorage: true # upload lighthouse report to the temporary storage
You can find a copy of this configuration in this gist. I highlighted in bold the main areas of interest.
The most important is there is a section to specify the URLs to check by separating them by new lines.
After we create this configuration file and directory, we can send our changes back to the GitHub repository.
First, let’s add the files we change to the version history.
repo.git.add(['.github/workflows/main.yml'])
# Provide a commit message

repo.index.commit('add lighthouse CI action.')
Our commit message will indicate the purpose of the change and will show up in the repository history.
Pushing Our Changes to the GitHub Repository
Finally, we are ready to push our changes to the repository.
origin = repo.remote(name="origin")
origin.push()
You can open the repo and review the changes that were committed, but the user is listed as root.
We can configure our user with these commands.
with repo.config_writer() as git_config:

    git_config.set_value('user', 'email', 'your@email.com')

    git_config.set_value('user', 'name', 'Your Name')
The next time you push another change, you should see your name.
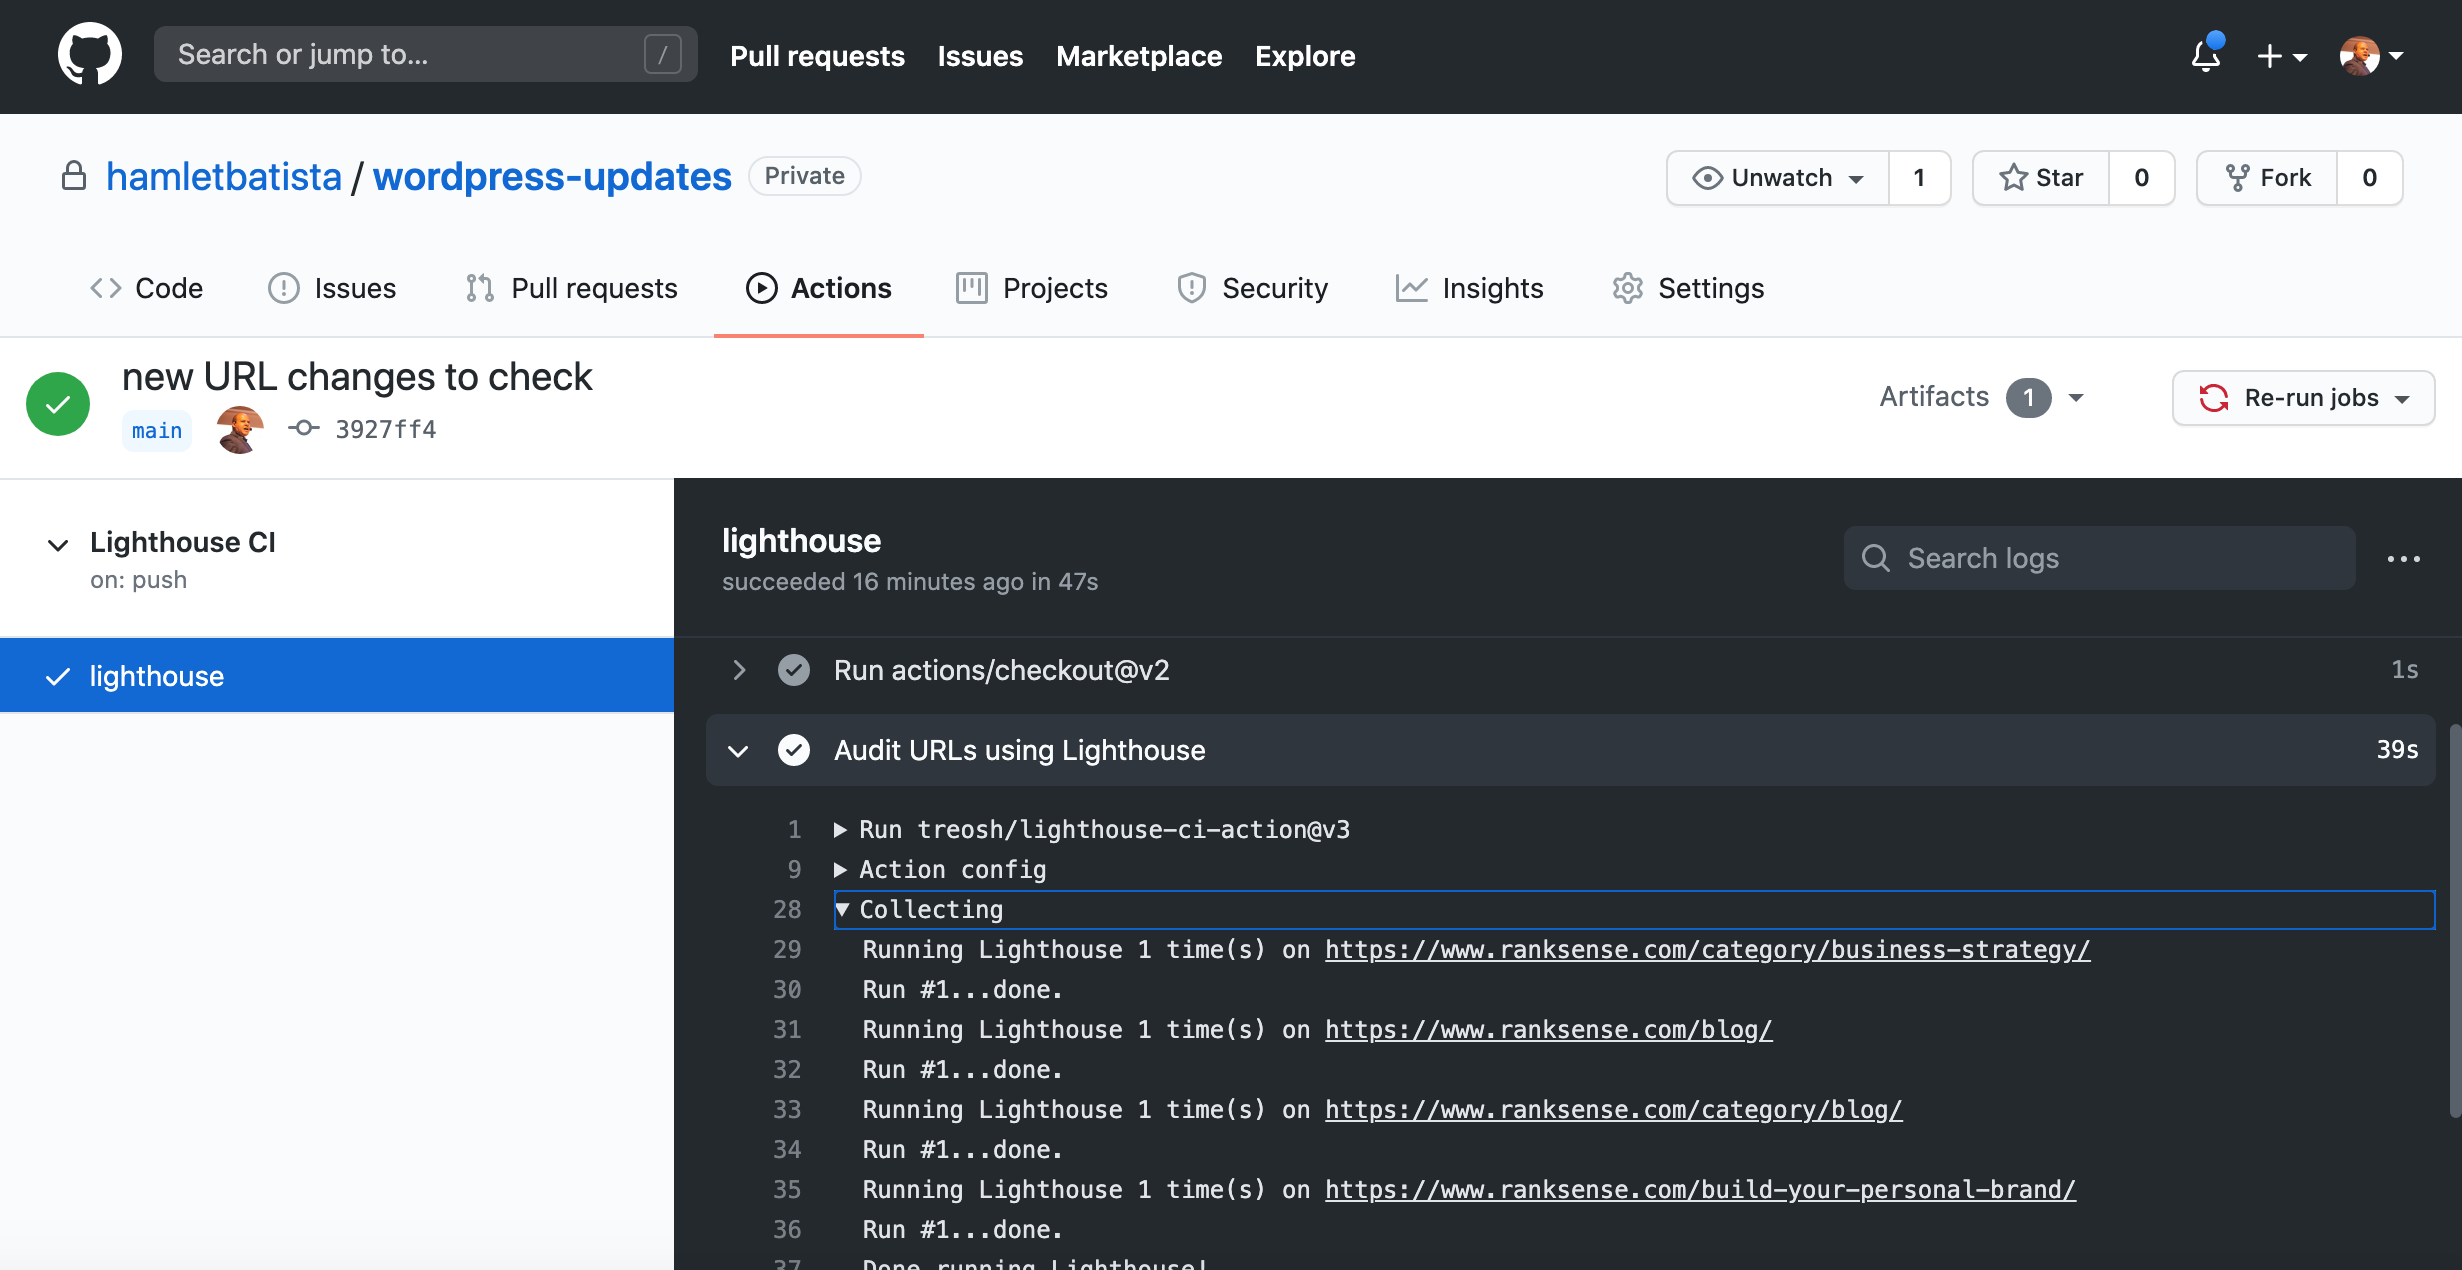
After you’ve completed all of these steps, you should be able to click on the Actions tab of your repository and find the automated checks on the URLs you listed in the YAML file.
Under the uploading part, you can find the links to the reports for each URL.
Really nice!
Updating the YAML Configuration File Automatically
Hard coding a small list of URLs to check is not particularly flexible.
Let’s learn how to update the configuration file from Python.
But, first, we need a larger list of URLs to check to really put this to good use.
What better place than the XML sitemaps?
Fortunately, I covered a wonderful library from Elias Dabbas that makes this a breeze.
pip install advertools
sitemap_url="https://www.ranksense.com/sitemap_index.xml"
df = adv.sitemap_to_df(sitemap_url)
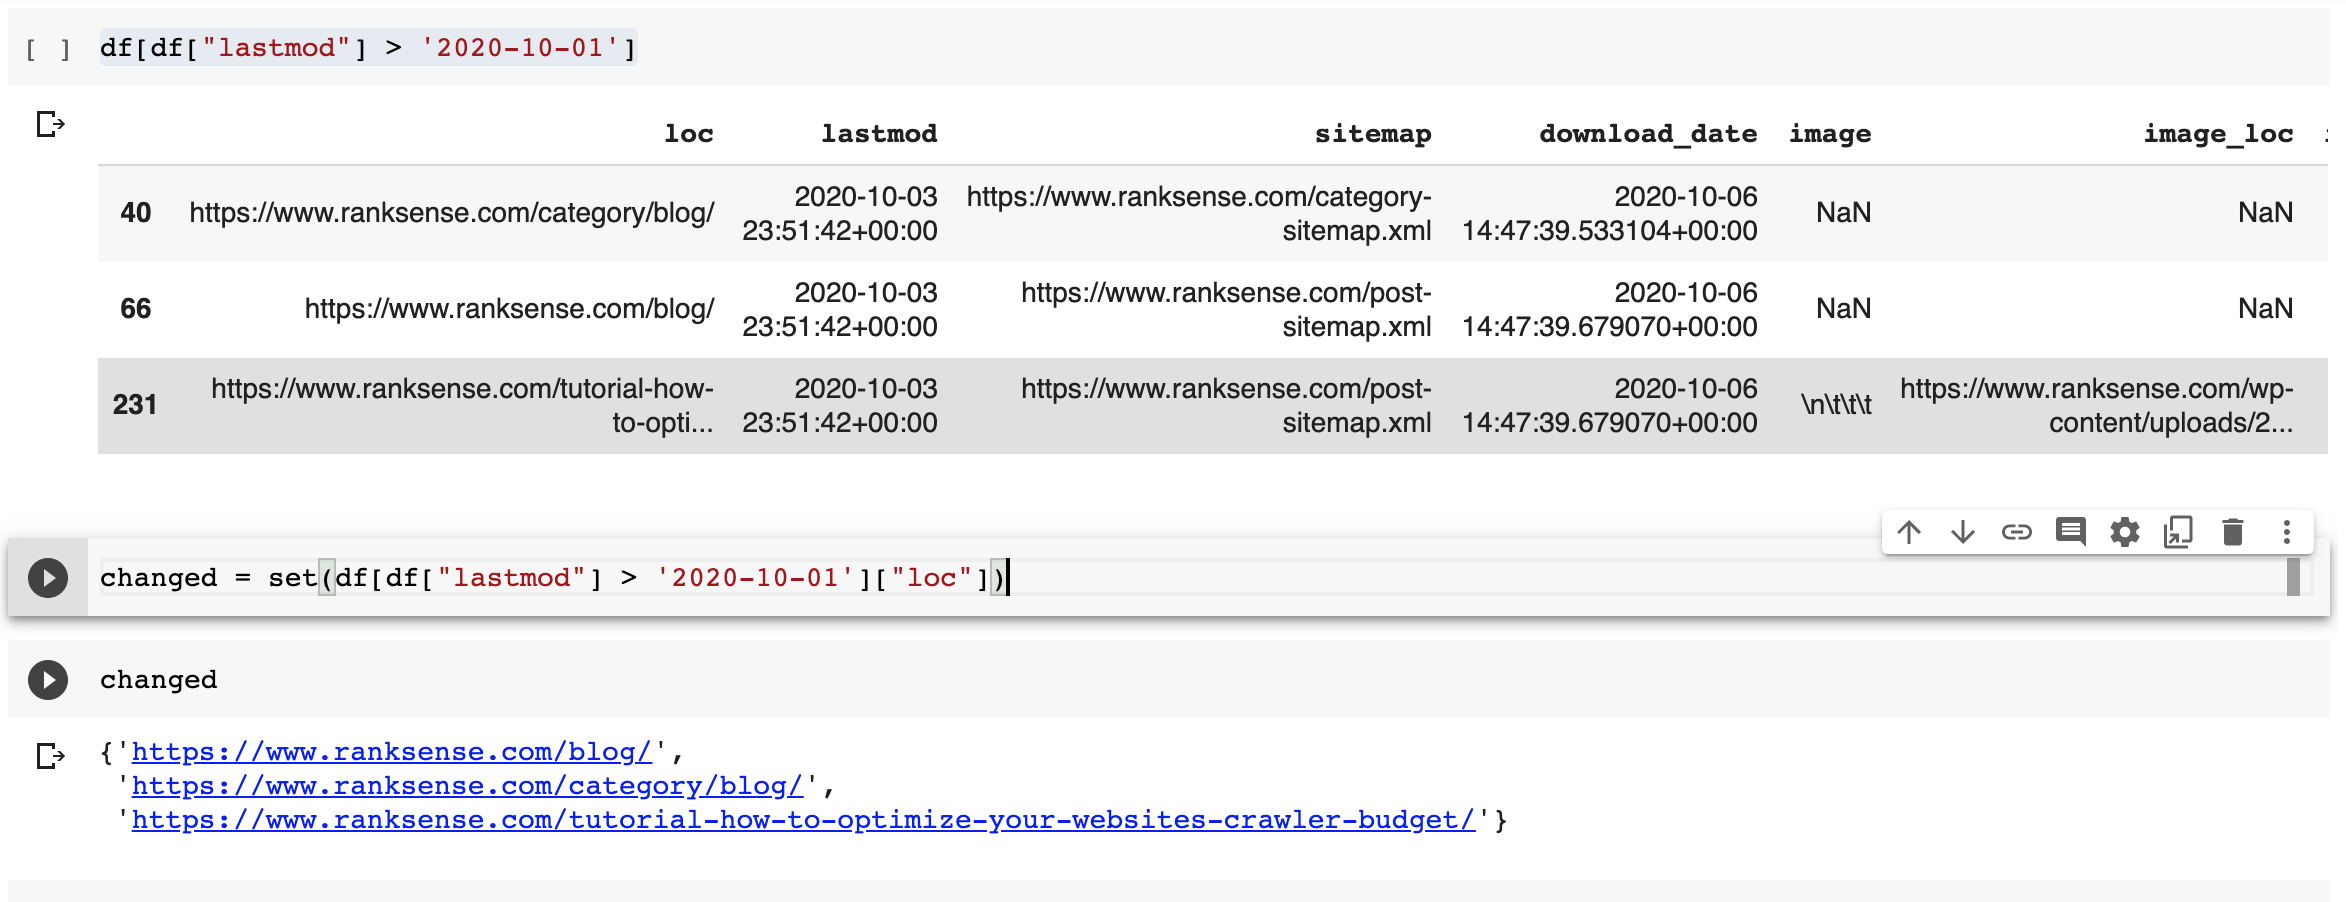
It creates a pandas data frame that I can easily filter to list only the pages updated after a date I specify.
For example, here I want the pages updated in October.
df[df["lastmod"] > '2020-10-01']
You can create a list of URLs to check using this or any criteria that make sense for your use case.
Let’s say your site has millions of pages, checking every URL would be far from practical.
Assuming you have categorized XML sitemaps, an effective approach is to just sample one or more URLs from each sitemap.
Most pages of the same type, generally use the same HTML template and the page speed scores won’t change much per URL of the same type.
Reading a YAML file
We can use the PyYAML library to read the configuration file we copied from the repo into a Python data structure.
pip install PyYAML
import yaml
with open(".github/workflows/main.yml", "r") as f:

    main_workflow = yaml.load(f)
This is what main.yml looks like when loaded into the Python domain.

Updating the list of URLs is relatively simple from here.
#this is the "path" to the URLs
main_workflow["jobs"]["lighthouse"]["steps"][1]["with"]["urls"]
Here are the steps to update the URL list.
- Copy the existing URLs to a variable, in case we want to keep them.
- Convert our new list of URLs to a string where each URL is separated by a new line.
- Assign our new list and optionally the old one to the dictionary value.
We can perform step 2 with this code.
"\n".join(changed)
Here is the final sequence.
old_urls=main_workflow["jobs"]["lighthouse"]["steps"][1]["with"]["urls"]
main_workflow["jobs"]["lighthouse"]["steps"][1]["with"]["urls"] = old_urls + "\n".join(changed)
If we don’t want to keep the old URLs, we can simply remove the code in bold letters.
Writing Back to the YAML File
Now that we made our changes, we can save them back to the configuration file.
with open(".github/workflows/main.yml", "w") as f:

    f.write(yaml.dump(main_workflow, default_flow_style=False))
I had to add an additional directive, default_flow_style=False in order to preserve the formatting of the URLs as close to the original as possible.
If you run the commands in the GitHub section again to add the main.yml file, commit and push the change to the repo, you should see another Lighthouse CI run with an updated number of URLs.
This time, the URLs are not hardcoded but generated dynamically.
Sweet!
Creating a Lighthouse Performance Budget
One of the most powerful features of Lighthouse CI is the ability to check reports against budgets and fail runs when the budgets are exceeded.
That is actually the simplest step of this whole setup.
You can find all the configuration options here.
We can write an example budget to test based on the example in the documentation. Then adjust the values according to the failure/success report.
[

{

"path": "/*",

"resourceSizes": [

{

"resourceType": "document",

"budget": 18

},

{

"resourceType": "total",

"budget": 200

}

]

}

]
You can save the file to the root of the repository and update the YAML configuration to include it.
main_workflow["jobs"]["lighthouse"]["steps"][1]["with"]["budgetPath"] = "./budget.josn"
When you commit the changes to the repository, make sure to also add the budget.json file.
That’s it.
We can run automated Lighthouse reports on any URLs we want.
But, how do we trigger all these steps when we update WordPress pages or posts?
Ping Services
We are going to put all our Python code covered so far inside a Google Cloud Function that we can trigger when there are WordPress updates.
In summary, the code will:
- Download the XML sitemaps and find the latest pages updated.
- Update/create a main.yml workflow file with a list of URLs to check.
- Commit the changed main.yml to the GitHub repository.
However, we only want to call our code when there are new changes in WordPress.
So, how do we do that?
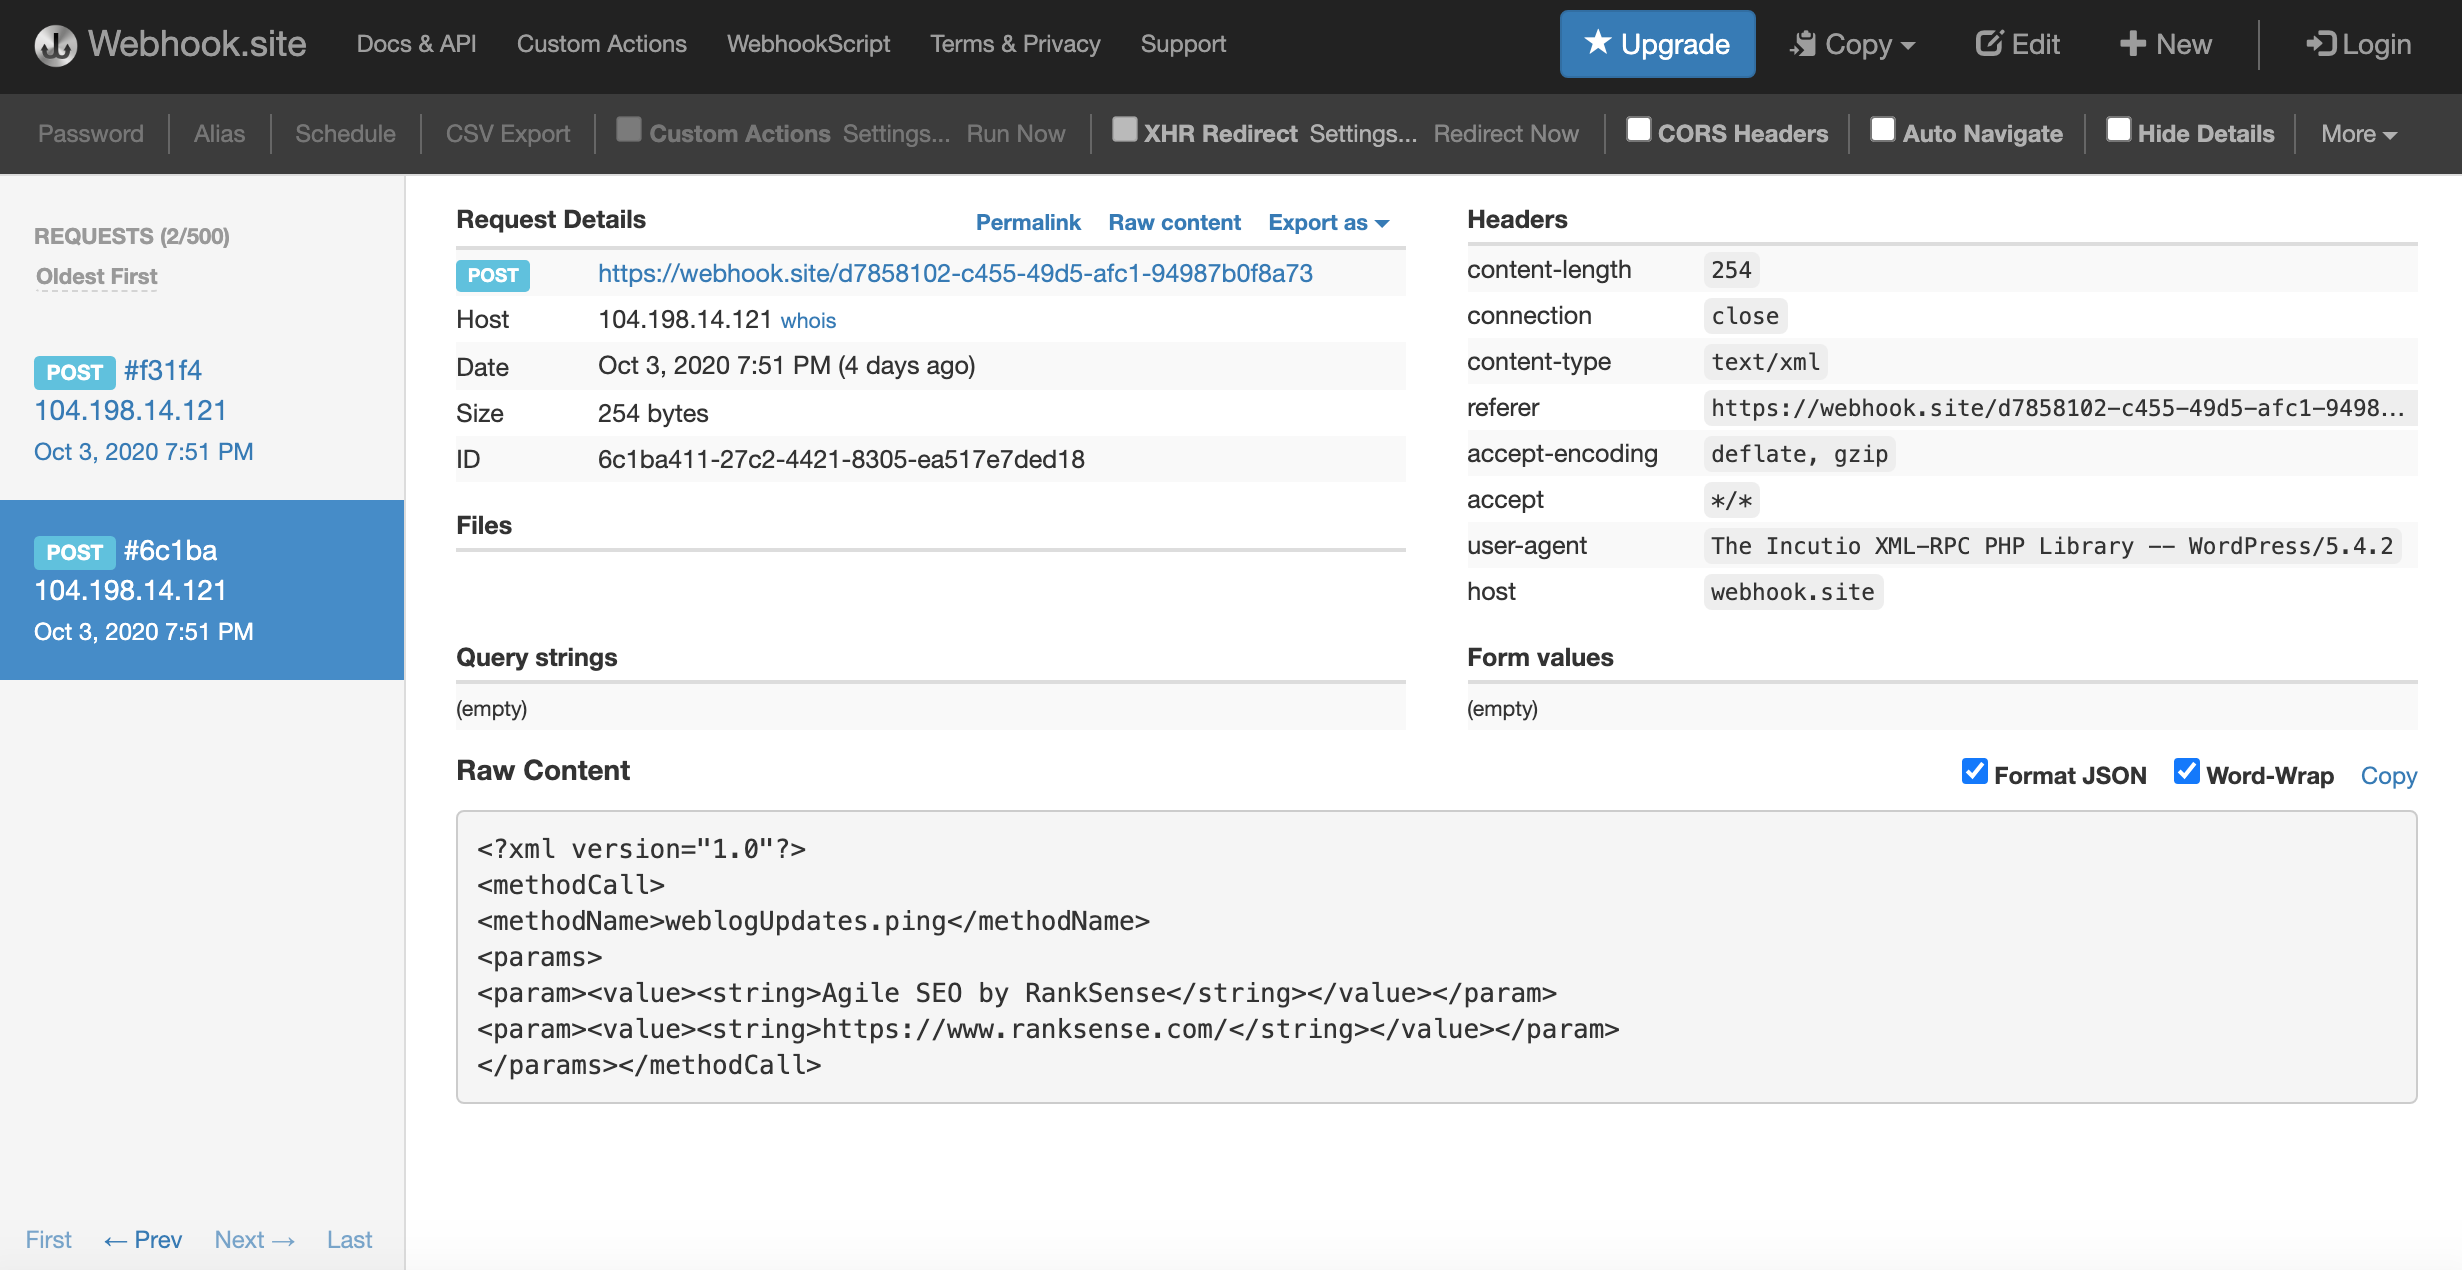
Fortunately, WordPress has a Ping mechanism we can use for this.
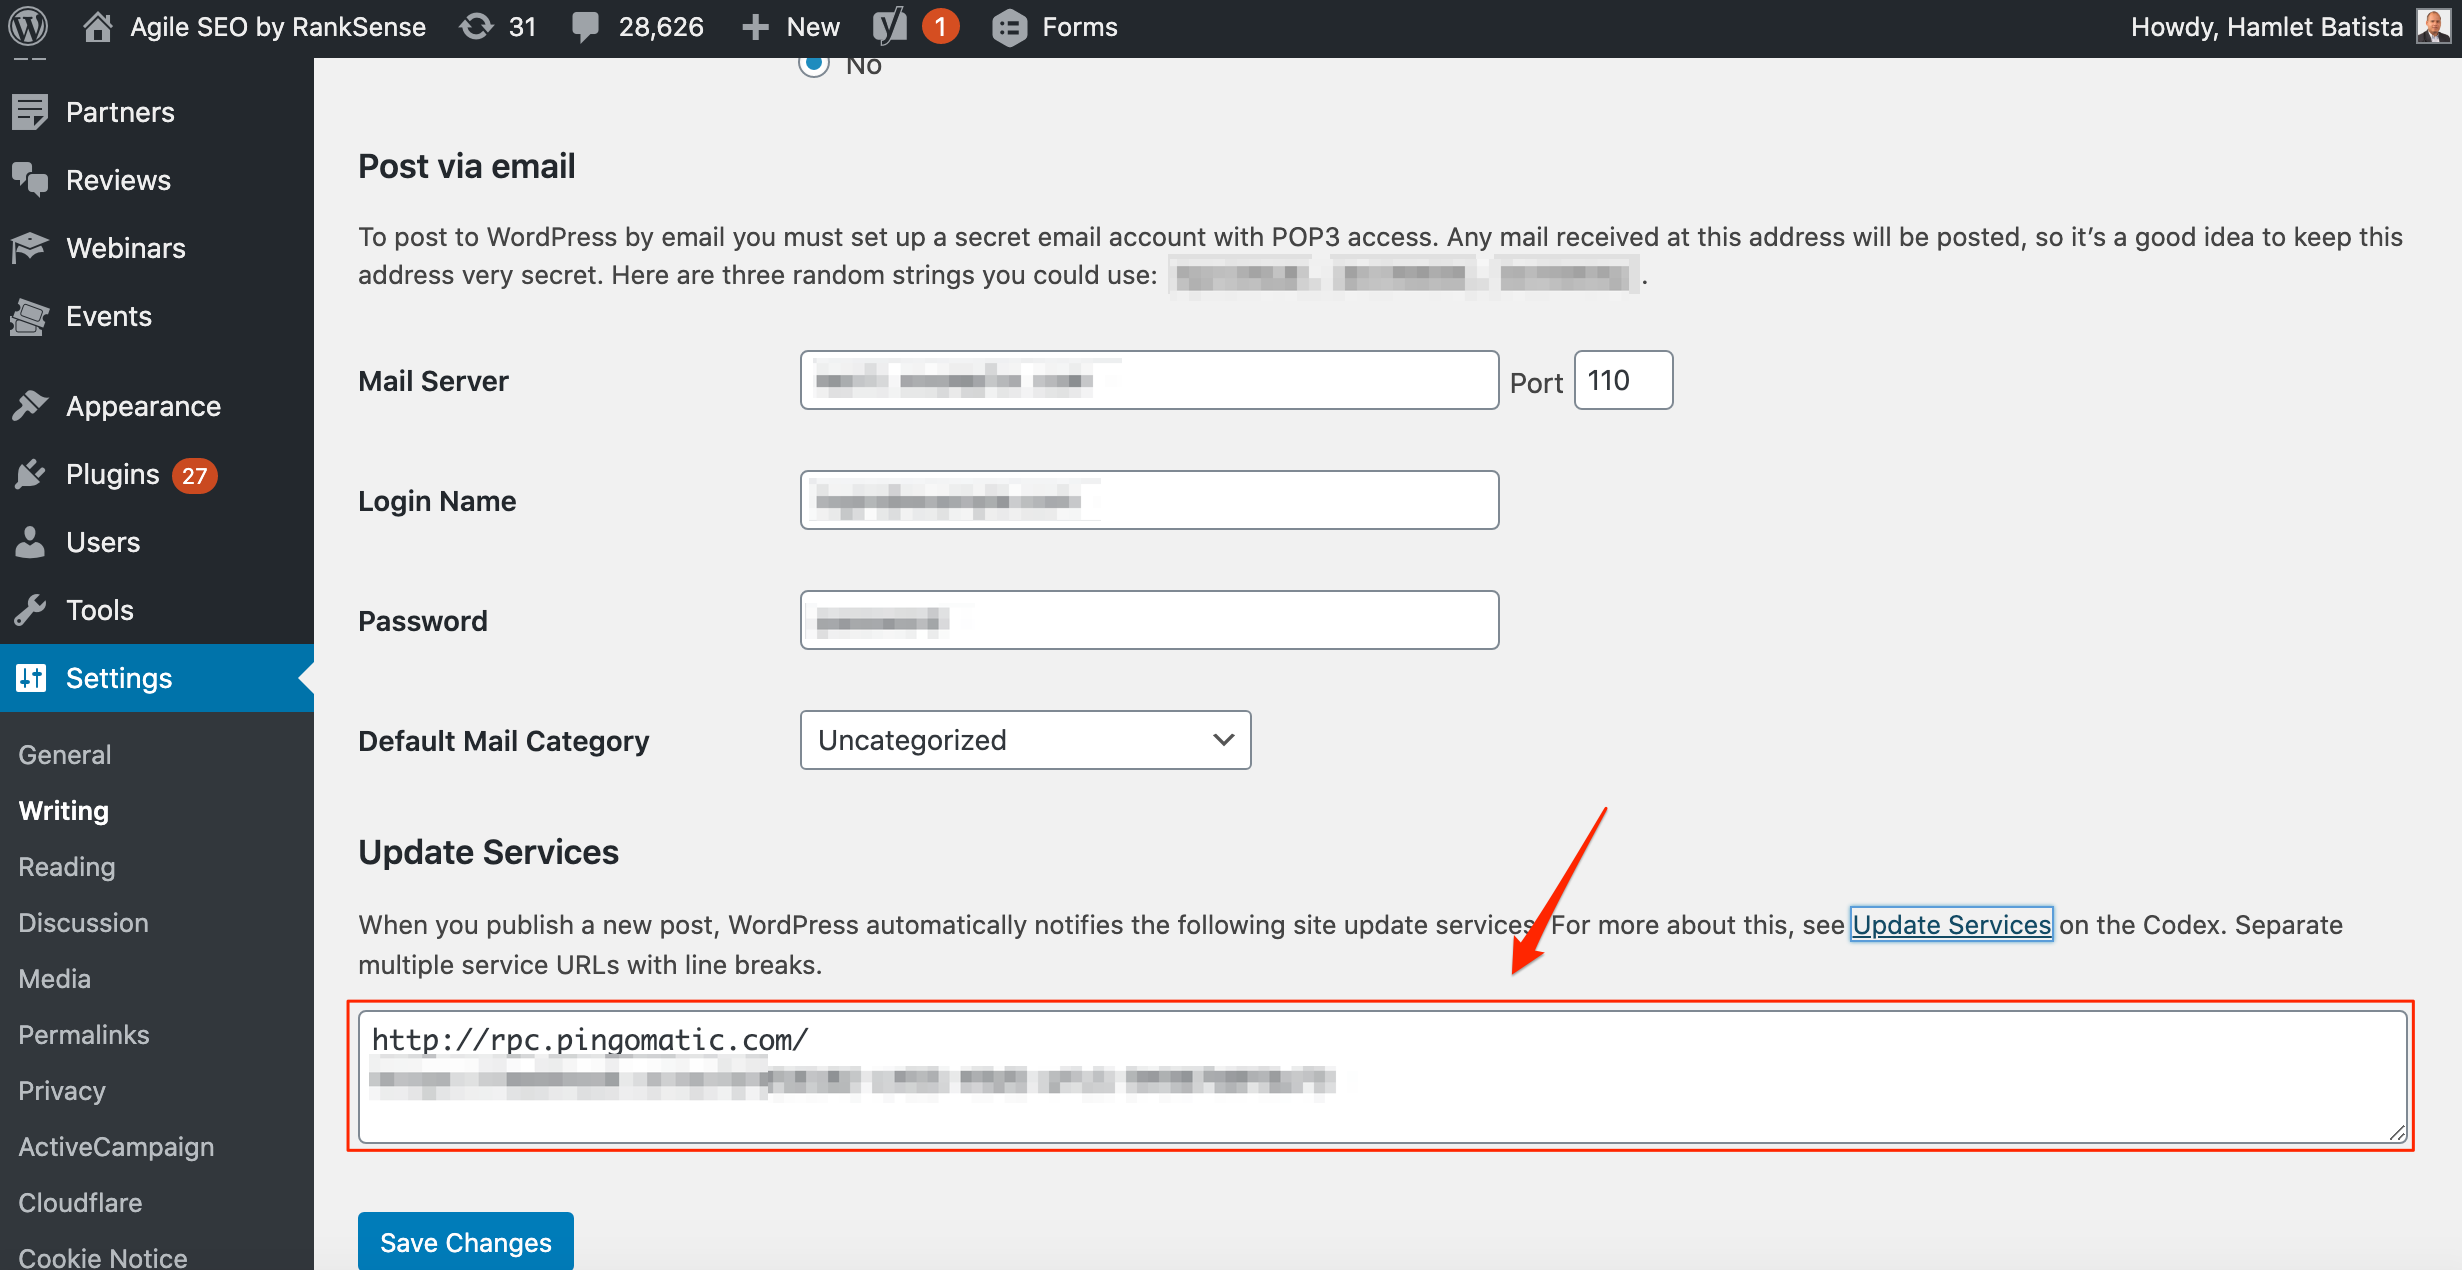
We only need to add our Cloud Function URL to the list of Ping services.
I tried reading the payload WordPress sends to see if the updated URLs are included and sadly, it always listed the home page and the site feed in my tests.
If WordPress sent the list of updated URLs, we could skip the XML sitemap downloading step.
Deploying the Cloud Function
Here are the steps to create the Cloud Function. Make sure to enable the service first.
First, we need to authenticate with Google Compute Engine.
!gcloud auth login --no-launch-browser
!gcloud config set project project-name
I created a gist with a working Cloud Function with all steps to get this idea to work. Please read the code to personalize it to your details and GitHub repository.
I also created a gist with the requirements.txt file you need to include when deploying the Cloud Function.
You need to download both files and have them in the same folder where you will execute the next command.
I moved the GitHub credentials to use environment variables. It is not a good idea to have them in source control.
!gcloud functions deploy wordpress_ping_post --runtime python37 --trigger-http --allow-unauthenticated --set-env-vars username=<your GitHub username>,password=<copy your GitHub private token>
You should see output similar to the one below.
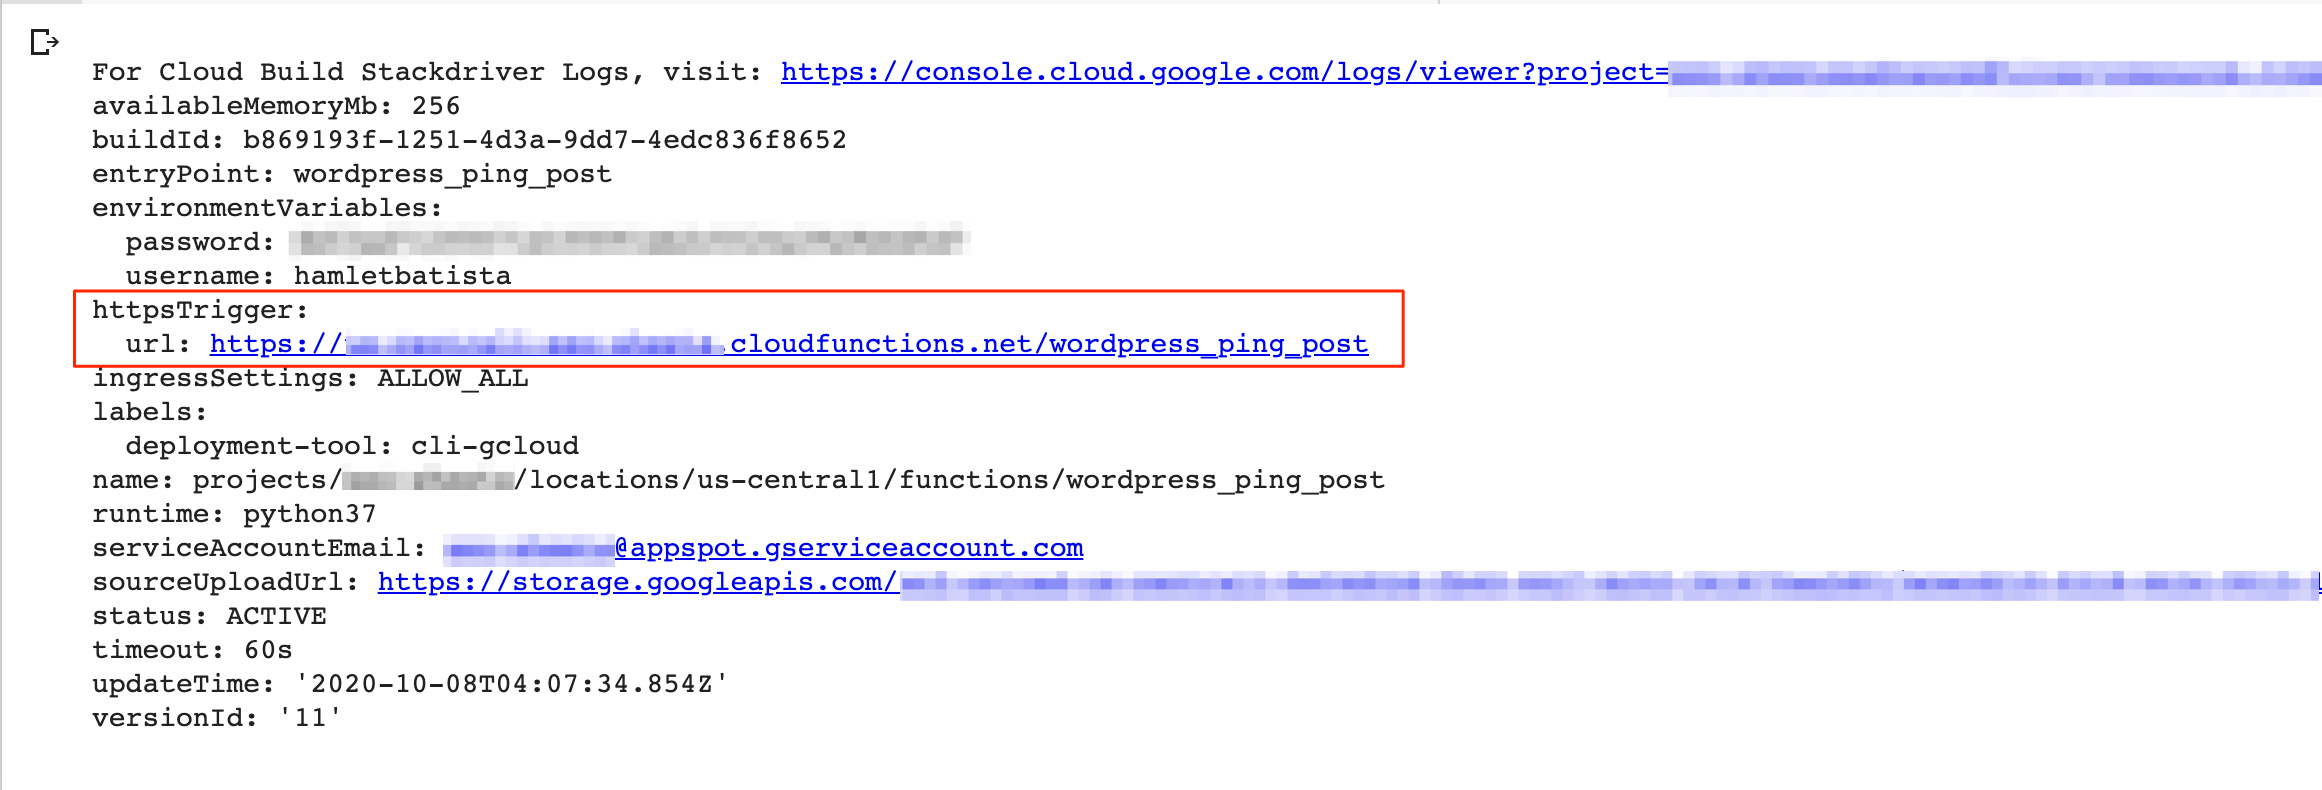
I highlighted the URL you need to add your WordPress Ping services list.
Resources to Learn More & Community Projects
I didn’t include the performance budget part in my Cloud Function. Please consider doing that as a homework.
Also, I encourage you to set up a Lighthouse CI server and update the file main.yml to send the reports there.
If you want a more familiar interface, consider this project from the amazing team at Local SEO Guide. It uses Data Studio as the reporting interface.
Latest Python SEO Projects
The momentum of the Python SEO community keeps growing strong! 🐍🔥
As usual, I asked my follower to share their latest projects.
Charly Wargnier knocked out of the part, with not just one project, but three impressive ones and another one in the works.
I've got 4 Python/@streamlit apps on the grill! 🔥🐍🔥
#1 StreamEA (Entity Analyser, will share this wk)
#2 StreamSuggest (Google Suggest API + Tree maps)
#3 StreamTrends (bulk GTrends analysis)The 4th one is inspired by your FAQ column in @sejournal 🙂https://t.co/Sp1hfe0U8s
— Charly Wargnier (@DataChaz) October 6, 2020
Greg Bernhardt just released scripts to automate Lighthouse reports. Make sure to check his site as he’s been posting practical Python scripts consistently.
How #SEO Can Use #Python to Automate #Lighthouse Reportshttps://t.co/eHchF277Un @DataChaz @hamletbatista @jroakes
— Greg Bernhardt 🐍🌊 (@GregBernhardt4) October 7, 2020
Nichola Stott is working on automating the Wave API. Not Google Wave, though!
Would using python to automate Wave API at scale count as cool? Cc @jessica_james01
— Nichola Stott (@NicholaStott) October 6, 2020
David Sottimano pitched the idea of doing a hackathon in 2021 and there is already a lot of interest in it!
Can we arrange an in-person hackathon in 2021 please? cc @jroakes @fighto @TylerReardon @hulyacobans @rvtheverett (and many, many more). Like a conference, except, we all meet up, discuss ideas, split into teams, 24 hour straight coding & pizza. Rest, present next day?
— Dave Sottimano (@dsottimano) October 7, 2020
More Resources:
