
Google recently announced they’re officially testing a mobile-first index. This means that Google will look first to the mobile version of your website to determine how it should be indexed in search.
What else does it mean?
There’s no better time than now to set up AMP for your website.
What Is AMP?
AMP stands for Accelerated Mobile Pages. It’s an open-source HTML framework that allows webpages to load instantaneously, even when they contain rich content like video and ads. Google first announced the AMP project in October 2015.
Essentially, you can think of AMP as a stripped-down version of your webpage that contains all the meat of your content, but gets rid of all the extras that slow down your site. AMP lets visitors see your content instantly, rather than having to wait up to 20 seconds. Yes, horrifyingly enough, that is indeed the median load time for mobile responsive sites.
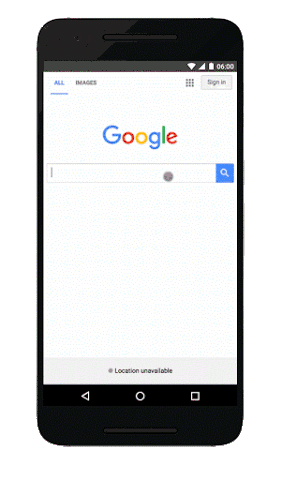
I’m sure you’ve clicked on AMP pages from your smartphone before. But on the off chance you haven’t, here’s a demo from Google:
Why Does AMP Matter?
Faster pages mean happier visitors. And happier visitors tend to stay, read, and engage with your content.
Google likes that kind of behavior.
Technically, AMP is not considered a ranking signal. However, Google does favor websites that visitors engage and spend time with, and they don’t like sites that visitors quickly bounce from due to long load times. Which type of site would you prefer to be?
AMP helps you serve content to your visitors faster, which reduces the likelihood they’ll leave (assuming all else is equal, of course, and that your content is outstanding and precisely answers the question they searched for).
So the effect AMP has on your organic traffic is indirect, but the results can be significant.
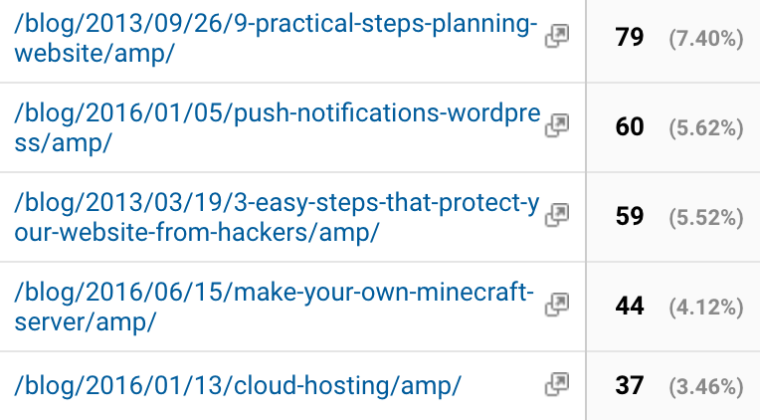
I manage the blog at HostGator. Here is a screenshot of the traffic to our blog coming from organic channels during a six-month period.

Can you guess which month I implemented AMP?
I set up AMP on our WordPress blog in early August on a Friday. By Monday morning, I could see the results in Search Console, and it only took a few weeks before Google had indexed all of the AMP versions of our blog articles.
As you can see, it paid off with a nice boost to our organic traffic starting in August.
To be fair, there were also other factors that improved our rankings, but I’m confident that AMP contributed. I can see the visits in Google in Google Analytics.
How to Set up AMP on Your Site
If you’ve ever been part of making a website responsive, you may remember it as a herculean project that caused infighting and debates about the meaning of the internet among the marketing, UX, and development teams. You may have even lost an office friendship or two during that dark time.
The good — actually, great — news about AMP? It’s easier to implement than you think.
Follow these instructions to implement AMP on your WordPress site or blog.
Step 1: Install the AMP Plugin

This free AMP plugin by Automattic couldn’t make things any easier. Once you activate it, it will make all of your pages AMP-ready by adding the /amp/ suffix to the end of your URLs. It does this by adding a canonical tag of sorts to the original versions of the articles. For reference, that code looks like:
https://www.hostgator.com/blog/2016/09/23/shared-hosting-vs-wordpress-hosting-whats-the-difference/amp/
You can confirm it’s working by adding amp/ to the end of any of your URLs to see the AMP version of the page.
Step 2: Install the Yoast Glue Plugin

Great, now you have AMP on your site. But wouldn’t it be nice if these pages looked like the rest of your site, instead of using the default black-and-white style?
Fortunately, there’s a plugin for that. Yoast has put together a handy plugin that integrates your SEO meta-data into the AMP pages and allows you to customize the colors to align with your brand. Oh, and it’s free, too!
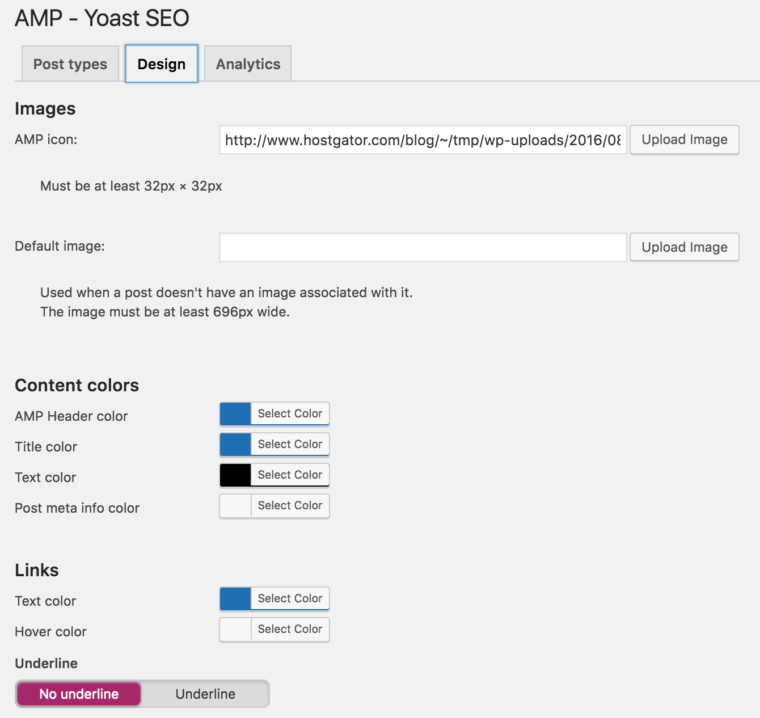
Once you’ve downloaded and activated the plugin, go to the Yoast SEO menu in your WordPress dashboard and click on AMP.

From there, click on the Design tab. Here you can upload a custom icon, adjust your colors and hyperlink settings, and more.
Important Note: The Glue for Yoast SEO & AMP plugin won’t work if you’re using another SEO plugin on your WordPress site. It’s not uncommon for plugins with duplicate functionality to not play nice with each other. If this is the case, you can decide whether you want to uninstall your other plugin and go with Yoast, or you’re okay with keeping the default black-and-white AMP version of your site, in which case you can stick with your current SEO plugin and uninstall Yoast.
At this point in the process, you’ll have the default version of your site, and one that’s optimized for AMP. Here’s an example of how what we ended up with at HostGator (the normal version is on the left, and the AMP version is on the right):
The AMP version is stripped down to precisely what your visitor is interested in. It removes the header and social share icons, while maintaining our brand identity and getting the reader right to the content. You may note that none of the content even appeared above the fold in our normal version (we’ll have to work on that!).
Step 3: Review Your AMP Pages in Search Console
Once you’ve implemented AMP and customized it to fit the look and feel of your site, it’s time to confirm that Google noticed your efforts. Log in to Google Search Console and click on Search Appearance > Accelerated Mobile Pages.
From there you’ll be able to watch your AMP pages as they get indexed and fix any errors that may arise. Note the steady rise of indexed AMP pages we saw at HostGator about a week after we implemented AMP.
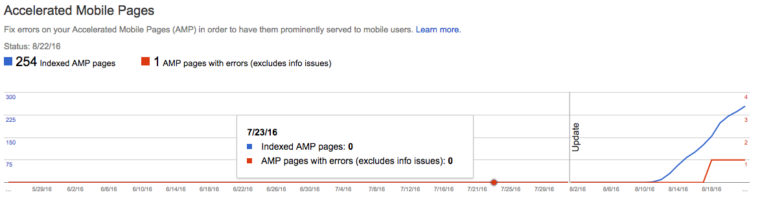
Any errors will be listed below the graph. Simply click through to find out what’s causing the error and blocking AMP. It could be another script or plugin you have enabled on your site. Fix the issue, then run the AMP Validator to verify it’s fixed.
Conclusion
There you have it! Your easy three-step guide to installing AMP on your WordPress site. If you aren’t using WordPress, don’t fret. The Accelerated Mobile Pages Project has a tutorial that will walk you through implementing AMP on your website. It’s not quite as 1-2-3 simple as the WordPress solution, but it will get the job done.
Image Credits
Featured Image: VolkerSchnaebele/Pixabay.com
Google Demo: Official Google Webmaster Central Blog
Screenshots by Amelia Willson. Taken November 2016.
