

In previous articles, we learned how to perform advanced, BERT-powered, automated intent classification in Python.
We also learned how to automatically populate Google Sheets in Python.
Wouldn’t it be cool if we could perform our intent classification directly in Google Sheets?
That is exactly what we will do here!
Introducing Google Apps Script
One limitation of the built-in functions in Google Sheets is that it limits you to predefined behavior.
The good news is that you can define custom functions with new behavior if you can code them yourself in Google Apps Script.
Google Apps Script is based on JavaScript and adds additional functionality that helps interact with Sheets, Docs and other Google Apps.
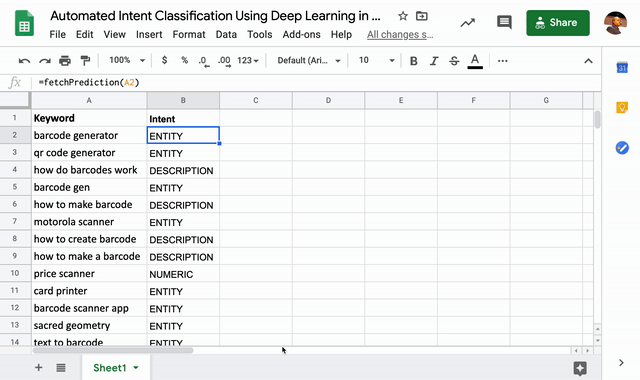
We are going to define a new custom function named fetchPrediction that will take keywords in Google Sheet cells, and run them through a BERT-powered predictive model to get the intention of search users.
Here is our plan of action:
- Learn to review and update values in Google Sheets from Apps Script.
- Practice fetching results from an API and populate a sheet with the retrieved values.
- Train our BERT-powered predictive model using Uber’s Ludwig.
- Use Ludwig to power an API we can call from Apps Script.
- Learn some new tools and concepts that help us connect both services together.
Let’s get started!
Retrieving Keyword Data From Google Sheets
This is an empty Google sheet with some barcode related keywords we pulled from SEMrush.
In our first exercise, we will read and print the first 10 keywords from column A.
Go to Tools > Script Editor to get started.
This is a built-in IDE (Integrated Development Environment) for Google Sheets.
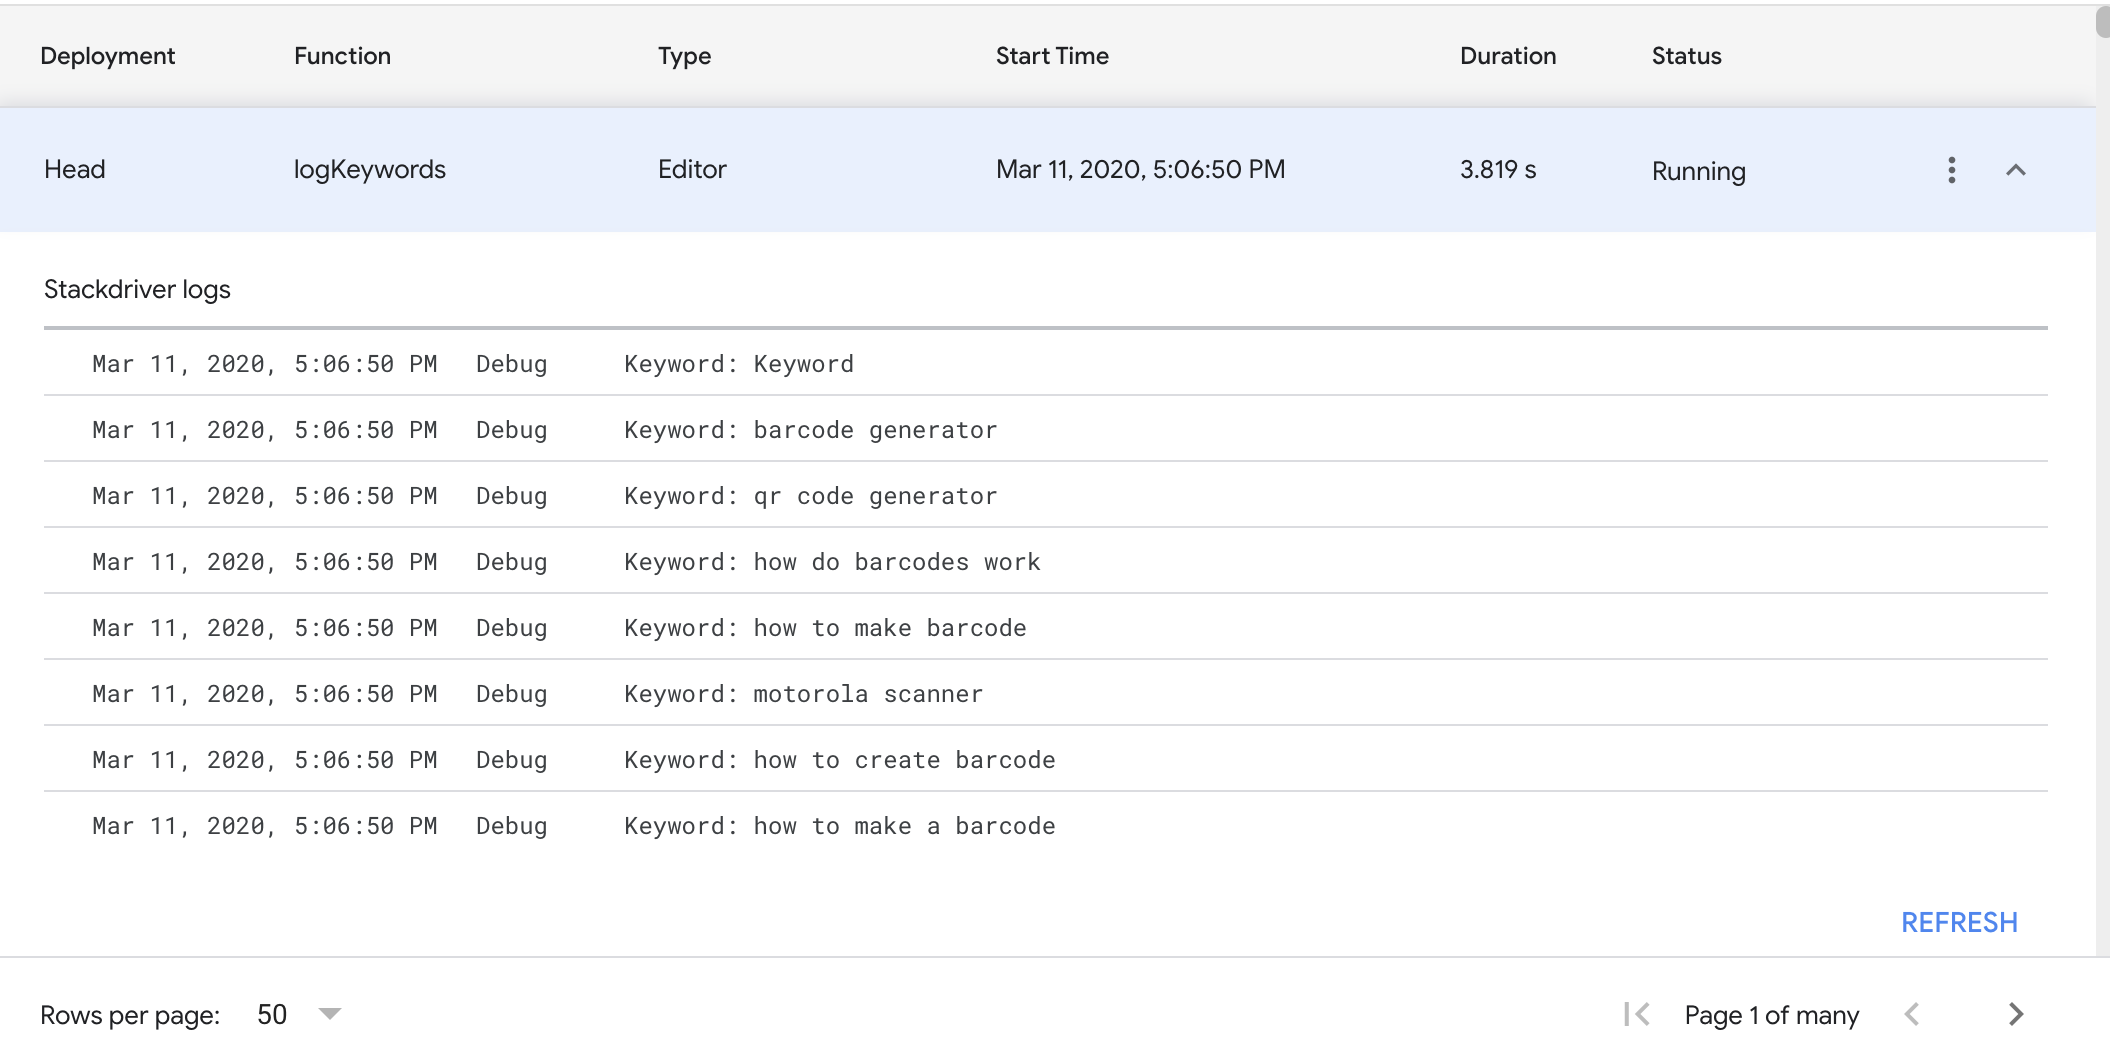
We are going to write a simple JavaScript function called logKeywords that will read all the keywords in our sheet and log them to the console.
Please refer to the official documentation here.
function logKeywords() {
  var sheet = SpreadsheetApp.getActiveSheet();
  var data = sheet.getDataRange().getValues();

  for (var i = 0; i < data.length; i++) {
      console.log('Keyword: ' + data[i][0]);
  }
}
Let’s walk over the function, step by step.
We first get a reference to the active sheet, in this case, it is Sheet1.
If you compare this code to the one we wrote in Python, you will see some advantages.
- We didn’t need to authenticate.
- We didn’t need to open the spreadsheet.
Got to View > Stackdriver logging. There you will get a link to the Apps Script Dashboard. Click on that to see the console logs.
It is a good idea to keep this page in another tab as you will refer to it often as your code and want to see if the changes worked.
You will see the latest log entry at the top of the list. Click on it and you will see something like the screenshot above.
Now, we printed more than 100 rows, which took a bit of time. When you are writing and testing your code, it is better to work with smaller lists.
We can make a simple change in the loop to fix that.
function logKeywords() {
  var sheet = SpreadsheetApp.getActiveSheet();
  var data = sheet.getDataRange().getValues();

  //for (var i = 0; i < data.length; i++) {
  for (var i = 0; i < 10; i++) {

    console.log('Keyword: ' + data[i][0]);
  }
}
Note that I hardcoded the value 10 as the limit and left a comment with the correct code.
I prefer to comment out code changes instead of deleting them as it will be easier to revert back when I’m ready to release for production use.
When you run this, it not only runs faster but checking the log is also a lot faster.
Add a Column with keyword IDs
Next, let’s learn to add data to the sheet.
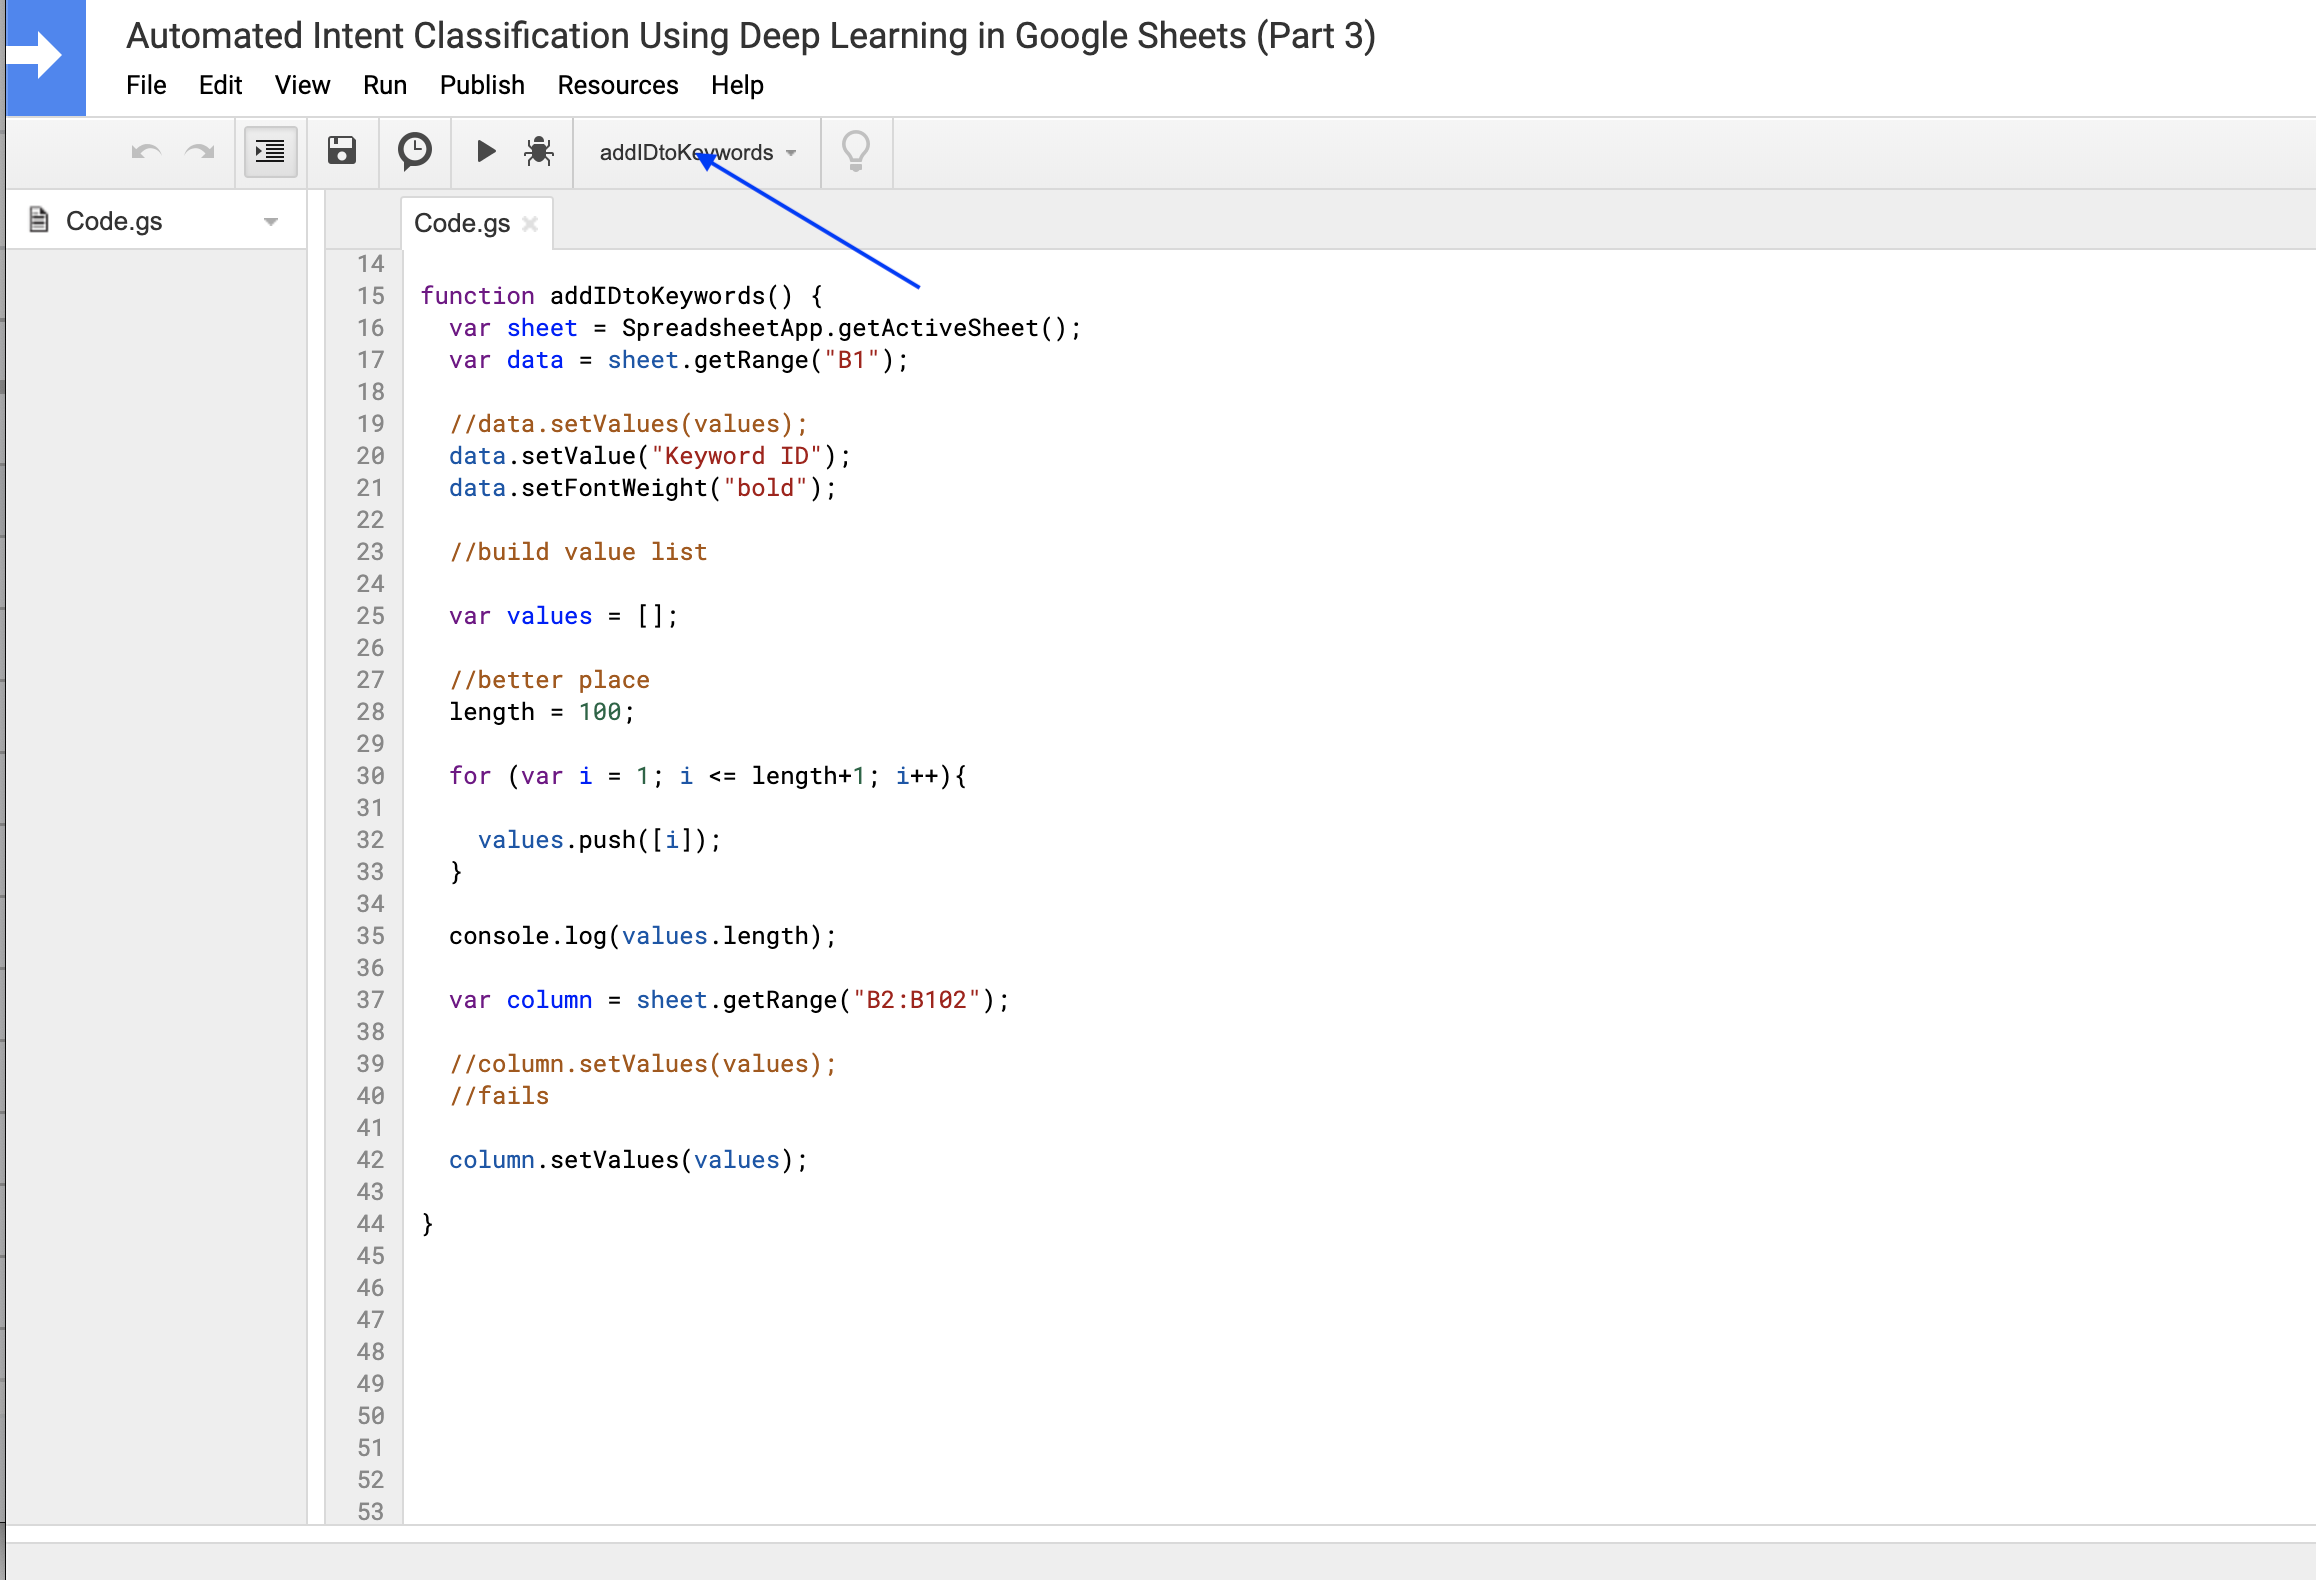
We are going to write a new function named addIDtoKeywords. It creates a column with one numeric ID per keyword.
There isn’t a lot of value in doing this, but it should help you test the technique with something super simple.
Here is the code to do that.
function addIDtoKeywords() {
  var sheet = SpreadsheetApp.getActiveSheet();
  var data = sheet.getRange("B1");

  //build value list

  var values = [];

  //number of keywords
  length = 100;

  for (var i = 1; i <= length+1; i++){

    values.push([i]);
  }

  console.log(values.length);

  //Update sheet column with calculated values
  var column = sheet.getRange("B2:B102");


  column.setValues(values);

}
Select this function in the pull-down and click on the play button to run.
You should get a new column in the sheet with numbers in increasing order.
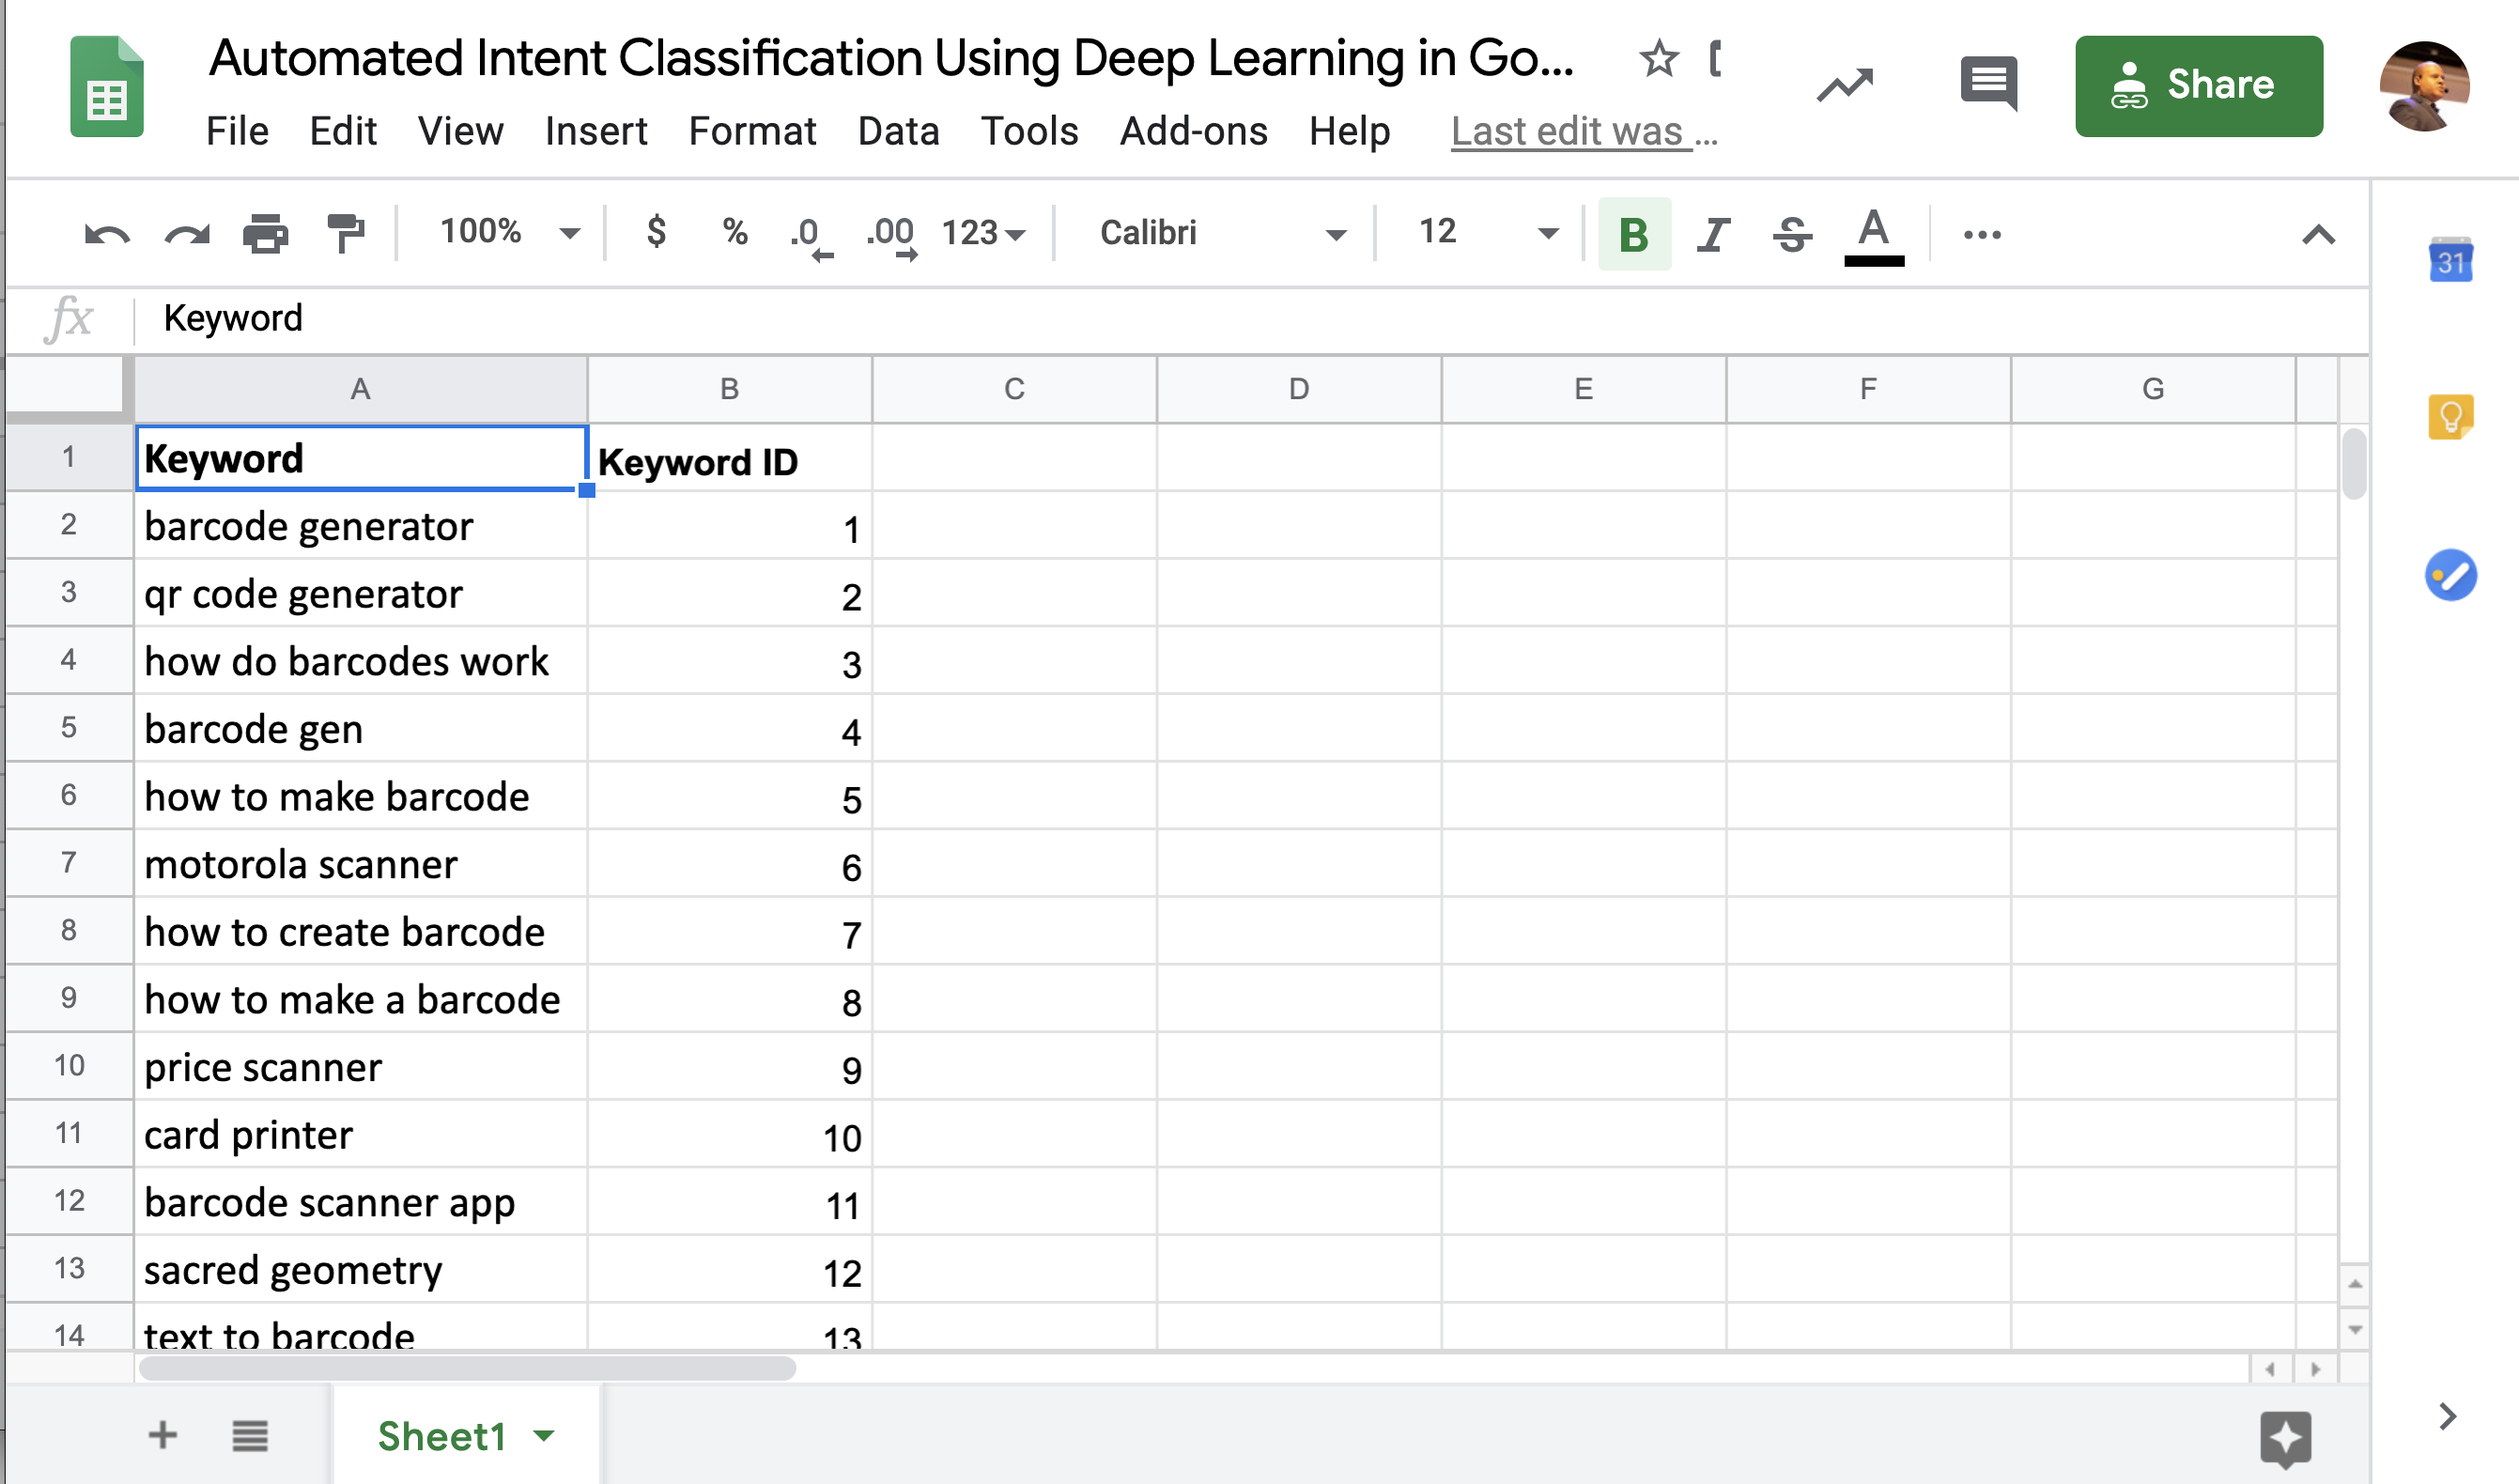
We can also add a column header in bold named Keyword ID using the following code.
 data.setValue("Keyword ID");
 data.setFontWeight("bold");
This is what the updated output looks like.
It is a very similar code. Let’s review the changes.
I added a JavaScript array named values to hold the keyword IDs.
During the loop, I added a line to add each ID generated within the loop to the array.
values.push([i]);I printed the length of the value array at the end of the loop to make sure the correct number of IDs was generated.
Finally, I need to get the values to the sheet.
var column = sheet.getRange("B2:B102");This code selects the correct cells to populate and then I can simply set their value using the list I generated.
column.setValues(values);It can’t get simpler than this!
Fetching API Results From Apps Script
In the next exercise, we will learn to perform API requests from Apps Script.
I recommend you follow this codelab from Google to get familiar with some of the more advanced concepts.
We are going to adapt code from step 11 which pulls data from a Books API.
Instead of fetching books, we will translate keywords using the Google Translate API.
Now, we are starting to write more useful code!
Here is a new function named fetchTranslation based on code adapted from step 11.
function fetchTranslation(TEXT){
  API_KEY="INPUT YOUR API KEY";

  TEXT = encodeURI(TEXT); //"My name is Steve" -> "My%20name%20is%20Steve";

  var url = `https://translation.googleapis.com/language/translate/v2?target=es&key=${API_KEY}&q=${TEXT}`;

  //console.log(url);

  var response = UrlFetchApp.fetch(url, {'muteHttpExceptions': true});

  var json = response.getContentText();

  //console.log(json);

  translation = JSON.parse(json);

  return translation["data"]["translations"][0]["translatedText"];

}
This function takes an input text, encodes it and inserts it into an API URL to call the Google Translate service.
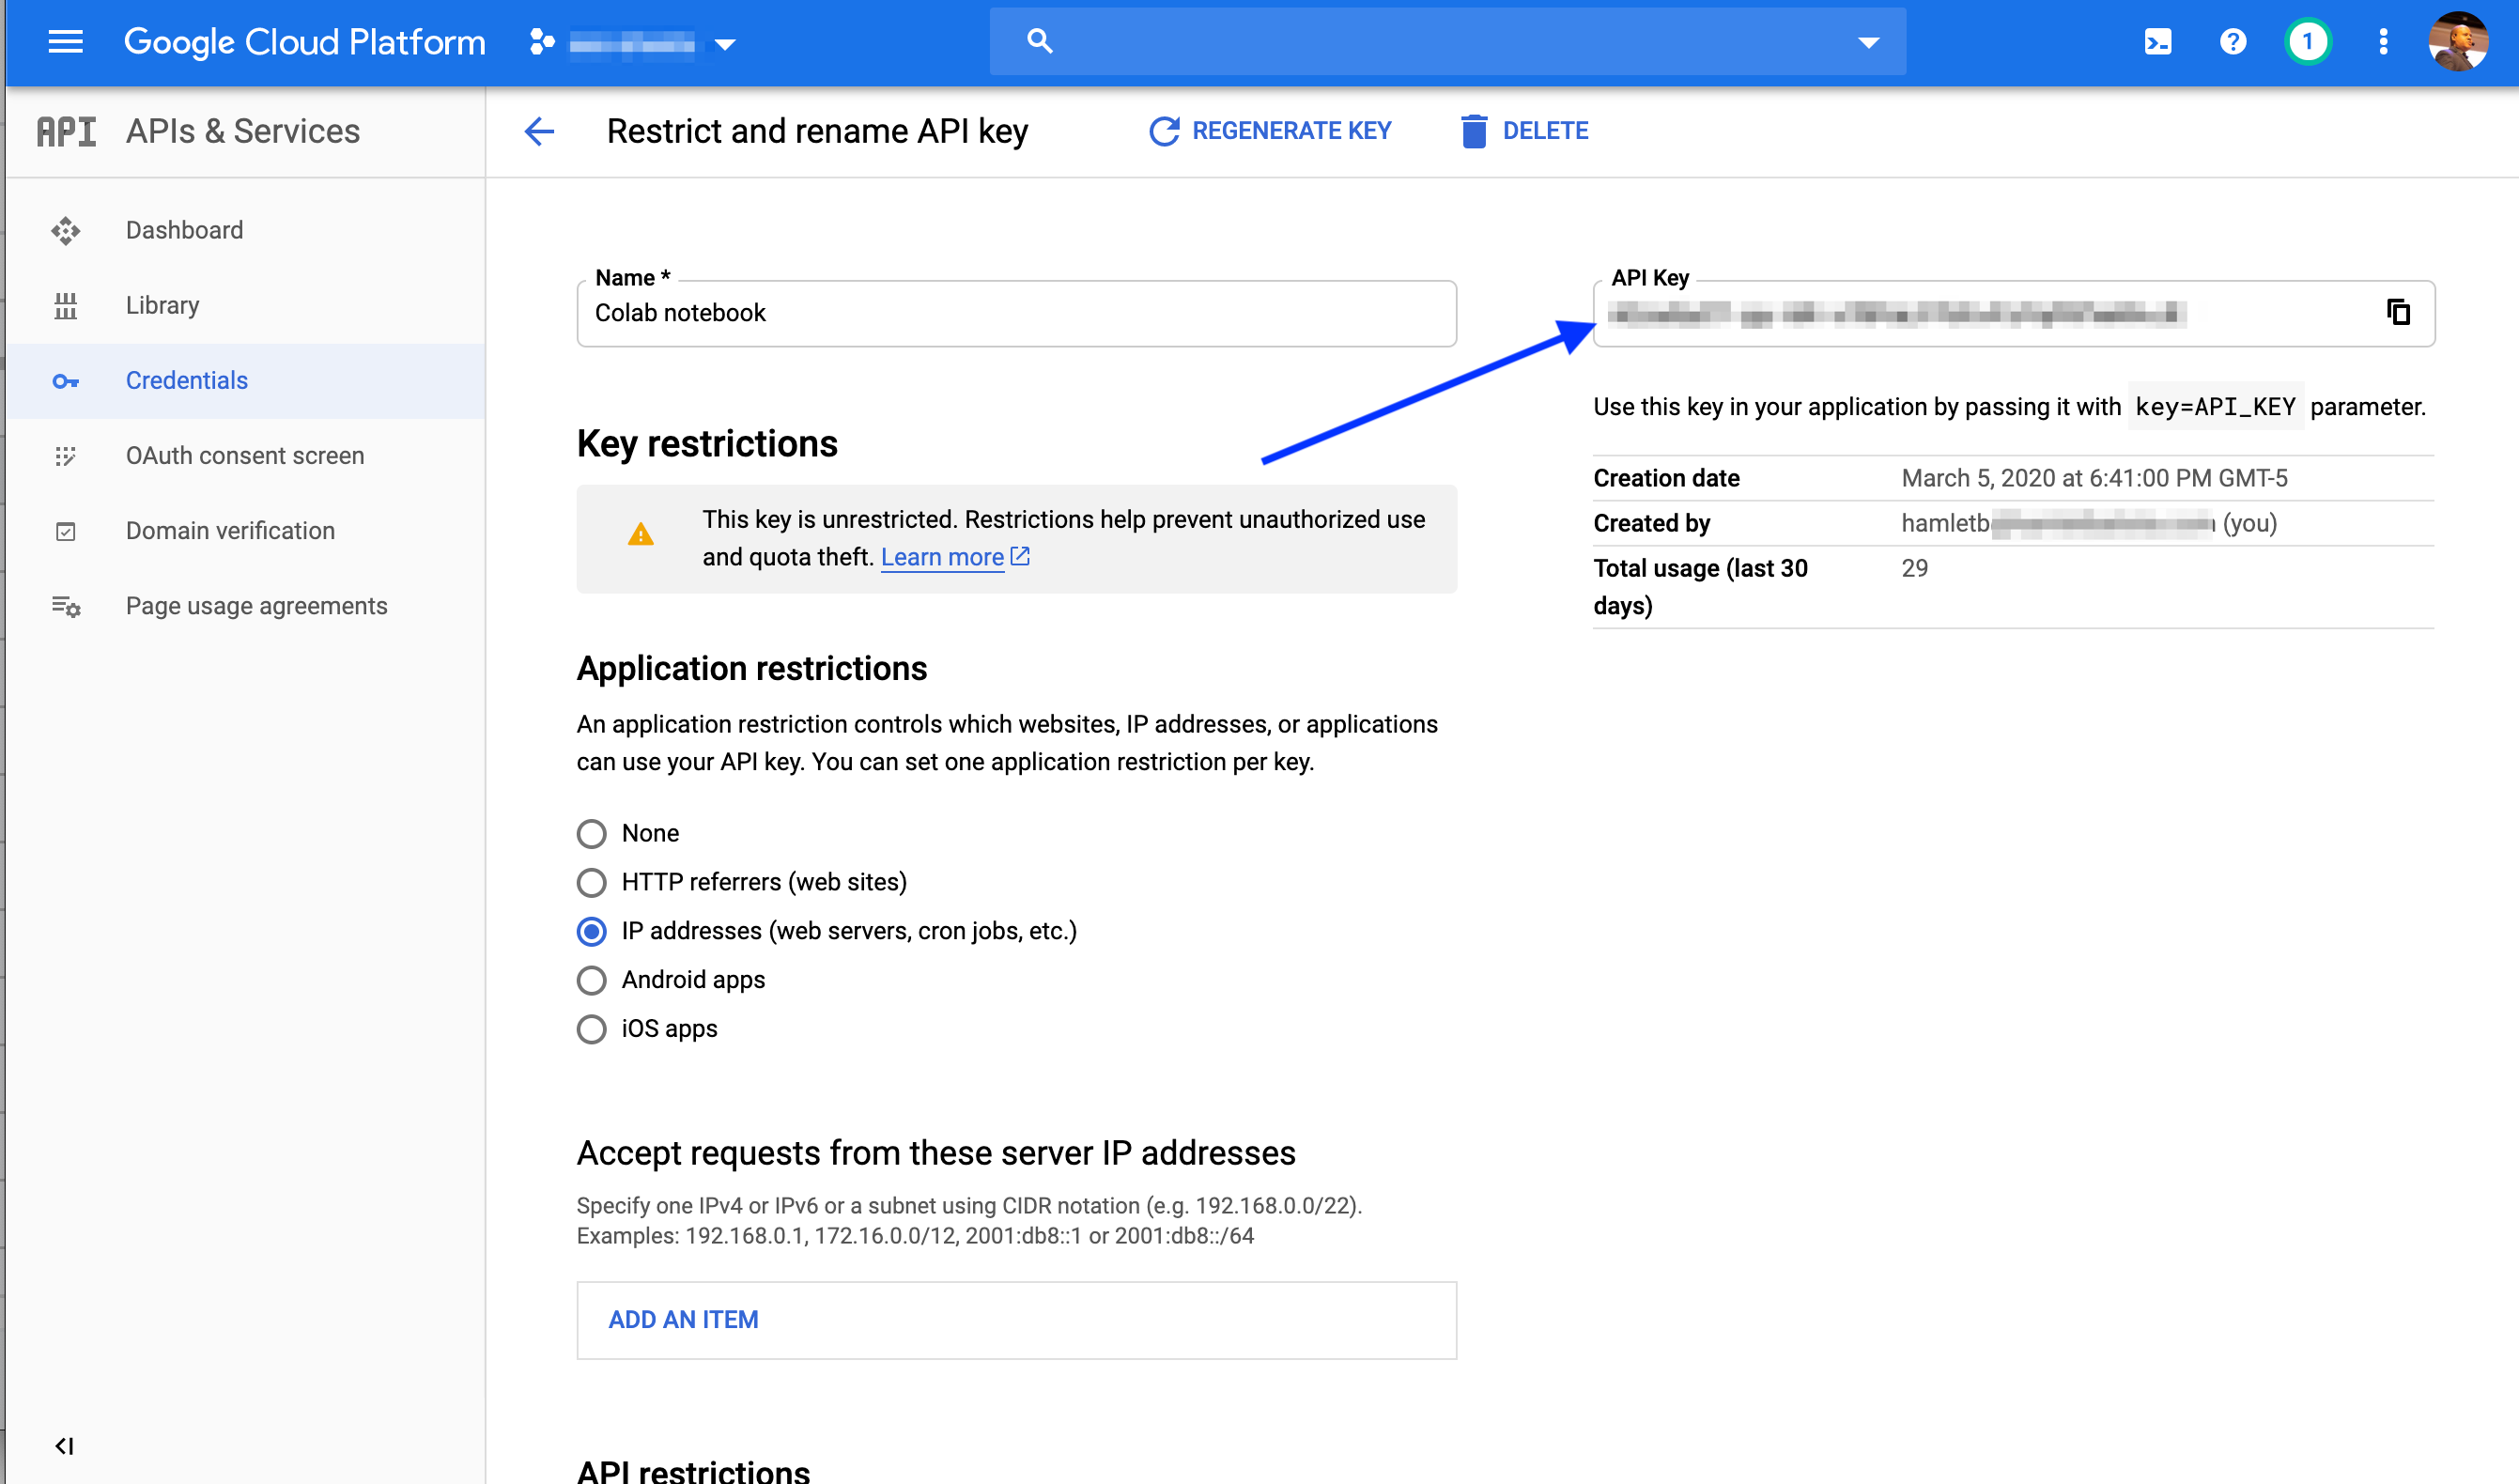
There is an API key we need to get and also we need to enable to Translate service. I also recommend restricting the API to the IP you are using to test during development.
Once we have the API URL to call, it is as simple as calling this code.
var response = UrlFetchApp.fetch(url, {'muteHttpExceptions': true});The next lines get us the response in JSON format and after a bit of navigation down the JSON tree, we get the translated text.
As you can see in my code, I like to log almost every step in the code to the console to confirm it is doing what I expect.
Here is one example of how I figured out the correct JSON path sequence.
//console.log(translation["data"]);

//console.log(translation["data"]["translations"]);

//console.log(translation["data"]["translations"][0]);

//console.log(translation["data"]["translations"][0]["translatedText"]);![]()
You can see the progression in the logs here, including the final output.
Translating Keywords
As we tested the function and it works, we can proceed to create another function to fetch and translate the keywords from the sheet.
We will build up from what we’ve learned so far.
We will call this function a super original name TranslateKeywords!
function TranslateKeywords() {
  var sheet = SpreadsheetApp.getActiveSheet();
  var header = sheet.getRange("B1");

  // Add a new header column named Translation
  header.setValue("Translation");
  header.setFontWeight("bold");

  //var keyword = "barcode generator";
  var keyword = sheet.getRange("A2").getValue();

  console.log(keyword);

  translated_keyword = fetchTranslation(keyword);

  console.log(translated_keyword);

  var data = sheet.getRange("B2");

  data.setValue(translated_keyword);


}
The code in this function is very similar to the one we used to set Keyword IDs.
The main difference is that we pass the keyword to our new fetchTranslation function and update a single cell with the result.
Here is what it looks like for our example keyword.
![]()
As you can probably see, there is no for loop, so this will only update one single row/keyword. The first one.
Please complete the for loop to get the translation for all keywords as a homework exercise.
Building an Intent Classification Model
Let’s move to build our intent classification service that we will call to populate keyword intents.
In my previous deep learning articles, I’ve covered Ludwig, Uber’s AI toolbox.
I like it a lot because it allows you to build state-of-the-art deep learning models without writing a single line of code.
It is also very convenient to run in Google Colab.
We are going to follow the same steps I described in this article, this will give us a powerful intent prediction model powered by BERT.
Here is a quick summary of the steps you need paste into Google Colab (make sure to select the GPU runtime!).
Please refer to my article for the context:
%tensorflow_version 1.x

import tensorflow as tf; print(tf.__version__)

!pip install ludwig

#upload Question_Classification_Dataset.csv and 'Question Report_Page 1_Table.csv'
from google.colab import files

files.upload()

import pandas as pd
df = pd.read_csv("Question_Classification_Dataset.csv", index_col=0)

!wget https://storage.googleapis.com/bert_models/2018_10_18/uncased_L-12_H-768_A-12.zip
!unzip uncased_L-12_H-768_A-12.zip

# create the ludwig configuration file for BERT-powered classification
template="""
input_features:
-
name: Questions
type: text
encoder: bert
config_path: uncased_L-12_H-768_A-12/bert_config.json
checkpoint_path: uncased_L-12_H-768_A-12/bert_model.ckpt
preprocessing:
word_tokenizer: bert
word_vocab_file: uncased_L-12_H-768_A-12/vocab.txt
padding_symbol: '[PAD]'
unknown_symbol: '[UNK]'
output_features:
-
name: Category0
type: category
-
name: Category2
type: category
text:
word_sequence_length_limit: 128
training:
batch_size: 32
learning_rate: 0.00002
"""
with open("model_definition.yaml", "w") as f:
    f.write(template)
!pip install bert-tensorflow

!ludwig experiment \
  --data_csv Question_Classification_Dataset.csv\
  --model_definition_file model_definition.yaml
After completing these steps in Google Colab, we should get a high accuracy predictive model for search intent.
We can verify the predictions with this code.
test_df = pd.read_csv("Question Report_Page 1_Table.csv")
#we rename Query to Questions to match what the model expects

predictions = model.predict(test_df.rename(columns={'Query': 'Questions'} ))

test_df.join(predictions)[["Query", "Category2_predictions"]]
We get a data frame like this one.
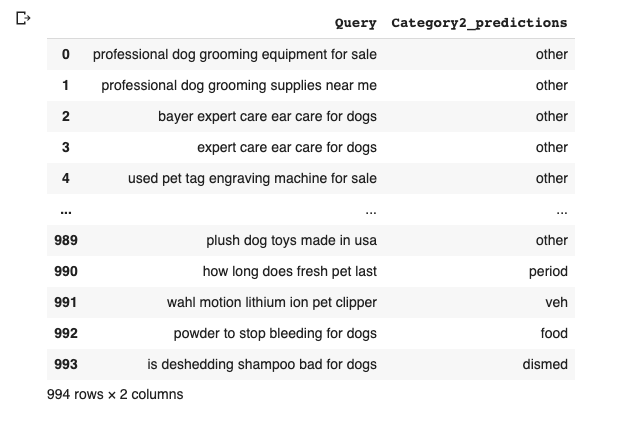
The intentions predicted are not the ones you typically expect: navigational, transactional, informational, but they are good enough to illustrate the concept.
Please check an awesome article by Kristin Tynski that explains how to expand this concept to get true search intents.
Turning Our Model Into an API Service
Ludwig has one super cool feature that allows you to serve models directly as an API service.
The command for this is Ludwig serve.
I was trying to accomplish the same thing following a super complicated path because I didn’t check that something like this already existed. 🤦
It is not installed by default, we need to install it with this command.
!pip install ludwig[serve]We can check the command-line options with:
!ludwig serve --help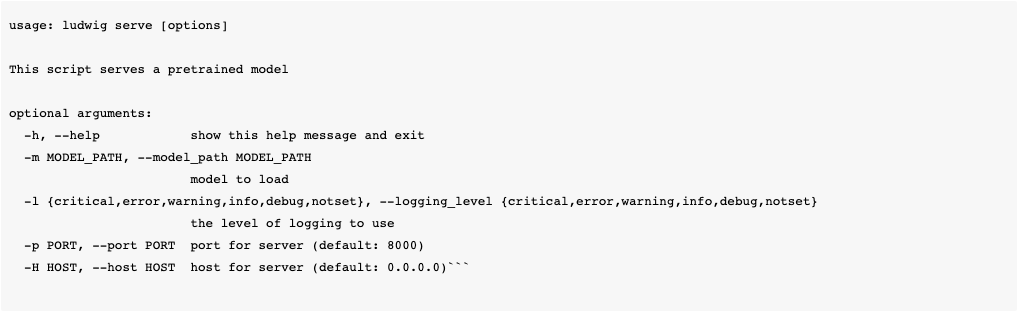
Creating an API from our model is as simple as running this command.
!ludwig serve -m results/experiment_run/model

INFO:     Started server process [5604]
INFO:     Waiting for application startup.
INFO:     Application startup complete.
INFO:     Uvicorn running on http://0.0.0.0:8000 (Press CTRL+C to quit)
INFO:     Shutting down
INFO:     Finished server process [5604]
As we are running this code in the notebook, we need to use a little trick to push this process to the background (a separate thread).
%%bash --bg

nohup ludwig serve -m results/experiment_run/model > debug.log 2>&1
The magic command %%bash –bg runs the shellcode in a separate thread returning control to the notebook so we can run code that can interact with the service.
I found this to be a super cool and valuable trick. I’m also introducing more shell tricks that I learned many years ago.
The nohup command prevents the process from getting killed when the parent dies. It is optional here.
The code 2>&1 redirects the standard error to the standard input and both are then sent to the file debug.log. You can learn more about this technique here.
We can track the progress of the background process using this command.
!tail debug.logAfter you see this message, you can proceed to the next step.
INFO: Uvicorn running on http://0.0.0.0:8000 (Press CTRL+C to quit)Let’s send a test API request using curl to see if the service works.
!curl http://0.0.0.0:8000/predict -X POST -F 'Questions=who is the boss?'You should get this response back.
{"Category0_predictions":"HUMAN","Category0_probabilities_":0.00021219381596893072,"Category0_probabilities_ENTITY":7.17515722499229e-05,"Category0_probabilities_HUMAN":0.9988889098167419,"Category0_probabilities_DESCRIPTION":0.000423480843892321,"Category0_probabilities_NUMERIC":2.7793401386588812e-05,"Category0_probabilities_LOCATION":0.0003020864969585091,"Category0_probabilities_ABBREVIATION":7.374086999334395e-05,"Category0_probability":0.9988889098167419,"Category2_predictions":"ind","Category2_probabilities_":8.839580550557002e-05,"Category2_probabilities_ind":0.9759176969528198,"Category2_probabilities_other":0.0013697665417566895,"Category2_probabilities_def":3.929347076336853e-05,"Category2_probabilities_count":4.732362140202895e-05,"Category2_probabilities_desc":0.014149238355457783,"Category2_probabilities_manner":7.225596345961094e-05,"Category2_probabilities_date":7.537546480307356e-05,"Category2_probabilities_cremat":0.00012272763706278056,"Category2_probabilities_reason":0.00042629052768461406,"Category2_probabilities_gr":0.0025540771894156933,"Category2_probabilities_country":0.0002626778441481292,"Category2_probabilities_city":0.0004305317997932434,"Category2_probabilities_animal":0.00024954770924523473,"Category2_probabilities_food":8.139225974446163e-05,"Category2_probabilities_dismed":7.852958515286446e-05,"Category2_probabilities_termeq":0.00023714809503871948,"Category2_probabilities_period":4.197505040792748e-05,"Category2_probabilities_money":3.626687248470262e-05,"Category2_probabilities_exp":5.991378566250205e-05,"Category2_probabilities_state":0.00010361814202042297,"Category2_probabilities_sport":8.741072088014334e-05,"Category2_probabilities_event":0.00013374585250858217,"Category2_probabilities_product":5.6306344049517065e-05,"Category2_probabilities_substance":0.00016623239207547158,"Category2_probabilities_color":1.9601659005274996e-05,"Category2_probabilities_techmeth":4.74867774755694e-05,"Category2_probabilities_dist":9.92789282463491e-05,"Category2_probabilities_perc":3.87108520953916e-05,"Category2_probabilities_veh":0.00011915313370991498,"Category2_probabilities_word":0.00016430433606728911,"Category2_probabilities_title":0.0010781479068100452,"Category2_probabilities_mount":0.00024070330255199224,"Category2_probabilities_body":0.0001515906333224848,"Category2_probabilities_abb":8.521509153069928e-05,"Category2_probabilities_lang":0.00022924368386156857,"Category2_probabilities_plant":4.893113509751856e-05,"Category2_probabilities_volsize":0.0001462997024646029,"Category2_probabilities_symbol":9.98345494735986e-05,"Category2_probabilities_weight":8.899033855414018e-05,"Category2_probabilities_instru":2.636547105794307e-05,"Category2_probabilities_letter":3.7610192521242425e-05,"Category2_probabilities_speed":4.142118996242061e-05,"Category2_probabilities_code":5.926147059653886e-05,"Category2_probabilities_temp":3.687662319862284e-05,"Category2_probabilities_ord":6.72415699227713e-05,"Category2_probabilities_religion":0.00012743560364469886,"Category2_probabilities_currency":5.8569487009663135e-05,"Category2_probability":0.9759176969528198}Exposing Our Service Using Ngrok
So, we have a new API that can make intent predictions, but one big problem is that it is only accessible from within our Colab notebook.
Let me introduce another cool service that I use often, Ngrok.
Ngrok helps you create publicly accessible URLs that connect to a local service like the one we just created.
I do not recommend doing this for production use, but it is very handy during development and testing.
You don’t need to create an account, but I personally do it because I get to set up a custom subdomain that I use very frequently.
Here are the steps to give our API a public URL to call from App Script.
!wget https://bin.equinox.io/c/4VmDzA7iaHb/ngrok-stable-linux-amd64.zip && unzip ngrok-stable-linux-amd64.zip
We first download and uncompress ngrok.
%%bash --bg

./ngrok http -hostname=api.yourdomain.com 8000 2> ngrok.log
The code above tells ngrok to connect to the local service in port 8000. That is all we need to do.
!curl http://api.yourdomain.com/predict -X POST -F 'Questions=who is the boss?'You can confirm it works by repeating the curl call, but calling the public URL. You should get the same result.
If you don’t want to set up a custom domain, you can use this code instead.
%%bash --bg

./ngrok http 8000 2> ngrok.log
This will generate a random public URL and you get retrieve with this code.
!curl -s http://localhost:4040/api/tunnels | python3 -c \

    "import sys, json; print(json.load(sys.stdin)['tunnels'][0]['public_url'])"
Now, we get back to our final steps.
Fetching Intent Predictions
We are going to adapt the code we used to make Google Translate API requests so we can make intent prediction requests.
One big difference between the two API services is that we need to make HTTP POST requests instead of simpler HTTP GET requests.
Let’s see how that changes our code and learn a bit more about HTTP in the process.
function fetchPrediction(question = "who is the boss?"){

  TEXT = encodeURI(TEXT);

  console.log(TEXT);

  var url = "http://api.yourdomain.com/predict";

   var options = {
    "method" : "POST",
    "contentType" : "application/x-www-form-urlencoded",
    "payload" : TEXT,
    'muteHttpExceptions': true
  };

  var response = UrlFetchApp.fetch(url, options);

  var json = response.getContentText();

  //console.log(json);

  prediction = JSON.parse(json);

  //console.log(prediction);

  console.log(prediction["Category0_predictions"]);

  return prediction["Category0_predictions"];

}
The function fetchPrediction calls the API service we created and returns the predicted intent. It basically reproduces the equivalent of the curl call we made Colab, but in Apps Script.
I highlighted some key changes in the code. Let’s review them.
One key difference between GET and POST requests is that in GET requests the data is passed in the URL as parameters.
In POST requests, the data is passed inside the body of the request.
We need to format the data before we pass it in the body and we need to set the correct content type so the server knows how to decode it.
This line encodes the question we are passing.
TEXT = encodeURI(TEXT);This is an example of what the encoded TEXT looks like.
Questions=label%20generatorThe correct content type for this encoding is application/x-www-form-urlencoded. This is recommended encoding for HTML form data.
We create an options data structure where we specify these settings and the correct request type and we are set to go.
Select the function fetchPrediction from the pull-down and click on the run button.
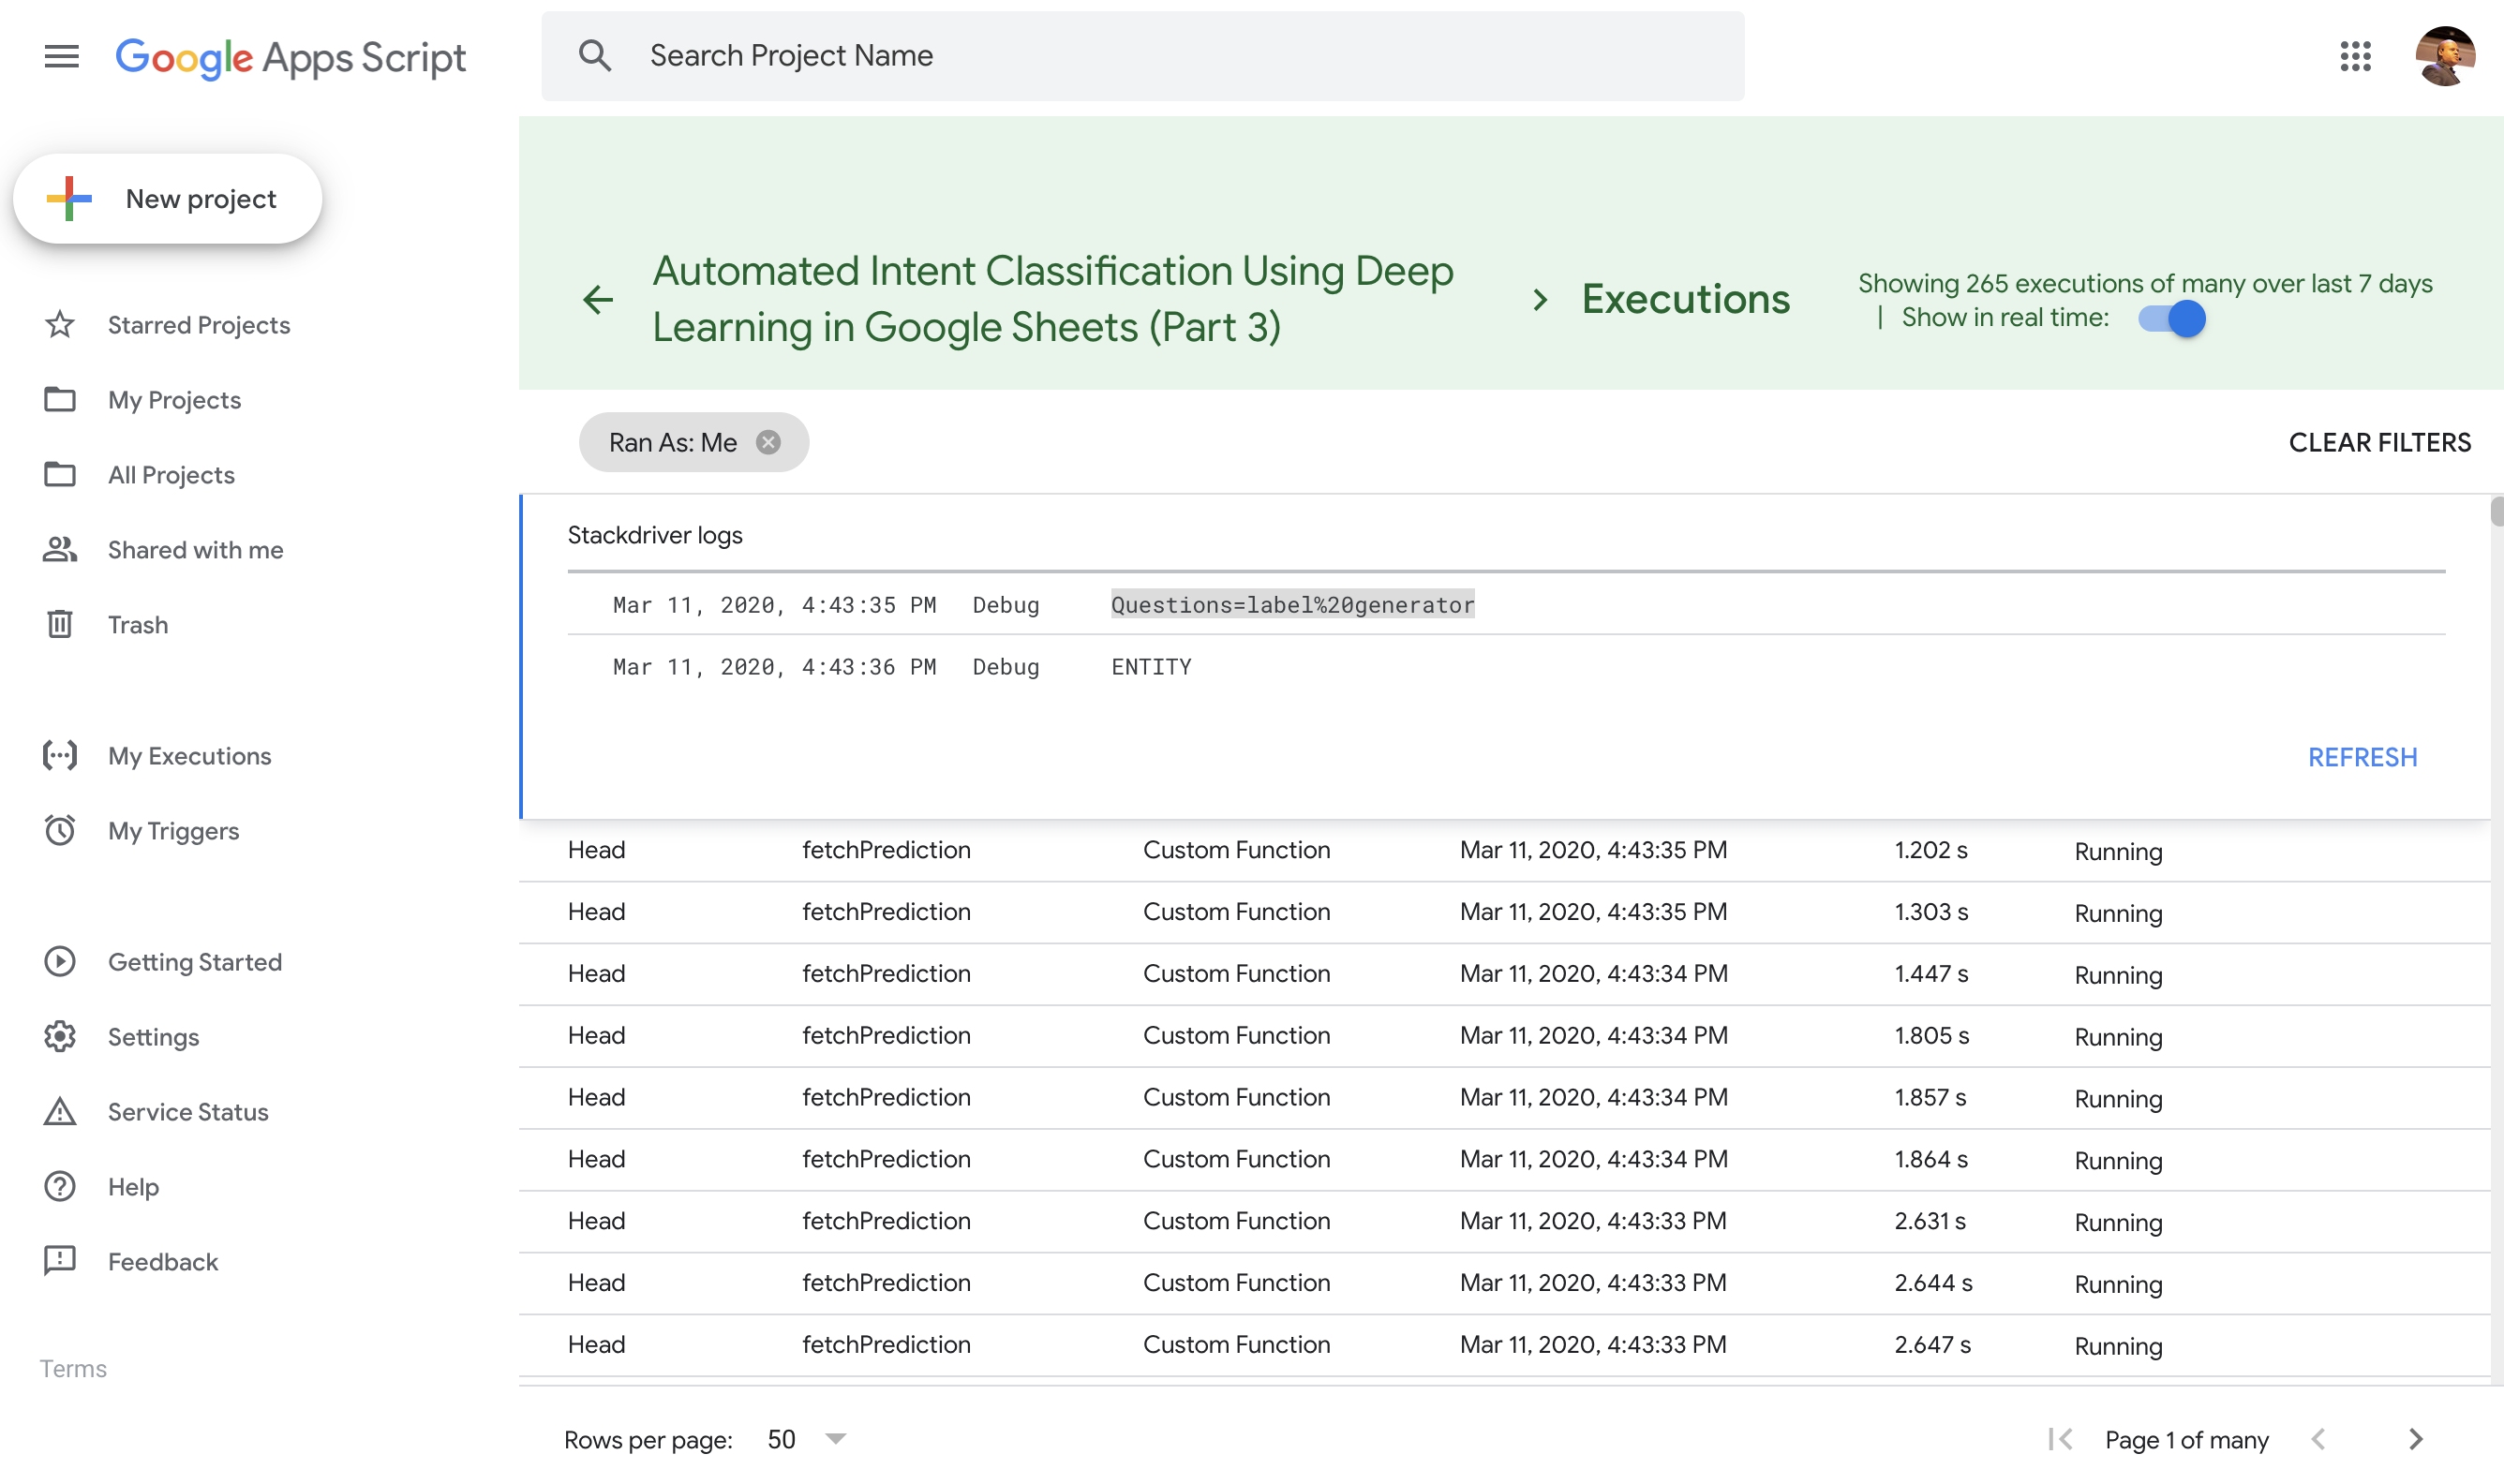
You should see the encoded input and predicted intent in the logs.
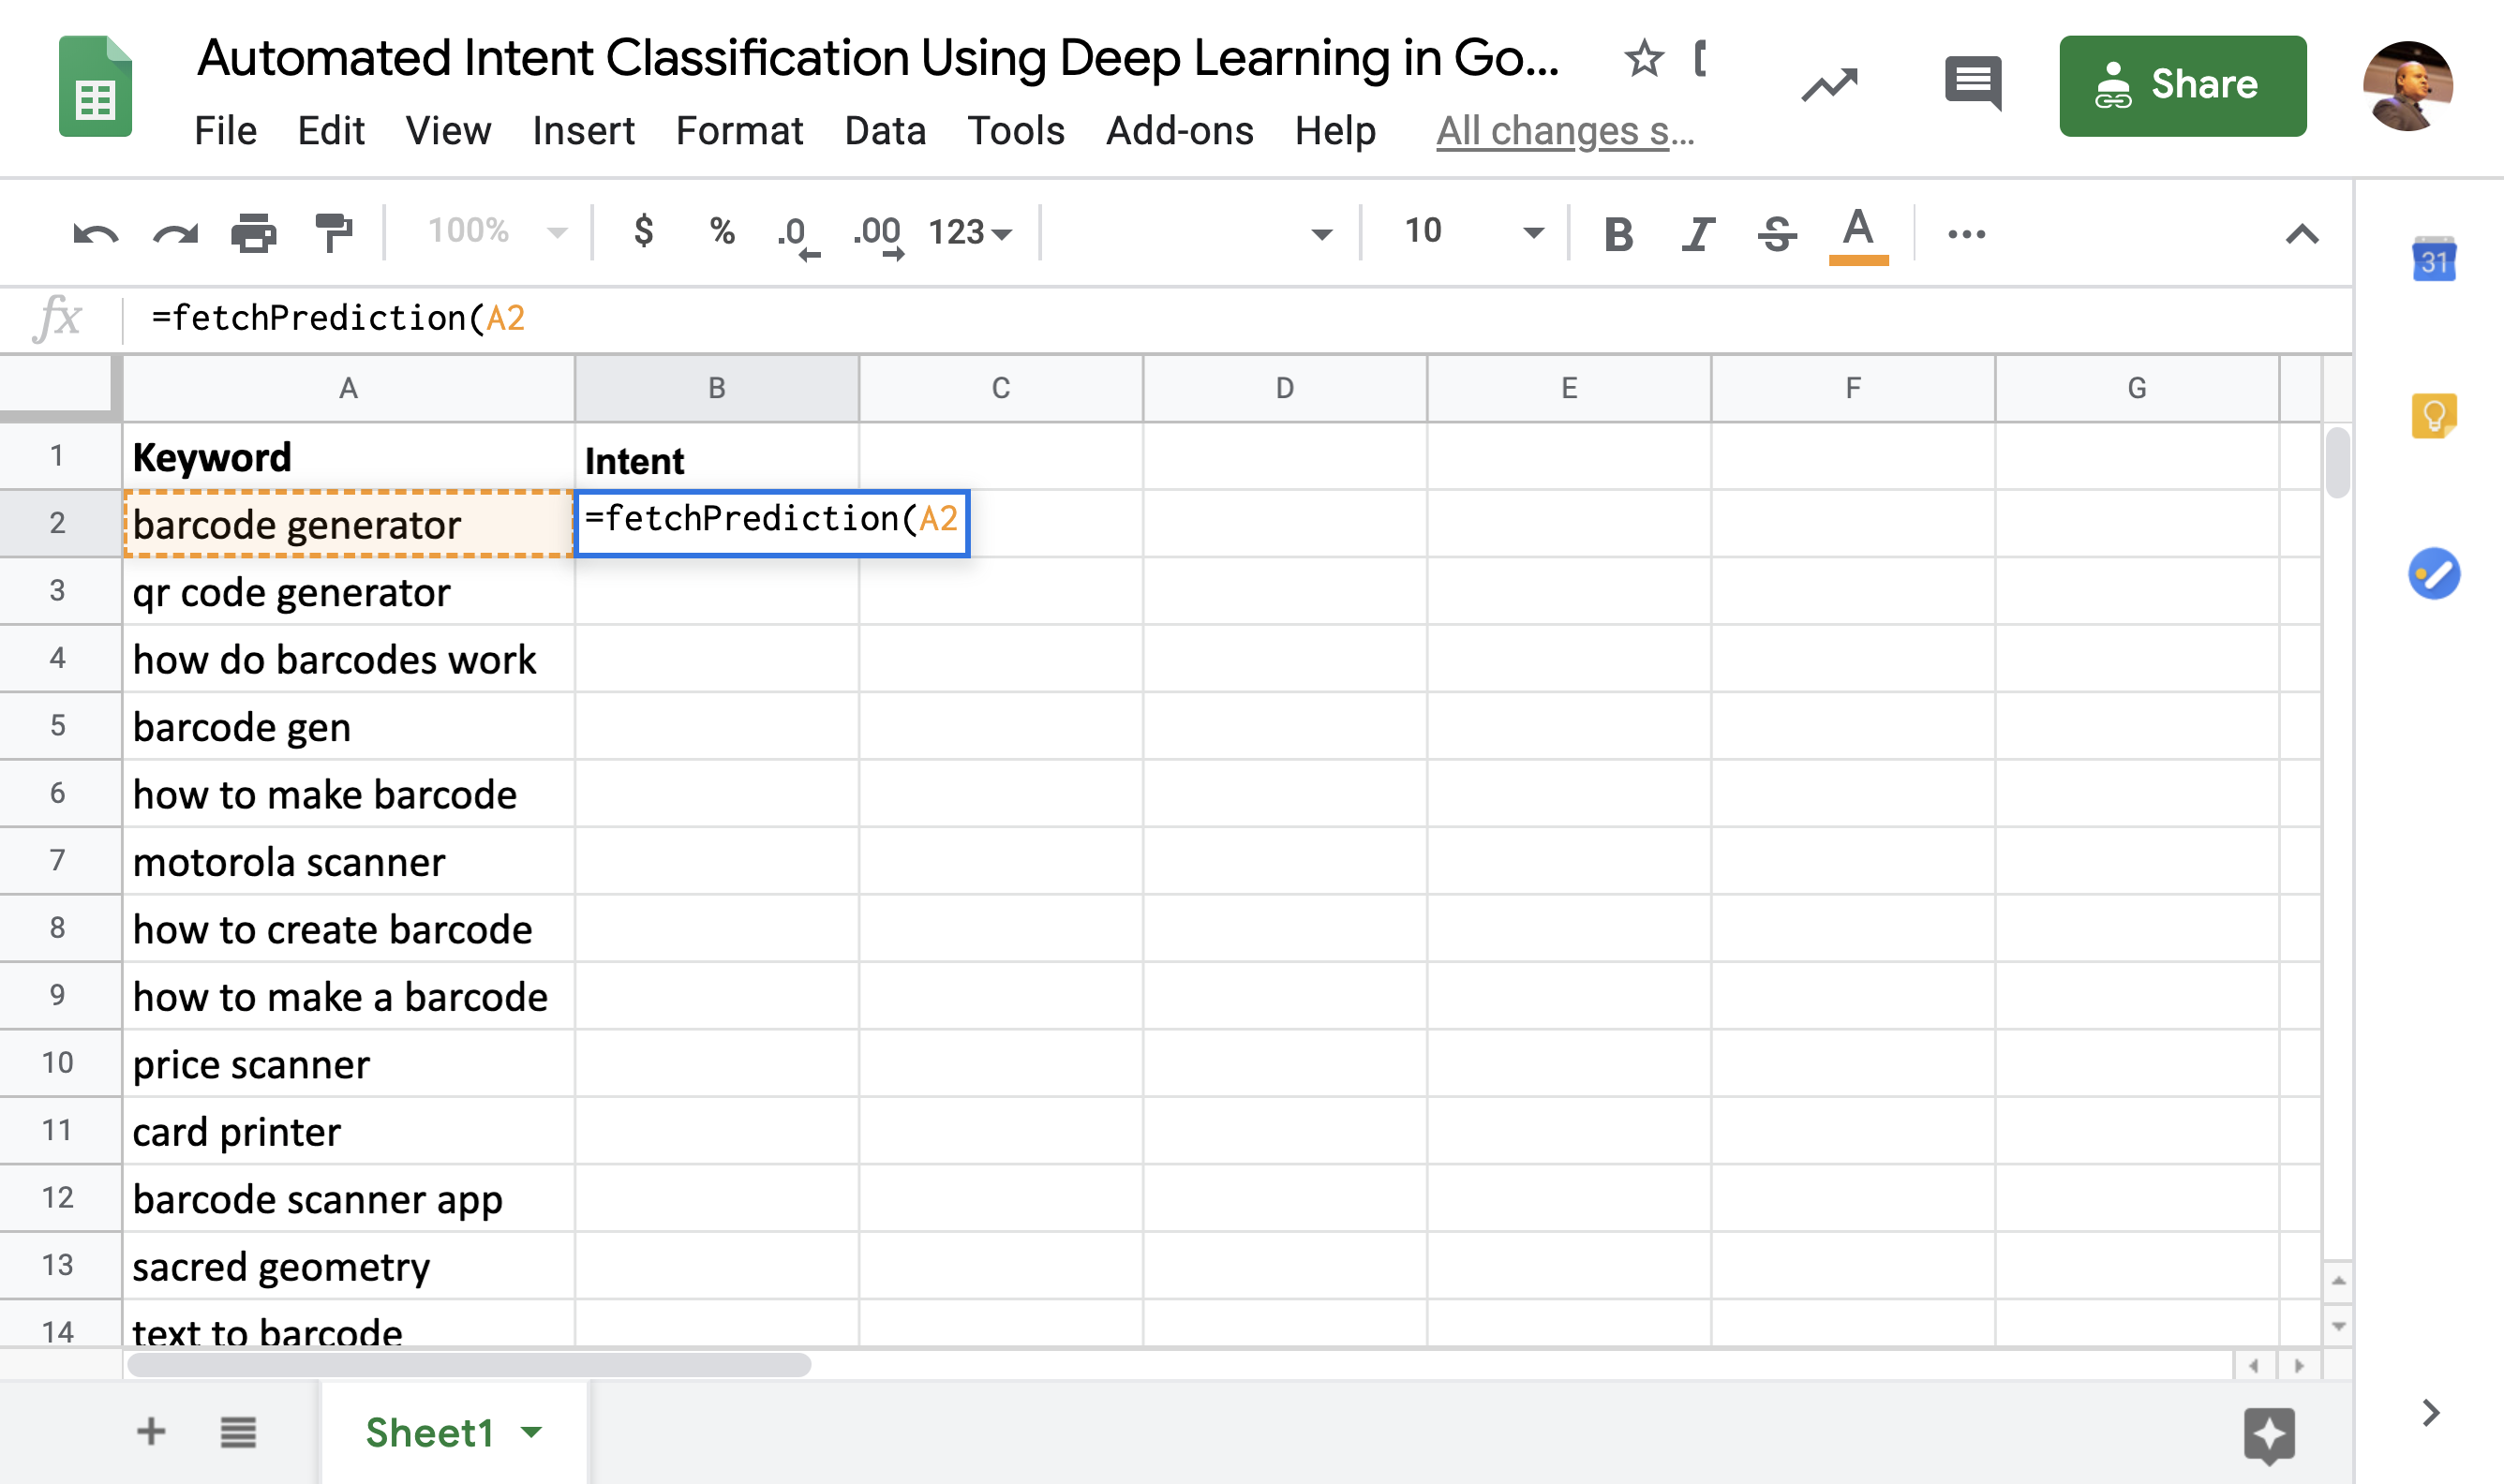
How do we get the intentions for all the keywords in the sheet?
You might be thinking we will create another function that will read the keywords in a loop and populate the intentions. Not at all!
We can simply call this function by name directly from the sheet! How cool is that?
Resources to Learn More
Combining simple App Script functions with powerful API backends that you can code in any language opens the doors to infinite productivity hacks.
Here are some of the resources I read while putting this together.
- Apps Script Tutorial
- Apps Script Quickstart
- Custom functions
- Apps Script Codelab
- Populating data from an API
- Translate text Codelab
- Batch updates in Google Sheets
Finally, let me highlight a very important and valuable project that JR Oakes started.

It is an awesome repository for Python and JavaScript projects from the coders in the SEO community. I plan to find time to upload my code snippets, please make sure to contribute yours.
For some reason, this non-issue keeps popping up in my Twitter feed. I will leave this tweet here as a friendly reminder. ✌️
Just a friendly reminder. #SEOs that code are in no way “better” than non-coders. The smartest #SEOs that I know👇🏼collaborate brilliantly with coders. Effective communication is an incredibly valuable and hard to gain skill. We should welcome diverse skills in our community. 💪🏼 https://t.co/wvYqxc2sNI
— Hamlet 🇩🇴 🇺🇸 (@hamletbatista) March 10, 2020
More Resources:
- Automated Intent Classification Using Deep Learning
- Automated Intent Classification Using Deep Learning (Part 2)
- 6 SEO Tasks to Automate with Python
Image Credits
All screenshots taken by author, March 2020
