

Easily one of the worst jobs in SEO is the link clean-up and disavow process. Removing links is one of those tasks that seems almost counter-intuitive and to make matters worse it’s caused by one of two situations:
- Poor link building practices were performed at some point costing either energy or money, and now all that work needs further energy or money to undo, or
- Someone (likely a competitor) is building bad links to the site in hopes that it will incur a penalty.
Knowing which of these two situations has occurred will significant speed up the process of dealing with the backlinks. Further, the difference between being preventative or reactive is also significant.
But first let’s answer a question many of you are likely thinking:
“I heard that with Penguin 4, Google doesn’t penalize links but just devalues those it doesn’t like. Why would I need a disavow file at all?”
Well here’s specifically what Google’s Gary Illyes from Google has written in response to the question from Search Engine Roundtable’s Barry Schwartz on the topic:
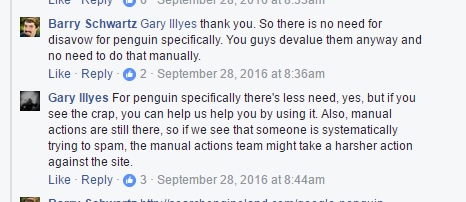
So there’s two specific points here worth noting:
- Manual actions are still in play and you can get hit with an unnatural links penalty.
- There are other algorithms and algorithmic functions outside Penguin. While Penguin devalues spam rather than demoting the site there is no claim that spammy links won’t hurt you in these other areas.
John Mueller cleared things up a bit in a Hangout when he stated:
“So, I’d say the largest majority of the websites don’t need to do anything with the disavow. Because like you said, we were able to pick up the normal issues anyway and we can take care of that. And if you do know that your SEO in the past has done some shady things with links or previous SEO or someone else, then of course doing the disavow is a good way to to kind of make sure you could you can sleep at night and don’t have to worry that Google is maybe interpreting those links in a way that you didn’t want.
I mean that the normal small business website out there they don’t need to do anything with the disavow tool. That’s also why that the tool isn’t tied in with the normal the rest of search console. It’s kind of a separate tool on its own. It’s really something that you only really need to do if you’re aware of of issues around links to your site.”
So – if you know you have link issues do a disavow. But how?
I’m going to warn readers that I’m not a huge fan of shortcuts in this area. I definitely love to use technology to its maximum potential in data collection but at this time I have not found any tool that I trust to do the analysis for me.
Why I warn readers of this is that this means following my advice won’t simply mean, “Run this tool and submit the file it outputs.”
No.
We’re going to pull data on backlinks and manually review them with only one exception. Let’s look at that first.
Situation 1: A Spammy Link Builder Has Built Known Spammy Links
This is an ideal situation: you or your client has paid a spammy link builder and that link builder has provided a list to your or your client as to where those links can be found.
In this case there’s no investigation necessary – disavow them all.
If this is where you’re at simply take the list and jump to Step Five below.
Situation 2: Negative SEO
Dealing with a negative SEO attack caught early is straightforward but more time consuming than Situation 1. You’ll know a negative attack by a backlink growth graph that looks something like:

The advantage to a link analysis under a negative attack is that there will be telltale signs that indicates when it occurred. It is this that eases the pain of dealing with it.
In the case of negative SEO, we don’t need to review every single link the site has ever acquired but rather just those links built during a particular time frame.
For instance, in the illustration above I’d want to look at everything from November 1, 2015 to the end of July 2016. That’s still a lot of links but a lot better than “all”.
Situation 3: Past Spam
The least fortunate scenario is faced when you know you have bad links but you’re not sure when they were built. If there’s no noticeable spike in backlinks as in the chart above and no reporting on link building but you can see those tell-tale bookmark and forum links, some crappy blog network links, etc. you’re faced with essentially having to perform a full backlink audit. That means pulling as much backlink data as you can and analyzing it all.
Now let’s step away from the cause of the links and take a brief look at what you’re really trying to address.
Manual Action, Algorithmic Slap, or Preventative Measures
There are basically three scenarios you may find yourself in that result in a backlink audit and disavow creation, each with an approach to go with it. They are:
1. Manual Action
If you find yourself with a notice in your Search Console that you got a manual action due to unnatural links, the approach is probably the most straightforward:
Burn everything and salt the earth.
In this scenario, anything that might even “kind” of look questionable, whether it’s legitimate or not, needs to be removed and that which can’t needs to be disavowed.
2. Algorithmic Slap
In this scenario a disavow will do (i.e., no need for a link removal) however the approach will be similar in regards to filtering the links.
Depending on the severity of the impact to your business you may wish to leave legitimate but questionable-looking links in the mix and remove them in a second round if the first fails.
In most cases, however, a full removal of anything that might even appear like spam is recommended.
3. Preventative
In this event, you aren’t looking for questionable links, just bad ones.
If anything appears in your backlink profile that could clearly be perceived as spam (scraper sites, negative SEO efforts, etc.) then they’ll be added to the disavow file but only those links that are specifically bad (and you’ll know them when you see them).
So, how do you prepare your lists and what do you do with them?
Step 1: Collect Your Data
The more backlink sources you have access to and the more filters those sources have, the better. The most obvious and universal backlink data source will be the Search Console.
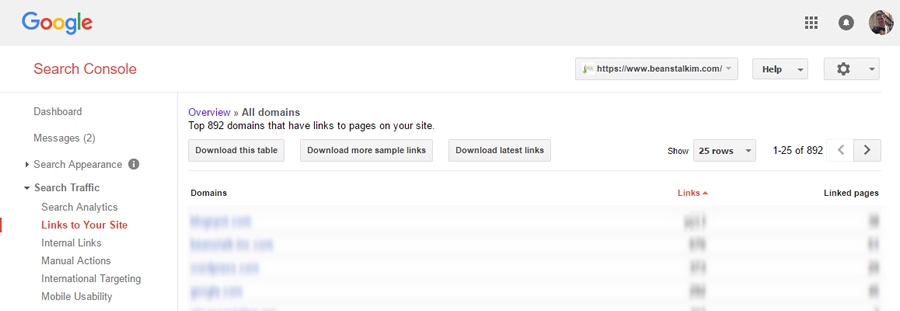
If you are up against a time-based issue such as a negative SEO attack as referenced above, the “Download latest links” option is the most helpful as it includes the date that each link in the list was found. Downloading both provides a more robust list.
If you’re dealing with a non-time-based issue or are up against a penalty and need to be thorough, download both and start an Excel document of just the link URLs stripping out any other data.
On top of that I always download from at least two, if not more, additional backlink sources from among Ahrefs, Majestic, Moz, and a host of others.
If you have a penalty it’s worth investing in purchasing access if only for a month to make sure you’re being thorough. Google has said that if you have a manual action penalty the links causing it will be in the list you can download from them. I have personally experienced a case where I submitted a reconsideration request and had it denied with the sample link given being one not included in those downloads so don’t count on it.
When you’re downloading your data also pay close attention to the automatic filtering. Ahrefs, for example, groups similar links by default. If you’re doing a backlink audit, you want to see them all so be sure to select “All links”.
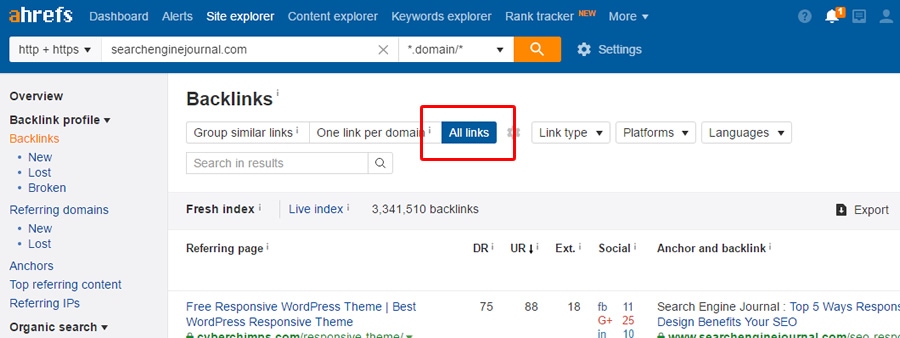
Download from all sources and add just the linking URLs to the previously made Excel document.
The next step is simply to click “Data” and then “Remove Duplicates.” You’ve pulled links from multiple sources and put them all together so you’re bound to have many. Once that’s done, copy the remaining links to a notepad document and save it somewhere handy.
Step 2: Process the Links
Hopefully, you don’t think I’d leave you to go through the links one-by-one. Now it’s time to download (if you don’t own it) URL Profiler. They have a 14-day free trial, so if you’re in a one-off scenario you may be able to get away with just using that.
When you launch URL Profiler, you’ll be presented with:
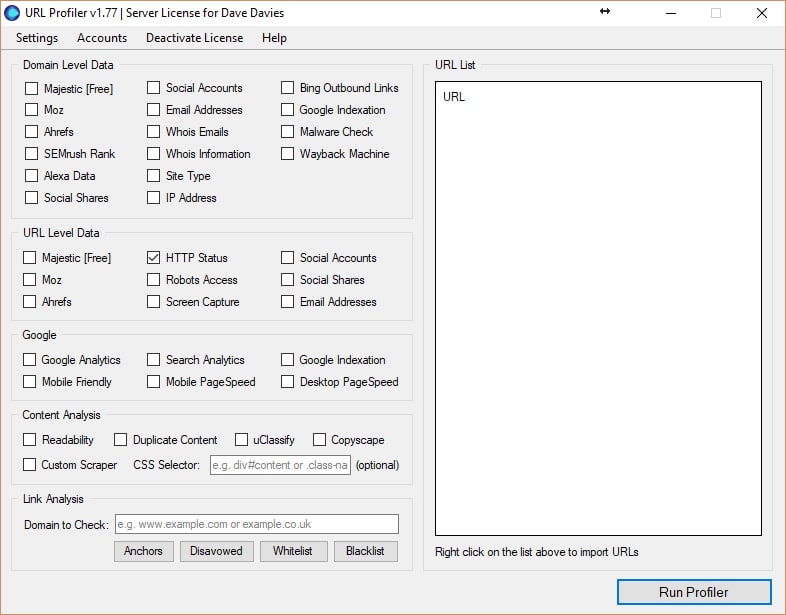
Which boxes you select will depend on the data you want and the services you subscribe to. You get 500 calls each of Moz and Majestic data per day but that increases with their paid subscriptions (even trials) if you have a lot of links to power through.
I tend to pull:
Domain-level Data
- Majestic
- Moz
- Ahrefs
- Social Shares
- Email Addresses (if dealing with a manual penalty)
- Whois Emails (if dealing with a manual penalty)
- Site Type
- IP Address
URL-level Data
- Majestic
- Moz
- Ahrefs
- HTTP Status
- Social Shares
In the Link Analysis section, you will enter your domain. This will tell the software to look for links to your domain on the pages and pull data related to them. It would them look something like:
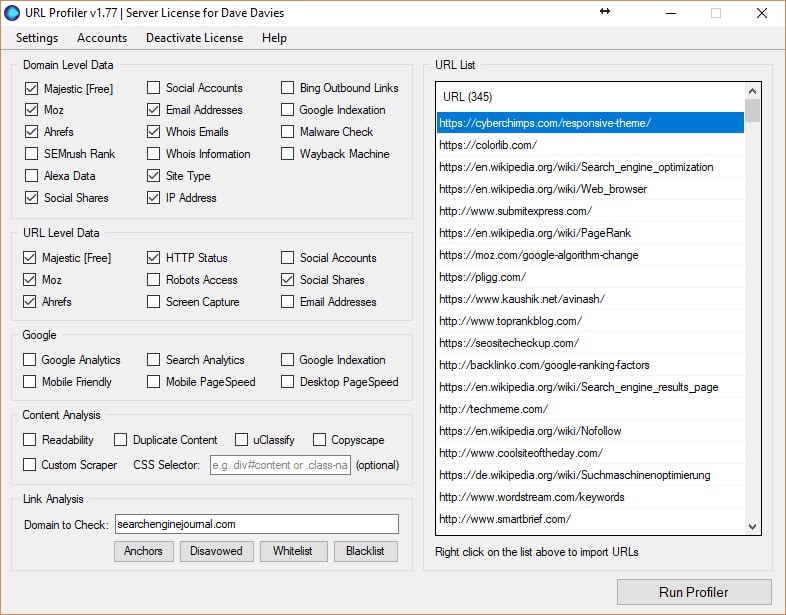
After that, just click “Run Profiler”. If you have a large backlink list and not a ton of RAM you’ll want to start this crawler right before heading home (perhaps for the weekend).
Once it’s finished you’ll be provided a spreadsheet with a large number of tabs. The software has attempted to grade the links for you and separate them into groups like so:
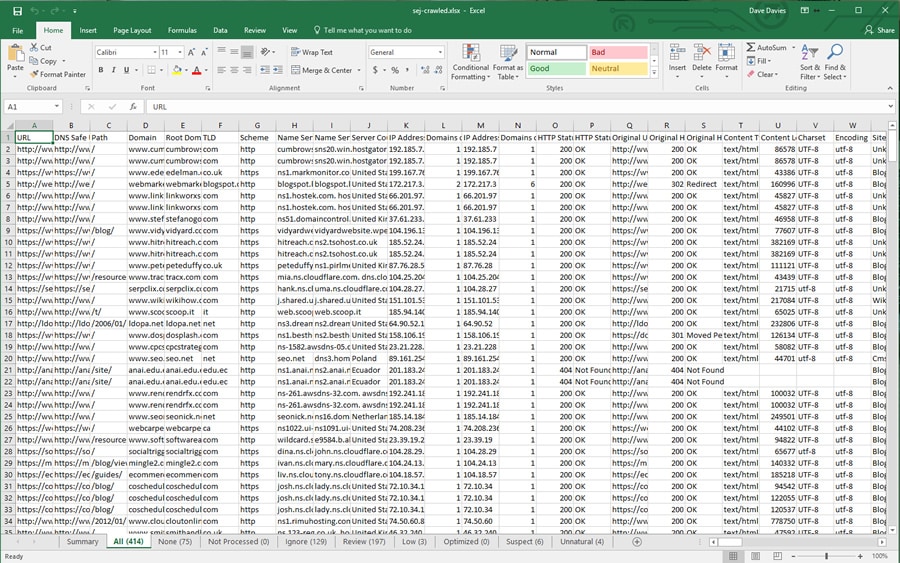
The first thing I tend to do is delete all the tabs but the “All” tab. I like to make my own decisions about something as important as my backlinks.
The “All” tab will contain a number of columns based on which fields you’ve elected to gather in your crawl. You’ll now want to remove all those that aren’t relevant to your specific needs.
You’ll want to consider the value of each yourself but 9 times out of 10 I’m left with:
- URL – obviously important.
- Server Country – can provide trustability signals.
- IP Address – can assist in sorting which domains are grouped on the same servers (read: bad blog networks).
- Domains On IP – can aid in grouping site that are on the same servers.
- HTTP Status Code – used for filtering links from pages that don’t exist.
- HTTP Status (if you don’t know your codes) – used for filtering links from pages that don’t exist.
- Site Type – can provide trustability signals.
- Link Status – used for filtering out links that no longer exist.
- Link Score – can provide trustability signals. This is a URL Profiler metric and not perfect by any means but one additional way to sort data.
- Target URL – good for sorting and understanding anchor text or penalty impact points.
- Anchor Text – good for sorting and understanding anchor text or penalty impact points.
- Link Type – good for sorting and can provide trustability signals.
- Link Location – good for sorting and can provide trustability signals.
- Rel Nofollow – important for filtering out nofollow links.
- Domain Majestic CitationFlow – can provide trustability signals.
- Domain Majestic TrustFlow – can provide trustability signals.
- Domain Mozscape Domain Authority – can provide trustability signals.
- Domain Mozscape Page Authority – can provide trustability signals.
- Domain Mozscape MozRank – can provide trustability signals.
- Domain Mozscape MozTrust – can provide trustability signals.
- Domain Ahrefs Rank – can provide trustability signals.
- Domain Ahrefs Backlinks – can provide trustability signals.
- URL Majestic CitationFlow – can provide trustability signals.
- URL Majestic TrustFlow – can provide trustability signals.
- URL Mozscape Page Authority – can provide trustability signals.
- URL Mozscape MozRank – can provide trustability signals.
- URL Mozscape MozTrust – can provide trustability signals.
- URL Ahrefs Rank – can provide trustability signals.
- URL Google Plus Ones – can provide trustability signals.
- URL Facebook Likes – can provide trustability signals.
- URL Facebook Shares – can provide trustability signals.
- URL Facebook Comments – can provide trustability signals.
- URL Facebook Total – can provide trustability signals.
- URL LinkedIn Shares – can provide trustability signals.
- URL Pinterest Pins – can provide trustability signals.
- URL Total Shares – can provide trustability signals.
Step 3: Review the Links
Now that we’re down to a single “All” tab, it’s time to start putting those links into our own groups. Essentially step 1 of this stage is to eliminate any links that we don’t need to review.
The first three tabs I create and move links to are:
- Tab “nopage” – The first step in this part of the process is to take out all the URLs that no longer exist. If you’re pulling full historic backlink data, this can be a huge number and that is why we left in the HTTP status. Sort by the code and if it’s not a 200 move it to the “nopage” tab. Worth noting – if you’re dealing with a penalty the software can give a non-200 code for pages that actually exist (rarely but it happens) so in that event you may want to pull out all the lines with a non-200 and re-run the tool for them for good measure but in most cases it’s not necessary.
- Tab “nolink” – The next step is to sort the remaining data by the column “Link Status.” Move all the rows with “Not Found” in this column to the tab “nolink” as no link was found on that page. This generally means the link was removed at some point in time. Again, if you’re including older data, this can be significant.
- Tab “nofollow” – Finally (for this stage) we sort by the “Rel Nofollow” column and move all the data with a “yes” over into the “nofollow” tab. As a nofollow link won’t be delivering a penalty it’s good to remove them so you’re not wasting time reviewing them. If you feel uncomfortable with this step and want to review your nofollow links you are welcome to. However, of all the link issues I’ve repaired I’ve never had a manual reconsideration denied or algorithmic penalty maintained based on the presence of nofollow links.
After this is done, it’s time to manually review the links.
I can’t cover every possible way to sort the links as that depends a lot on the issue you’re facing and the types of links you’re looking for. However, there are some tricks that dramatically speed up the process of going through them.
Here are some core techniques:
- Sort the links by Domain Authority and move all the links from sites with a 30 or more into their own tab. Then sort this data by Ahrefs Rank or Majectic Citation Flow and pull all the links with a 30 or above into yet another tab. Those with a Domain Authority above 30 but a secondary rating below 30 should be moved back to your “All” tab for further investigation. You can now go through the newly created 30+/30+ tab of data knowing two sources rate the link decently well. With these, I tend to sort them by anchor text, Target URL, and perhaps one or two more columns like total shares. Scan quickly for obvious problems and you may find a few which you’ll move to a “disavow” tab but for the most part these should prove fine. You can now rename this tab “good” and move any new good link there.
- Sort the links by Domains on IP, Then IP and then by URL. Doing this will quickly group together links from sites on the same IP address and help you quickly isolate poorly setup blog networks and other similar issues. Take any of those out and put them in your “disavow” tab.
- Sort the links by Site Type and then by one of the quality metrics like DA. This will allow you to quickly sort the different types of links (blog, article, directory, etc.) and order by likely weight. You can then scan the domains which can often be a dead giveaway to move them to a disavow, anchor text, etc. or just visit the pages if necessary. Even if you have to visit them – knowing the site type will group together what you’re about to have to sort through and making digesting the data far faster.
- Sort by target URL and then anchor text. Sorting your links in this manner groups the pages together and makes obvious any anchor text spam directed at any one of them. You may want to be careful here as some may be legitimate but again – you’ll know specifically what you’re looking for when you visit each one or at least the ones that aren’t obviously spam.
There are endless other sorting techniques but each situation is unique.
Simply consider what metrics make sense for the sites linking to you to have.
Should they have a lot of social shares? Then sort by that.
Should they be on sites with a lot of backlinks? Then sort by that or use that as a reinforcement metric like one might with DA or TrustRank.
Once you’ve moved all the links into tabs – you’ve got your good links in one tab and your disavow links in another – it’s time to go to step four if you’re dealing with a manual penalty or step five if you’re not.
Step 4: Request the Links Be Removed
With a manual action it’s important to really show that you’ve put in the work to remedy the situation. You will want to send three (that’s right … three) separate link removal requests. This will be a fairly nicely worded letter to the domain owner of the site your link is on (why we included those emails in our URL Profiler crawl above), simply noting the issue you’re dealing with and asking that they kindly remove the link so you don’t have to include them in the disavow file.
They may request a payment. If the fee is small I don’t view it as extortion, I view it as compensation for their time.
The webmaster now needs to do something for you that you or someone working for you may have requested they do in the first place. I charge for my time so I don’t blame them. If they want $5 or $10 to remove the link go for it – anything more than that I tend not to and just include them in the disavow list.
Clearly document the dates the emails were sent out. You can use email software or send them out one-by-one… that really doesn’t matter. They should be spaced out by about one to two weeks allowing time for reply.
A week after the third is sent out, you can run all the linking URLs from your “disavow” tab through the URL Profiler again, though this time, you just need to enter your domain and look for the links that remain.
Step 5: Create Your Disavow File
You can go one of two routes on this – disavow the links or the domains. I lean toward disavowing the domains just in case some tag page of a blog didn’t show up in the crawls yet but the link is there.
If you only disavow the URLs this link would still get counted. If you want to quickly and easily turn your list of links from your disavow tab into a list of domains simply follow these steps:
- Copy all the linking pages into a notepad.
- Find and replace http:// with nothing (to remove it).
- Find and replace https:// with noting (to remove it).
- Find and replace www. with noting (to remove it).
- Find and replace / with , (changing slashes to commas).
- Save this to your desktop as working.csv.
- Open the file with Excel.
- You’ll find the entire first column is now just your domains.
- Paste the entire column into a new tab in the B column.
- To eliminate any duplication go to Data and “Remove Duplicates.”
- Fill the entire column A with “domain:”.
- Copy columns A and B to a new notepad doc.
- Find and replace a space with nothing (to remove empty space).
Basically now you’ve got your disavow file ready. All that’s left is to add something to the first row that reads something like:
#The following domains were found in either Search Console, Ahrefs, Majestic SEO, and/or Moz. All the domains below have or do currently link to the mydomain.com domain but are undesirable. Those that still link were contacted on July 21, 2017, August 7, 2017, and August 14, 2017 with a request to remove them but have not.
(The last sentence is really only necessary if you’re up against a manual action.)
Step 6: Submit Your Disavow File
The only remaining step is to submit the disavow file you’ve just created. Doing so is done via the Search Console but Google keeps it outside the links in the system because it’s a dangerous tool to play with if you don’t know what you’re doing.
You’ll find the disavow submission page here.
If you have a manual action you will also need to create a reconsideration request. This is basically a document where you get to outline specifically what happened (be honest – they already know) and ask (beg?) for forgiveness.
Here’s a basic copy of one I have used that worked successfully and is A-typical of the ones I have found work:
On June 1, 2017 mydomain.com received an unnatural links notice.
Our first step was to go through the arduous process of sending out link removal requests.
To this end, we pulled backlink data from Search Console, Moz, Ahrefs, and Majestic. We filtered and reviewed all these links which left us with 22,251 links to address from 1,209 domains. After three full rounds of link removals we have been left with 2,344 links from 570 domains.
We have left all the domains on the disavow list to make sure they are purged from Google’s side prior to being removed from ours.The sample list we were given as examples makes great sense. They were:
The sample list we were given as examples makes great sense. They were:
- http://www.sample1.com
- http://www.sample2.com
- http://www.sample3.com
Clearly mass article syndication was used as a link strategy in the past. Unfortunately, the logins were not available to remove them directly and they did not remove them at our request. Requests for removal were sent out on:
- July 21, 2017
- August 7, 2017
- August 14, 2017
Links were verified before each new round of requests to make sure that we weren’t re-contacting people who had removed the links. We spent $60 for sites that required what we could consider a reasonable fee for the time it would take to remove.
The data we used for the link removals has been uploaded into Google Drive and is available to you at https://www.google.com/drive/
The spreadsheet contains 3 tabs:
- The remaining links
- The links that were pulled at the beginning
- The domains we started with
We have done everything I believe we can do to remove the links that are potentially violating Google’s Guidelines and have disavowed all that remain. We hope you agree.
Regards and thank you sincerely for your “reconsideration”.
Dave Davies
For MyDomain.com
We submitted this reconsideration with the spreadsheet noted (not the one used to create the disavow but the one referenced in the letter above) and it was accepted days later.
I should note – the dates and domains in this letter have been changed to protect the client but the link volume and violation cause were left in as an example.
So That’s How You Do It
So that’s how to successfully analyze your backlinks as quickly as possible while remaining accurate and creating and submitting a disavow file.
It can be a painfully slow process. I know – I’ve had to do them for sites that had literally millions of links, but if I look at the cost of a week’s worth of work (about what that job took) vs the cost of getting or keeping a penalty… a great payoff and few of us have that kind of link volume.
If you’re lucky, you may never need to create a disavow file and if you catch a negative SEO attack early, you’ll likely have some easy links to sort through. But even in the worst of cases, if done in an organized and logical fashion, the process can go quickly, smoothly and – most importantly – effectively.
- Related reading: SEJ’s Illustrated Guide to Link Building
Image Credits
Featured Image: Created by Dave Davies via Adobe Stock.
In-post Images: Screenshots by Dave Davies. Taken September 2017.
