


What makes a user experience fantastic?
Simply put, in order to make a fantastic user experience, the user has to be able to accomplish their goal(s) on your website.
Looking at the bigger picture, if you want to make your customers’ goals more achievable on your website, you need to get to know your customers. The more you get to know your users and their goals, the easier it will be to make the necessary changes to your website in order support their needs.
Now you’re wondering, “How do I find out what those goals are?”
Keep reading…
Requirements
A requirement explains what your product is supposed to do or characteristics of your product. In order for requirements to be useful, they can’t obscure. Requirements should be clear and unambiguous as possible. An example of a requirement is “the circular, red button is used to turn the desktop monitor off.”
There are two types of requirements:
1. Functional Requirements
Functional requirements are used to further explain the functionality built into the product in order to help users achieve their goals. In other words, functional requirements explain exactly what the product does.
- Business rules
- Transaction corrections, adjustments
- Administrative functions
- Authentication
- Audit tracking
- External interfaces
- Certification requirements
- Reporting requirements
- Historical data
- Legal / Regulatory requirements
2. Non-Functional Requirements
Non-functional requirements are used to describe characteristics of a product, rather than what the product can do. Generally, non-functional requirements tend to end with “ity”, but not all.
- Scalability
- Capacity
- Availability
- Reliability
- Recoverability
- Maintainability
- Serviceability
- Security
- Regulatory
- Manageability
- Environmental
- Data Integrity
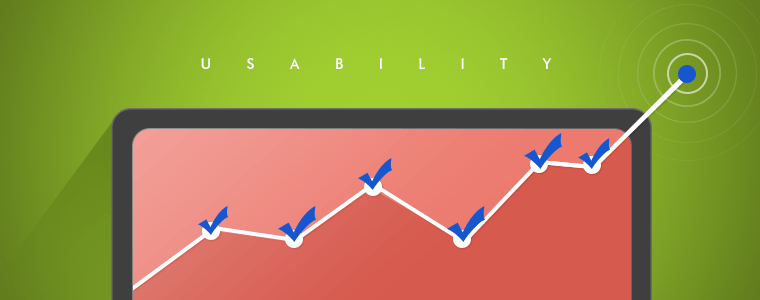
- Usability
- Interoperability
- Performance
Why This Process is Necessary
When the steps are listed, it might seem like a simple process. After all, there’re only three: 1. collect data, 2. analyze it, and 3. launch the changes to your site. Unfortunately, it’s not that easy.
User requirement gathering is a more difficult process. When framing a user requirement, you might feel a little wary about what the user wants. Collecting the data to back up or suspend any suspicions will ensure the requirements are necessary. Additionally, the requirements grow as more people interact with the prototype.
Step 1: Collect Data
During this step, instead of considering your users, consider your shareholders.
When it comes to creating functional requirements, you’ll want to keep your users in mind. However, when you’re creating non-functional requirements, opinions from the people who are actually investing in your company/product should be kept in mind.
Listed below are a few methods to keep in mind when gathering your data:
- Observation: Whether it’s direct or indirect, observing a user will provide information about how they navigate your website and which routes they take to accomplish their goal. Some companies use trained professionals to record different behaviors of the user that might show certain emotions.
- Surveys: Users tend to voice their opinions honestly with surveys (when they’re anonymous). With a survey, you’re able to take a more direct approach by asking specific questions.
- Focus Groups: When you’re looking to develop a general opinion while pointing out any problems, focus groups are your best option. This method brings both designers and shareholders together to express their opinions.
- Interviews: Interviewing is a great method to explore some data that you haven’t already collected. When creating requirements, introduce shareholders to developers and also include users.
- Researching Competitor’s Websites: By checking out your competitor’s website and what they have to offer, you’ll get an idea of what your future users might be looking for in a website. Also, by looking at a competitor’s website, you can also identify issues to avoid for your website.
Deciding which method to use can be difficult, but remember to choose the one that is best for your website. No one method is generally better than the other, but one specific method might be the best option for your needs. For example, since surveys take less time and attention, you’ll be able to reach a larger group. However, if you’re looking to use a method that’s more subjective, you’ll want to use interviews. Additionally, you don’t have to choose just one method. Using various methods will increase the flow of data which results in a clearer vision of your requirements.
Step 2: Analyze Data
Now that you’ve gathered all of that useful data, what do you do with it?
To avoid a large, jumbled mess, you’ll need to organize and categorize the data you’ve gathered. Not only will this make your life easier, it’ll show you the commonalities of the data that you should be focusing on.
Follow the steps below to analyze your data:
1. User Groups
Before you start analyzing the data, organize the users and group them together based on commonalities. The categories to focus on are personal, academic, and attitude. The personal category will include characteristics such as the age, gender, and nationality. The academic category focuses on characteristics such as experience, education, and profession. Lastly, the attitude category is pretty self-explanatory since it basically is asking “what type of attitude does your user have towards this website and experience?”
The best way to represent user groups is using a grid as shown below. The actual characteristics in the grid can be added or removed, depending on how much you think that they are beneficial to identify a user group.
2. Customer Personas
After you’ve built your user groups, the next step is to build a persona from each category of users. Using a persona instead of trying to consider each user in each group will simplify the process. When you’re building your persona, identify what their goals are when they’re using your website.
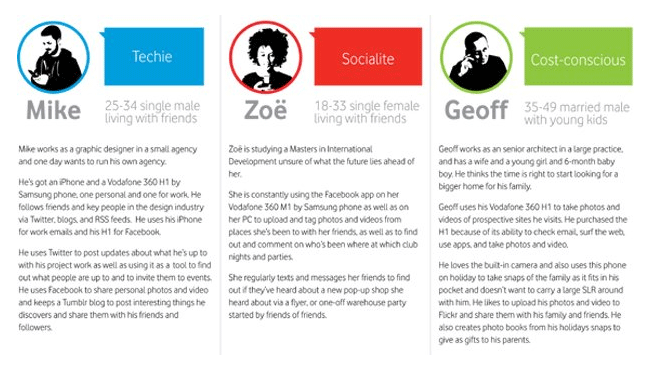 Image credit: Blog.kissmetrics.com. Used under license.
In the example above, the personas were built for users of the Vodafone 360 H1 by Samsung. The labels “Techie”, “Socialite”, and “Cost-conscious” are all used to identify the different user groups. When you create a persona, make sure to include details such as their hobbies and lifestyle.
Personas are used to discover information about your users that you might not have expected. Also, thinking about one user persona instead of an entire group of users will make the process much less confusing and easier to analyze.
While each company’s personas are bound to be different, they should at least include a name, image, demographic information, what they’re looking to accomplish, and a little about them as a person.
3. Situations
Now that you’ve created your customer personas, it is time to discover how they act in certain situations. Create these situations by listing certain tasks your persona will go through when they’re on your website. Once you list the task, place your persona in it to figure out how they will act.
Let’s take a customer persona and put them into a situation: With holiday season approaching us, Joanne (54 year-old teacher) has no idea what to buy for her mustang-enthusiast of a husband. However, she notices that one of the websites her husband buys mustang gear from has introduced a Holiday Gift Guide. This is an example of a specific scenario that you’ll be putting your persona through, but you’ll want to create many others for that one persona.
- Situation Example– “Jackie wants to fly to Århus next Thursday, returning on the last flight on Friday. She wants to know how much this would cost, and whether it would be cheaper to take a different flight back. She is not quite sure how Århus is spelt on the computer. When she has found the right flight, she wants to confirm the purchase with a credit card.” Source: usabilitynet.org
- Situation Example– “It is a busy morning with a long queue of telephone calls. John, who only started the job this week, takes a call from Mr. Jones, who says he still has not received goods he ordered three months ago. Mr Jones does not know his account number, but gives his name and address. John retrieves the account, and checks the status of the order. It shows that the goods were dispatched seven days ago. He informs Mr Jones that they should arrive shortly. He also notices an error in the post code for the address, which he corrects.” Source: usabilitynet.org
4. Analyze the Situation
The final step of this process is to define each task that your persona will be performing in order to accomplish the goal in the selected situation. In the table below, the function will be what your persona wants to accomplish, the task will be what they need to do in order to accomplish their goal, and the sub tasks are each task they need to perform so they can accomplish it.
One of the advantages of using a table like the one below is that you can reuse it for different situations and compare results. This table will help you to better understand exactly what your persona is going through when attempting to complete their goals.
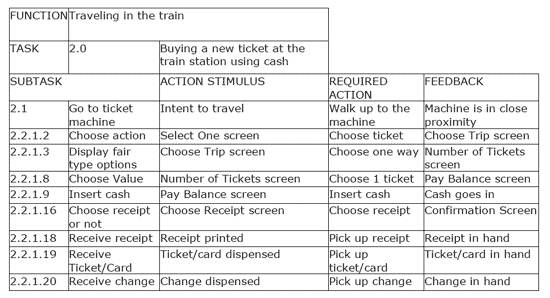 Image credit: Anyakogan.com. Used under license.
Step 3: Use the Information to Make Changes
Now that you understand the process of analyzing your data, we can use that data to improve your customers’ experiences.
To provide an example, let’s use CJ Pony Parts again. First, choose a user group: middle-aged men looking to buy a new part for their mustang. In the second step, I’ll identify our persona, Rick (Joanne’s mustang-enthusiast husband) as a 55 year-old male that enjoys entering his mustang in car shows. For the third step, I’ll come up with a situation in which Rick is searching for the part he’s been saving up for. For the final step, I’ll use the task analysis table to show which steps Rick has to take in order to purchase the new part for his mustang.
For this step, you should be examining each task in order to list the functional and non-functional requirements of the website. For example, if Rick is looking for a particular part, a navigational bar listing the category in which the item would belong to would be a functional requirement.
I recommend creating a versatile table for requesting functions. In the table, include sections such as: Requirement, Number, Explain the Requirement, Reasoning for Requirement, Criteria, and Urgency.
With the sections listed above, you’ll be able to easily use the table for various tasks, all while staying organized. Once you use that table for each task, you will have collected your functional and non-functional requirements.
Conclusion
Evaluating the experience of your users isn’t a simple process, especially when your website is complex. The steps provided should help simplify the process in order to provide your users with the best possible experience.
