


If you’re running Google AdWords campaigns, then you have probably heard of (and are hopefully using) ad extensions. If you aren’t familiar with them, you should be. Ad extensions enable you to enhance your paid search ads by connecting additional types of information, such as product information, addresses, click-to-call phone numbers, etc. Specifically in AdWords, you can utilize ad sitelinks extensions, location extensions, product extensions, and phone extensions. In addition, I covered Seller Rating Extensions in a previous post, where Google attaches a merchant star rating to your ads when you are eligible. For this post, I’m going to focus on location extensions, and more specially, how to filter and override your location extensions in AdWords.
Quick Introduction to Location Extensions
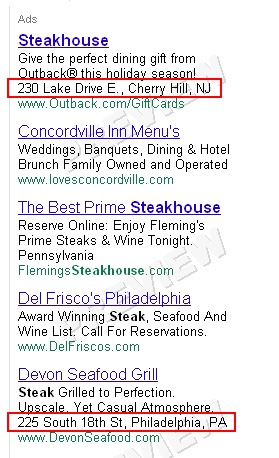
Locations Extensions enable you to attach business address information to your paid search ads. Google will attach your location “when users are interested in or physically near a particular geographic area.” That’s directly from the AdWords Help Center. If you’re a local business, then using location extensions is a great way to provide valuable location information directly in your paid search ads. Here’s a screenshot of location extensions in action:
There are a few ways that you can set up location extensions in AdWords. First, you can manually enter addresses that can be used in your ads. But as you can imagine, this can become tedious and time-consuming (especially if you have numerous campaigns set up). The other way to set up location extensions is to connect a Google Places account with your campaigns (and this is what I recommend doing). Then Google will leverage the listings in your Places account when attaching address information to your ads. This is a great way to go, since you can centrally manage your addresses, and those addresses will be part of a verified Places account. It’s a win-win.
Filtering Your Listings
For many businesses with single locations, you can simply connect your Places account with your campaigns and be good to go. Then, when your ads are eligible, Google will attach location information to your paid search ads (based on that one listing). That’s all fine and good, but what if you have several listings in your Places account? To make matters more complex, what if you have multiple listings across different lines of business?
For example, let’s say you owned a delicatessen and an Italian restaurant. Would you want both addresses to be available to show in your ads across campaigns? Can this type of mix-up even happen?? It can, and it might be happening to your ads right now. You can check impressions and clicks per location directly in AdWords if you are unsure. The core problem is that you might be connecting a Google Places account at the campaign level, and that campaign might have many ad groups that leverage that Places account. So, if the Google Places account has several business listings in it, then the address information from those listings is eligible to show in your ads (even if they are for different businesses). I’ve seen this problem during various SEM Audits I have completed. I don’t know about you, but I’m not sure someone looking for a pastrami on rye wants to follow the address for an Italian restaurant, right? You might get some unhappy visitors…
Filtering Your Google Places Feed in AdWords
One way to handle location issues in AdWords is to filter your Google Places listings within each campaign. This will enable you to select certain listings from your Google Places feed that can show in your ads, while ensuring other listings never get attached. Using this setup, and referencing our example from earlier, you can be sure that the address for your delicatessen will show versus the Italian restaurant you own.
Now that we’ve covered why you would need to filter Places listings in AdWords, I’m going to quickly walk you through how to do this in your campaigns:
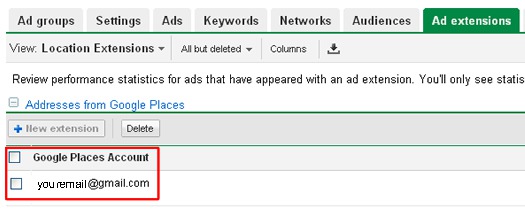
1. First, access the “Ad Extensions” tab for a specific campaign in your AdWords account. Then click “View” and “Location Extensions”:

2. Next, click the email address associated with your Google Places account (if you have already connected your Places account with your campaign). If you haven’t done this yet, you will need to associate your Places account with the campaign at hand. Then come back to these instructions.
3. Click the “Filter” checkbox, which will then display your options:

4. At this point, you can filter by Business Name, Category, or Country/Territory. Which one you choose depends on your specific business listings. For this example, let’s use “Business Name” and enter the exact name of the business listing you want to include in your ads. Note, you can set multiple restrictions per filter, if needed.
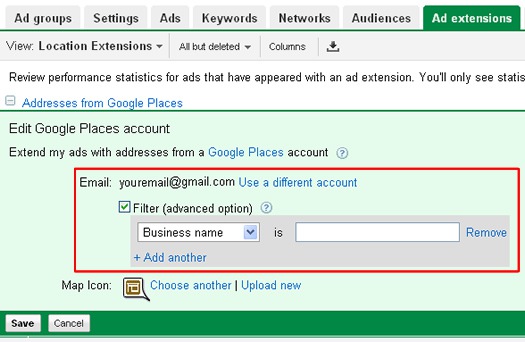
5. Then click “Save” to activate your filter.
Give AdWords a few minutes to synchronize with your Places account and then come back to the location extensions screen (via the Ad Extensions tab). Hit refresh to make sure you are seeing the latest data, and presto, you should see the one location listed below. Previously, you might have seen numerous locations listed. Now you can be sure that only specific locations will be attached to your ads. Awesome. 🙂
Note About Ad-level Extensions
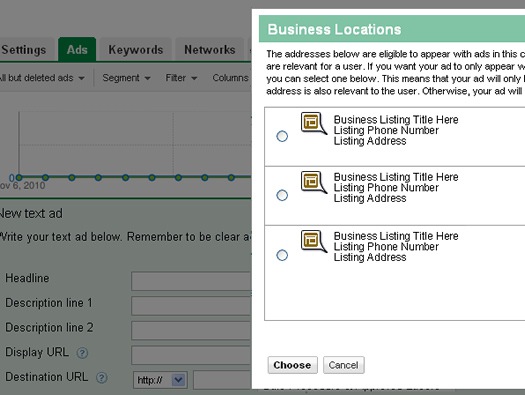
In addition to filtering your locations, you can also implement ad-level location extensions. This is when you would want to associate one location with one specific ad. For example, if you were running a specific promotion at a specific business location. Remember, filtering let’s you choose specific locations that apply at the campaign-level (and will be eligible for any ad groups within that campaign). In contrast, ad-level extensions let you attach one listing to one specific ad. This obviously gives you the most granular control over which location shows for an ad, but does come with some drawbacks (more on that soon). In order to implement ad-level location extensions, you could select a specific listing from the Places feed that is available at the campaign-level. You would complete this when creating or editing a specific ad (and not make any adjustments at the campaign-level like you did with filtering). Here is a screenshot of setting up an ad-level location extension.
Setting up ad-level location extensions in AdWords:
I won’t go into great detail about ad-level location extensions in this post, but there are a few important points to understand. First, when using ad-level location extensions, your ad will only show when the user is located close to the target area or if they are searching for a keyword along with a local qualifier. For example, someone searching for “deli in midtown manhattan”. Therefore, you can be limiting your impressions and subsequent clicks by using ad-level location extensions. Second, it’s extremely time-consuming to manually enter addresses per ad. Imagine having to set this up for dozens of ads (or more.) Then you would have to manage those ads over time. Therefore, unless you have a very specific situation where ad-level location extensions are needed, I recommend using the “filtering” approach that I detailed earlier.
Now that we’ve covered filtering locations and ad-level location extensions, here are some key takeaways from the post:
- If you haven’t connected your Google Places account with your campaigns, you should. It’s a great way to centrally manage your listings, while using a verified Places account.
- If you have multiple listings across various lines of business, then you can filter your locations per campaign in AdWords. This would enable you to use only selected listings for location extensions within that campaign.
- If you have a specific situation where ad-level location extensions are necessary, then you can set this up at the ad-level (and not at the campaign-level). For example, if you were running a specific promotion at a specific store and only wanted that location to show up in your ad. Other than unique situations like this, I recommend using the “filtering” approach.
Be Bold, Override Your Extensions
Location extensions can be powerful, but only if you are showing the right locations! If you have multiple listings in your Google Places account, and those listings are across various lines of business, then you might choose to override your listings. Using filtering or ad-level location extensions can help you tailor your ads in order to provide the right information to the right people at the right time. And that’s what paid search is all about.
