


In Reorganizing XML Sitemaps with Python for Fun & Profit, I covered how to reorganize XML sitemaps to isolate indexing problems.
Let’s say you followed that process and now you have dozens of important URLs that are not indexed and you need to understand, in aggregate, the main causes of your indexing issues.
In this column, we are going to learn something really exciting!
We will learn how to automate the Chrome browser, but more specifically, the URL Inspection Tool to check URLs in bulk and visualize any patterns affecting indexing.
The URL Inspection Tool has grown so powerful that it has become an indispensable tool for effective technical SEO work. The tool has five primary use cases and we will automate most of them in this article:
- Inspect an indexed URL.
- Inspect a live URL.
- View a rendered version of the page.
- Check HTTP response, page resources, and JavaScript messages.
- Request indexing for a URL.
There Is No URL Inspection Tool API
If you had tried to automate this tool, you were probably frustrated to learn that there is no API available.
So, how are we going to automate it with no API?
I’ll let you in on a powerful technique commonly used by software quality assurance teams: web browser automation.
Most professional web development shops run automated quality assurance tests in the web browser. They do this to make sure the software works as expected as it is getting built.
We will use browser automation tools and techniques but with the purpose of running our favorite new tool, the URL Inspection Tool, that doesn’t yet have an API.
Please note that Google has explicit terms banning automated queries, but their wording appears to be focused on Google searches as used by ranking trackers.
It is possible they won’t be happy with this technique so I recommend using it with extreme moderation.
In any case, it is not practical to check thousands or millions of URLs with this approach as you will learn below.
Overall Approach
We will connect our browser automation code to a running instance of the Chrome browser.
We will manually log in to Google Search Console in this instance. Once connected, we will direct the browser to open pages, click on page elements, extract content, etc.
The URL Inspection Tool is just one example I’m using to illustrate this powerful technique. You can literally automate any tool or task you regularly perform in a web browser.
Let’s have some fun!
Required Tools & Libraries
Python + JavaScript
I decided to write the content extraction code in JavaScript because it is a more appropriate language when it comes to DOM parsing and DOM navigation.
But, I’m writing the rest in Python as I still need to analyze and manipulate the data we’ll collect and Python is much better for that.
Getting Set Up
The magic in this article is possible thanks to the excellent library Puppeteer from Google’s Chrome team.
We are specifically using the unofficial Python wrapper Pyppeteer. Puppeteer/Pyppeteer allows you to fully control the Chrome browser through the Developer Tools Protocol interface.
In order to get started download and install miniconda for your OS from this URL: https://docs.conda.io/en/latest/miniconda.html.
It is not practical to run this in Google Colaboratory because you need a local Chrome browser running.
You can optionally install Jupyter to use it as you coding environment:
conda install jupyter
Install Pyppeteer
python3 -m pip install pyppeteer
After I installed Pyppeteer (version 0.0.25), I faced some bugs that forced me to revert back to older versions of a couple of required libraries.
conda install tornado==4.5.3
conda install websocket==6.0
Starting Chrome in Debug Mode
After you have Pyppeteer and Jupyter correctly set up, you can proceed to start Chrome in debug mode to allow script control.
First, create a separate user profile to hold the Google Search Console account user data and password.
Let’s use this command in Mac.
mkdir ~/chrome-dev
/Applications/Google\ Chrome.app/Contents/MacOS/Google\ Chrome --remote-debugging-port=9222 --no-first-run --user-data-dir=~/chrome-dev
This would be the equivalent in Windows (I haven’t tested it).
mkdir ~/chrome-dev
"C:\Program Files (x86)\Google\Chrome\Application\Chrome.exe --remote-debugging-port=9222 --no-first-run --user-data-dir=~/chrome-dev"
We are passing two new extra parameters:
- –remote-debugging-port
- –user-data-dir
The first one enables remote control, while the second one creates another user profile so that our testing doesn’t mess with our regular browsing (if we use Chrome as the main browser).
When Chrome starts it will print out some debug messages to the console. You need to capture the first line that will look like this:
DevTools listening on ws://127.0.0.1:9222/devtools/browser/be6cf39f-0748-4d99-b9ca-cf3bda9fdca6
We are specifically interested in the URI that starts with ws://. Let’s copy it to a Python variable so we can connect to the Chrome instance.
ws=”ws://127.0.0.1:9222/devtools/browser/be6cf39f-0748-4d99-b9ca-cf3bda9fdca6”
Next, let’s manually log into our relevant Google account and open Google Search Console.
Basic Automation Operations
Now that we have a browser instance in debug mode and we are logged in to the Google Search Console, we will simulate user actions to automate the URL inspection tool.
These are the specific browser actions we will automate:
- Navigating to a website page.
- Clicking on the URL inspector input box.
- Typing the URL we want to check, including hitting enter to submit it.
- Clicking on the report accordion to visualize the reports (optional).
- Running custom JavaScript extraction functions to extract report data.
- Clicking on REQUEST INDEXING to request indexing.
- Clicking on TEST LIVE to check the live version of the page.
- Clicking on RENDERED PAGE to see the rendered version of the page.
Element Selectors
In order to click on web page elements and extract their content, you need to specify their location in the parsed DOM. XPaths are one way to do this that I’ve covered in the past.
You can also address elements using CSS selectors or JS paths directly, which are the approaches we will use in this article. You can use get the XPath/CSS selector/JS Path of any DOM element relatively easy in Chrome:
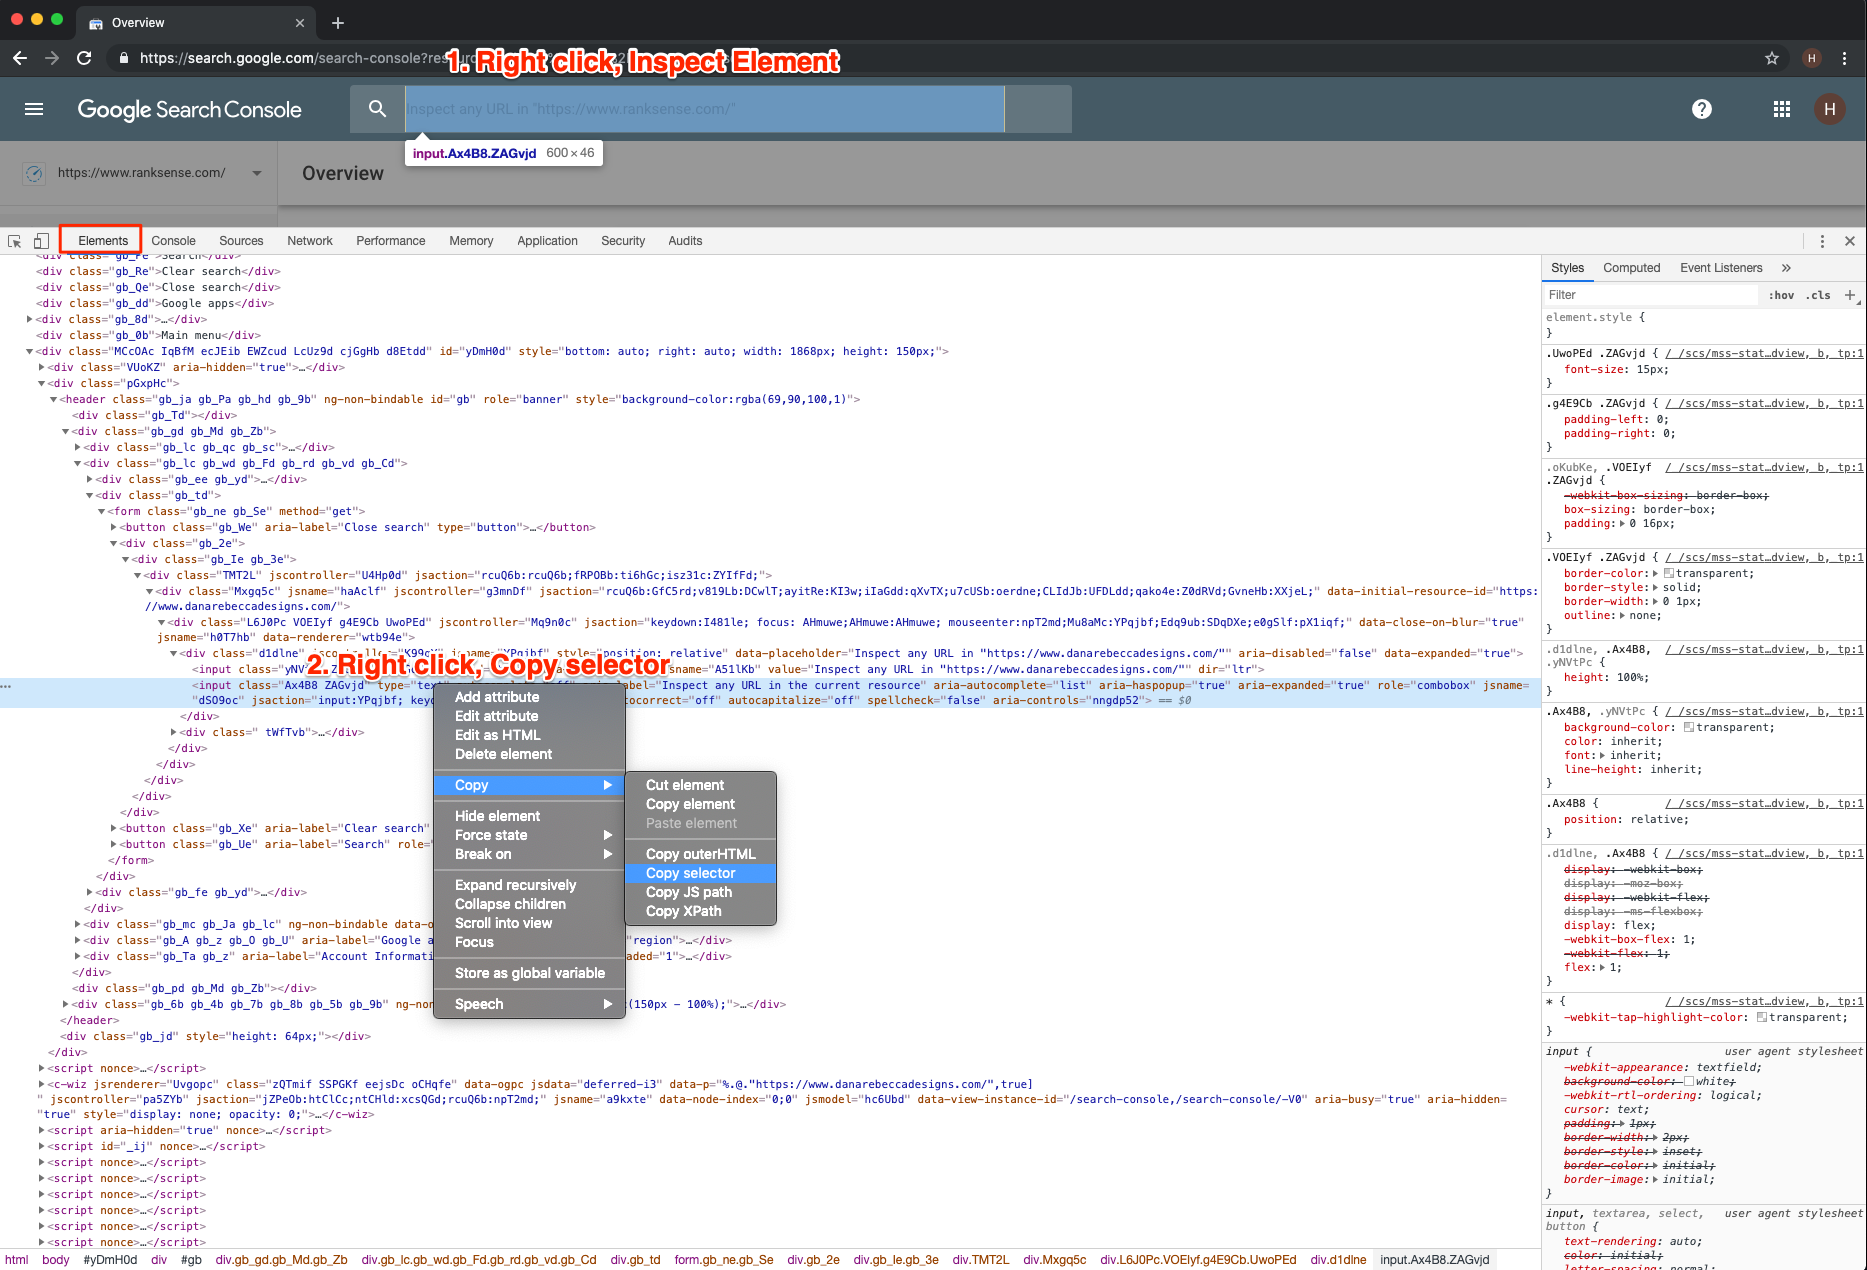
Right-click the element you want, click on “Inspect Element”, in the Chrome Developer Tools’s Element view, right-click again, under Copy, select JS path.
We are going to run the URL inspector manually, and record all the selectors we need. We will use CSS selectors for elements we need to click and JS Paths for elements we need to extract.
Here is the list I put together:
URL Inspector Search Box
sel = “#gb > div.gb_gd.gb_Md.gb_Zb > div.gb_lc.gb_wd.gb_Fd.gb_rd.gb_vd.gb_Cd > div.gb_td > form > div > div > div > div > div > div.d1dlne > input.Ax4B8.ZAGvjd”
We will use this selector to click on the search box to bring it into focus, and to type the URL to search, including the ENTER keystroke.
Note that this selector changes each time I load the Chrome browser, so I need to manually copy and paste it again to the script.
URL Is on Google / Not on Google
document.querySelector('#yDmH0d > c-wiz:nth-child(21) > div > div.OoO4Vb > span > div > div.y3IDJd.rFZTte.Fx3kmc > content > div.shSP > div > div > div.LgQiCc.vOSR6b.RVNZdd.qtMyGd > content > div.khfFee > div > div.CC5fre')We will use this element to learn if the page is indexed.
The following selectors have two alternative paths depending on whether the page is indexed.
Referring Page
document.querySelector('#yDmH0d > c-wiz:nth-child(20) > div > div.OoO4Vb > span > div > div.y3IDJd.rFZTte.Fx3kmc > content > div.shSP > div > div > div:nth-child(3) > content > div > div > div > div.V8vvZb > div > div > content > div.I1NQYe > div:nth-child(1) > div:nth-child(3) > div:nth-child(2) > div > div') ||
document.querySelector('#yDmH0d > c-wiz:nth-child(20) > div > div.OoO4Vb > div.shSP > div > div > div:nth-child(3) > content > div > div > div > div.V8vvZb > div > div > content > div.I1NQYe > div:nth-child(1) > div:nth-child(3) > div:nth-child(2) > div');
We use this to extract the page that Google used to discover the inspected page.
Crawled Date
document.querySelector('#yDmH0d > c-wiz:nth-child(20) > div > div.OoO4Vb > span > div > div.y3IDJd.rFZTte.Fx3kmc > content > div.shSP > div > div > div:nth-child(3) > content > div > div > div > div.V8vvZb > div > div > content > div.I1NQYe > div:nth-child(2) > div:nth-child(2) > div:nth-child(2) > div') ||
document.querySelector('#yDmH0d > c-wiz:nth-child(20) > div > div.OoO4Vb > div.shSP > div > div > div:nth-child(3) > content > div > div > div > div.V8vvZb > div > div > content > div.I1NQYe > div:nth-child(2) > div:nth-child(2) > div:nth-child(2) > div');
We use this to extract the date Google crawled the page.
User-Declared Canonical
document.querySelector('#yDmH0d > c-wiz:nth-child(20) > div > div.OoO4Vb > span > div > div.y3IDJd.rFZTte.Fx3kmc > content > div.shSP > div > div > div:nth-child(3) > content > div > div > div > div.V8vvZb > div > div > content > div.I1NQYe > div:nth-child(3) > div:nth-child(3) > div:nth-child(2) > div') ||
document.querySelector('#yDmH0d > c-wiz:nth-child(20) > div > div.OoO4Vb > div.shSP > div > div > div:nth-child(3) > content > div > div > div > div.V8vvZb > div > div > content > div.I1NQYe > div:nth-child(3) > div:nth-child(3) > div:nth-child(2) > div > div');
We use this to extract the canonical specified on the page.
Google-Selected Canonical
document.querySelector('#yDmH0d > c-wiz:nth-child(20) > div > div.OoO4Vb > span > div > div.y3IDJd.rFZTte.Fx3kmc > content > div.shSP > div > div > div:nth-child(3) > content > div > div > div > div.V8vvZb > div > div > content > div.I1NQYe > div:nth-child(3) > div:nth-child(4) > div:nth-child(2) > div') ||
document.querySelector('#yDmH0d > c-wiz:nth-child(20) > div > div.OoO4Vb > div.shSP > div > div > div:nth-child(3) > content > div > div > div > div.V8vvZb > div > div > content > div.I1NQYe > div:nth-child(3) > div:nth-child(4) > div:nth-child(2) > div');
We use this to extract the canonical Google selected.
The following selectors will allow us to click on buttons and tabs to perform the desired actions.
#VIEW CRAWLED PAGE
view_crawled_page = "#yDmH0d > c-wiz:nth-child(21) > div > div.OoO4Vb > span > div > div.y3IDJd.rFZTte.Fx3kmc > content > div.shSP > div > div > div.LgQiCc.vOSR6b.RVNZdd.qtMyGd > content > div.DxKHSb > div > c-wiz:nth-child(1) > div > span > div > content > span > div > span"

#We will click on this element to open the crawled page drawer.

#TEST LIVE
test_live = "#yDmH0d > c-wiz:nth-child(21) > div > div.OoO4Vb > span > div > div.y3IDJd.rFZTte.Fx3kmc > content > div.sVgexf.VpESuc > div.too21 > c-wiz > div > div > content > span"

#We will click on this element to check the live version of the page.

#VIEW RENDERED PAGE
view_rendered_page = "#UyVAwe > content > c-wiz > div > div > div > div.loOCwb > div.mrslJ.ZjAUM > div.ThdJC.kaAt2.xagcJf.dyhUwd.KKjvXb.j7nIZb > content"

#We will click on this element to view the rendered version of the page.

#MORE INFO
more_info = "#UyVAwe > content > c-wiz > div > div > div > div.loOCwb > div.mrslJ.ZjAUM > div.ThdJC.kaAt2.xagcJf.S5PKsc.KKjvXb.j7nIZb > content"

#We will click on this element to view the HTTP status cod, page resources, etc of the page.

#HTTP Response
http_response = "#xTCd3 > div > div.DJMsc > div.U26fgb.O0WRkf.oG5Srb.C0oVfc.jzHKVd.fjurve.M9Bg4d > content > span > div > div.hzVcte > div.kD7LSc.DoYruc"

#We will click on this element to view the response headers.

#Page resources
page_resources = "#xTCd3 > div > div.DJMsc > div.U26fgb.O0WRkf.oG5Srb.C0oVfc.jzHKVd.BRQdU.M9Bg4d > content > span > div > div.hzVcte > div.kD7LSc.DoYruc"

#We will click on this element to view the rendered version of the page.

#JavaScript console messages
javascript_console_messages = "#xTCd3 > div > div.DJMsc > div.U26fgb.O0WRkf.oG5Srb.C0oVfc.jzHKVd.Rear5e.RDPZE.M9Bg4d > content > span > div > div.hzVcte > div.kD7LSc.DoYruc.RDPZE"

#We will click on this element to view the Javascript errors.

#REQUEST INDEXING
request_indexing = "#yDmH0d > c-wiz:nth-child(21) > div > div.OoO4Vb > span > div > div.y3IDJd.rFZTte.Fx3kmc > content > div.shSP > div > div > div.LgQiCc.vOSR6b.RVNZdd.qtMyGd > content > div.DxKHSb > div > c-wiz.FrvLod > div.CerIhf > span > div > content > span > div > span > span.cTsG4"

#We will click on this element to request indexing.
JavaScript Extraction
Next, we will create a JavaScript function with all relevant JS paths used for extraction.
We will pass this function to Chrome to execute on our target page and we will get back a Python dictionary that we can load into a pandas data frame.
       () => {
            var data = {};

            //referring page

            data["referring_page"] = document.querySelector('#yDmH0d > c-wiz:nth-child(20) > div > div.OoO4Vb > span > div > div.y3IDJd.rFZTte.Fx3kmc > content > div.shSP > div > div > div:nth-child(3) > content > div > div > div > div.V8vvZb > div > div > content > div.I1NQYe > div:nth-child(1) > div:nth-child(3) > div:nth-child(2) > div > div') ||
                document.querySelector('#yDmH0d > c-wiz:nth-child(20) > div > div.OoO4Vb > div.shSP > div > div > div:nth-child(3) > content > div > div > div > div.V8vvZb > div > div > content > div.I1NQYe > div:nth-child(1) > div:nth-child(3) > div:nth-child(2) > div');

            //last crawl
            data["last_crawl"] = document.querySelector('#yDmH0d > c-wiz:nth-child(20) > div > div.OoO4Vb > span > div > div.y3IDJd.rFZTte.Fx3kmc > content > div.shSP > div > div > div:nth-child(3) > content > div > div > div > div.V8vvZb > div > div > content > div.I1NQYe > div:nth-child(2) > div:nth-child(2) > div:nth-child(2) > div') ||
                document.querySelector('#yDmH0d > c-wiz:nth-child(20) > div > div.OoO4Vb > div.shSP > div > div > div:nth-child(3) > content > div > div > div > div.V8vvZb > div > div > content > div.I1NQYe > div:nth-child(2) > div:nth-child(2) > div:nth-child(2) > div');


            //user declared canonical
            data["user_declared_canonical"] = document.querySelector('#yDmH0d > c-wiz:nth-child(20) > div > div.OoO4Vb > span > div > div.y3IDJd.rFZTte.Fx3kmc > content > div.shSP > div > div > div:nth-child(3) > content > div > div > div > div.V8vvZb > div > div > content > div.I1NQYe > div:nth-child(3) > div:nth-child(3) > div:nth-child(2) > div') ||
                document.querySelector('#yDmH0d > c-wiz:nth-child(20) > div > div.OoO4Vb > div.shSP > div > div > div:nth-child(3) > content > div > div > div > div.V8vvZb > div > div > content > div.I1NQYe > div:nth-child(3) > div:nth-child(3) > div:nth-child(2) > div > div');


            //Google-selected canonincal
            data["google_selected_canonical"] = document.querySelector('#yDmH0d > c-wiz:nth-child(20) > div > div.OoO4Vb > span > div > div.y3IDJd.rFZTte.Fx3kmc > content > div.shSP > div > div > div:nth-child(3) > content > div > div > div > div.V8vvZb > div > div > content > div.I1NQYe > div:nth-child(3) > div:nth-child(4) > div:nth-child(2) > div') ||
                document.querySelector('#yDmH0d > c-wiz:nth-child(20) > div > div.OoO4Vb > div.shSP > div > div > div:nth-child(3) > content > div > div > div > div.V8vvZb > div > div > content > div.I1NQYe > div:nth-child(3) > div:nth-child(4) > div:nth-child(2) > div');


            data["referring_page"] = data["referring_page"] && data["referring_page"].textContent;
            data["last_crawl"] = data["last_crawl"] && data["last_crawl"].textContent;
            data["user_declared_canonical"] = data["user_declared_canonical"] && data["user_declared_canonical"].textContent;
            data["google_selected_canonical"] = data["google_selected_canonical"] && data["google_selected_canonical"].textContent;

            return data;

            }
Most data extraction selectors have more than one option. We use a trick to execute the alternative if the first option fails. The || operator does just that, similar to how it works in Unix/Linux command line.
Trying to get these data using Python directly is possible, but in this case it is a lot simpler and straightforward to use JavaScript.
Putting Everything Together
Now that we have completed all preparatory steps, let’s get to the fun part. Automating the whole thing!
Here is the code to connect to the live Chrome instance running with Google Search Console open.
import asyncio
from pyppeteer import connect

from time import sleep

async def inspect_urls(urls):
    #example URI. Copy and paste from Chrome output
    #run Chrome using (Mac):
    #mkdir ~/chrome-dev
    #/Applications/Google\ Chrome.app/Contents/MacOS/Google\ Chrome --remote-debugging-port=9222 --no-first-run --user-data-dir=~/chrome-dev

    ws = "ws://127.0.0.1:9222/devtools/browser/52112a5a-7555-4743-a37f-5fb26bd81b92"

    browser = await connect({"browserWSEndpoint": ws})
    page = await browser.newPage()
    #optional viewport resize
    await page.setViewport({"width": 1920, "height": 1280})
I added some extra code to control the window size. Feel free to update to adapt to your computer.
Create a list of URLs you want to check. This list can come for example from an XML sitemap that under indexed.
I do not recommend checking too many URLs using this method, maybe a few dozen super important pages.
First, automating the browser is slow and resource intensive and you need to be logged into your Google account. If they don’t like this, they can easily ban your whole account.
It is also possible that Google starts adding captchas if people start abusing this technique.
Here is the code to open the main website page in Search Console.
await page.goto('https://search.google.com/search-console?resource_id=https%3A%2F%2Fwww.ranksense.com%2F',
           {"waitUntil": "networkidle0"})

print(url)
Then, here we can click on the URL inspector input box to bring it to focus.
#example input box selector, changes often
sel= "#gb > div.gb_gd.gb_Md.gb_Zb > div.gb_lc.gb_wd.gb_Fd.gb_rd.gb_vd.gb_Cd > div.gb_td > form > div > div > div > div > div > div.d1dlne > input.Ax4B8.ZAGvjd"
await page.waitForSelector(sel)
await page.click(sel)
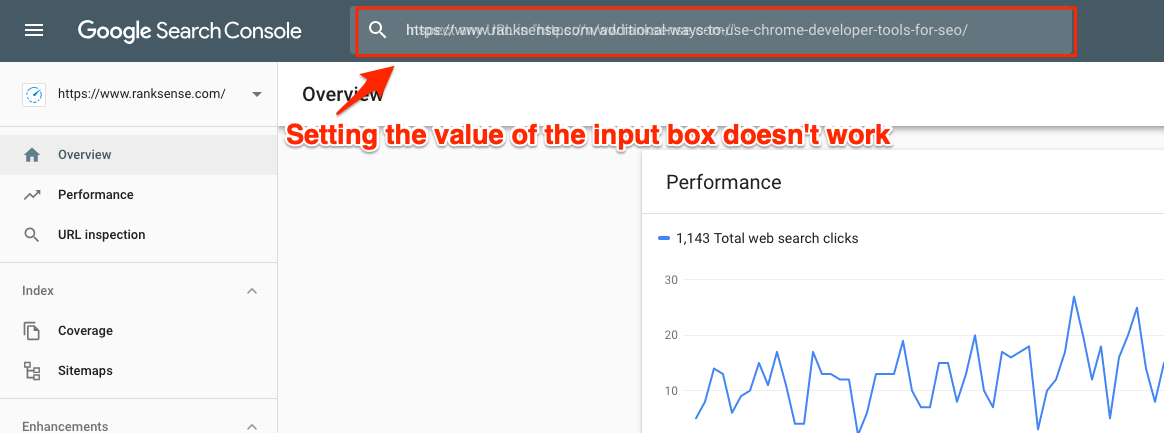
#await page.querySelectorEval(sel, "el => el.value = 'Testing 123'") #doen't work
await page.keyboard.type(url) #input url
await page.keyboard.press("Enter")As you saw in the animated GIF at the beginning of the article, the coolest part is watching the browser typing the URL to check, character by character. It feels like magic.
I first tried setting the input field value directly but it didn’t work.
Next, we add a delay of 5 seconds to wait for the tool to run and check the URL. Feel free to increase it.
When the report opens, we can go straight and run the data extraction, but as we are watching the browser perform tasks, I thought it would be useful to expand one of the hidden tabs.
#wait for retrival
sleep(5)
coverage_selector = "#yDmH0d > c-wiz:nth-child(20) > div > div.OoO4Vb > span > div > div.y3IDJd.rFZTte.Fx3kmc > content > div.shSP > div > div > div:nth-child(3) > content > div"

try:
    await page.waitForSelector(coverage_selector)
    await page.click(coverage_selector)
except:
    pass #skip click on timeout exception
Now, the most important step. Getting the reported data for the URL back to Python. We pass the generated JavaScript function for Chrome to evaluate and return our data dictionary.
js_extractor="""
() => {
var data = {};
//referring page
data["referring_page"] = document.querySelector('#yDmH0d > c-wiz:nth-child(20) > div > div.OoO4Vb > span > div > div.y3IDJd.rFZTte.Fx3kmc > content > div.shSP > div > div > div:nth-child(3) > content > div > div > div > div.V8vvZb > div > div > content > div.I1NQYe > div:nth-child(1) > div:nth-child(3) > div:nth-child(2) > div > div') ||
document.querySelector('#yDmH0d > c-wiz:nth-child(20) > div > div.OoO4Vb > div.shSP > div > div > div:nth-child(3) > content > div > div > div > div.V8vvZb > div > div > content > div.I1NQYe > div:nth-child(1) > div:nth-child(3) > div:nth-child(2) > div');
//.textContent;
//last crawl
data["last_crawl"] = document.querySelector('#yDmH0d > c-wiz:nth-child(20) > div > div.OoO4Vb > span > div > div.y3IDJd.rFZTte.Fx3kmc > content > div.shSP > div > div > div:nth-child(3) > content > div > div > div > div.V8vvZb > div > div > content > div.I1NQYe > div:nth-child(2) > div:nth-child(2) > div:nth-child(2) > div') ||
document.querySelector('#yDmH0d > c-wiz:nth-child(20) > div > div.OoO4Vb > div.shSP > div > div > div:nth-child(3) > content > div > div > div > div.V8vvZb > div > div > content > div.I1NQYe > div:nth-child(2) > div:nth-child(2) > div:nth-child(2) > div');
//.textContent;
//user declared canonical
data["user_declared_canonical"] = document.querySelector('#yDmH0d > c-wiz:nth-child(20) > div > div.OoO4Vb > span > div > div.y3IDJd.rFZTte.Fx3kmc > content > div.shSP > div > div > div:nth-child(3) > content > div > div > div > div.V8vvZb > div > div > content > div.I1NQYe > div:nth-child(3) > div:nth-child(3) > div:nth-child(2) > div') ||
document.querySelector('#yDmH0d > c-wiz:nth-child(20) > div > div.OoO4Vb > div.shSP > div > div > div:nth-child(3) > content > div > div > div > div.V8vvZb > div > div > content > div.I1NQYe > div:nth-child(3) > div:nth-child(3) > div:nth-child(2) > div > div');
//.textContent;
//Google-selected canonincal
data["google_selected_canonical"] = document.querySelector('#yDmH0d > c-wiz:nth-child(20) > div > div.OoO4Vb > span > div > div.y3IDJd.rFZTte.Fx3kmc > content > div.shSP > div > div > div:nth-child(3) > content > div > div > div > div.V8vvZb > div > div > content > div.I1NQYe > div:nth-child(3) > div:nth-child(4) > div:nth-child(2) > div') ||
document.querySelector('#yDmH0d > c-wiz:nth-child(20) > div > div.OoO4Vb > div.shSP > div > div > div:nth-child(3) > content > div > div > div > div.V8vvZb > div > div > content > div.I1NQYe > div:nth-child(3) > div:nth-child(4) > div:nth-child(2) > div');
//.textContent;
data["referring_page"] = data["referring_page"] && data["referring_page"].textContent;
data["last_crawl"] = data["last_crawl"] && data["last_crawl"].textContent;
data["user_declared_canonical"] = data["user_declared_canonical"] && data["user_declared_canonical"].textContent;
data["google_selected_canonical"] = data["google_selected_canonical"] && data["google_selected_canonical"].textContent;
return data;
}
"""
results = await page.evaluate(js_extractor)
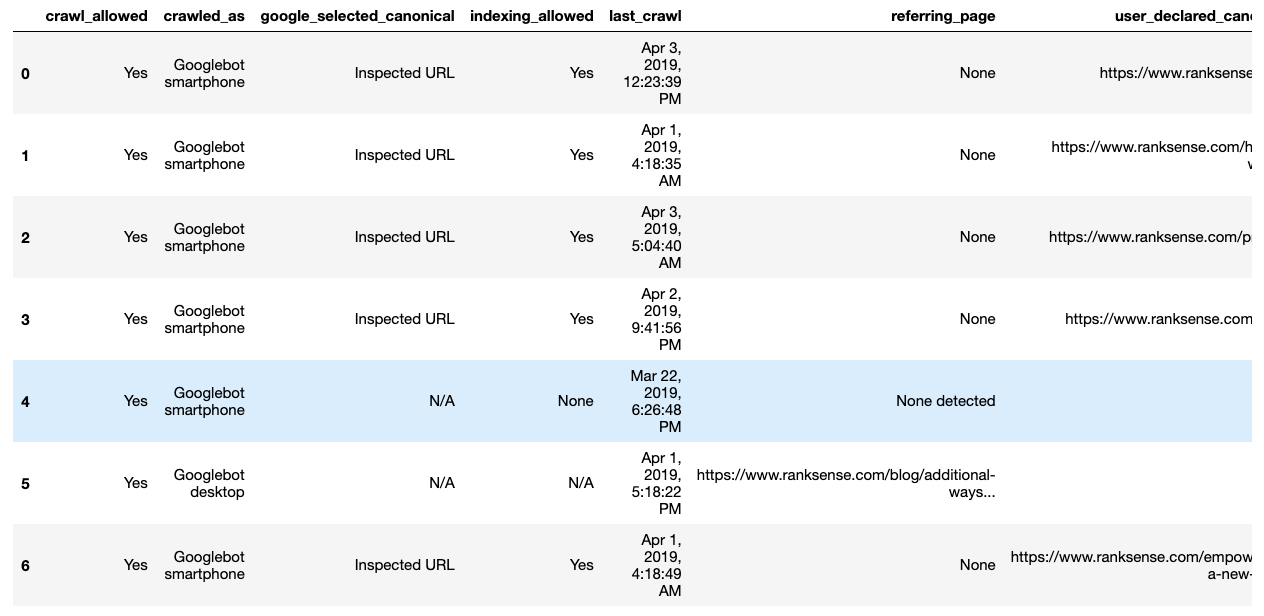
print(results)Here is some example output.
https: //www.ranksense.com/
{'referring_page': None, 'last_crawl': 'Apr 2, 2019, 4:03:13 PM', 'crawled_as': 'Googlebot smartphone', 'crawl_allowed': 'Yes', 'indexing_allowed': 'Yes', 'user_declared_canonical': 'https://www.ranksense.com/', 'google_selected_canonical': 'Inspected URL'}
https: //www.ranksense.com/how-it-works/
{'referring_page': None, 'last_crawl': 'Apr 1, 2019, 4:18:35 AM', 'crawled_as': 'Googlebot smartphone', 'crawl_allowed': 'Yes', 'indexing_allowed': 'Yes', 'user_declared_canonical': 'https://www.ranksense.com/how-it-works/', 'google_selected_canonical': 'Inspected URL'}
https: //www.ranksense.com/pricing/
{'referring_page': None, 'last_crawl': 'Apr 1, 2019, 4:18:15 AM', 'crawled_as': 'Googlebot smartphone', 'crawl_allowed': 'Yes', 'indexing_allowed': 'Yes', 'user_declared_canonical': 'https://www.ranksense.com/pricing/', 'google_selected_canonical': 'Inspected URL'}
https: //www.ranksense.com/blog/
{'referring_page': None, 'last_crawl': 'Mar 23, 2019, 11:53:31 AM', 'crawled_as': 'Googlebot smartphone', 'crawl_allowed': 'Yes', 'indexing_allowed': 'Yes', 'user_declared_canonical': 'https://www.ranksense.com/blog/', 'google_selected_canonical': 'Inspected URL'}
https: //www.ranksense.com/products/organic-search-ads/feed/
{'referring_page': 'None detected', 'last_crawl': 'Mar 22, 2019, 6:26:48 PM', 'crawled_as': 'Googlebot smartphone', 'crawl_allowed': 'Yes', 'indexing_allowed': None, 'user_declared_canonical': None, 'google_selected_canonical': 'N/A'}
https: //www.ranksense.com/additional-ways-to-use-chrome-developer-tools-for-seo/
{'referring_page': 'https://www.ranksense.com/blog/additional-ways-to-use-chrome-developer-tools-for-seo/', 'last_crawl': 'Apr 1, 2019, 5:18:22 PM', 'crawled_as': 'Googlebot desktop', 'crawl_allowed': 'Yes', 'indexing_allowed': 'N/A', 'user_declared_canonical': None, 'google_selected_canonical': 'N/A'}
https: //www.ranksense.com/empowering-a-new-generation-of-seos-with-python/
{'referring_page': None, 'last_crawl': 'Apr 1, 2019, 4:18:49 AM', 'crawled_as': 'Googlebot smartphone', 'crawl_allowed': 'Yes', 'indexing_allowed': 'Yes', 'user_declared_canonical': 'https://www.ranksense.com/empowering-a-new-generation-of-seos-with-python/', 'google_selected_canonical': 'Inspected URL'}
I will leave the following steps as an exercise for your to complete using the selectors I already provided:
- Review rendered page.
- Run a live test.
- Submit page to index.
Performing Analysis
After we let Chrome and Pyppeteer do the heavy lifting for us, we should have indexing data for the URLs that we checked in a list of dictionaries. We can convert them into a pandas data frame.
import pandas as pd

#example list of urls to inspect
site_pages = ["https://www.ranksense.com/", "https://www.ranksense.com/how-it-works/",
              "https://www.ranksense.com/pricing/", "https://www.ranksense.com/blog/",
              "https://www.ranksense.com/products/organic-search-ads/feed/",
              "https://www.ranksense.com/additional-ways-to-use-chrome-developer-tools-for-seo/",
              "https://www.ranksense.com/empowering-a-new-generation-of-seos-with-python/"]

data = asyncio.get_event_loop().run_until_complete(inspect_urls(site_pages))
# data contains a list of dictionaries, where each entry is like this:
#{'referring_page': None,
#  'last_crawl': 'Apr 3, 2019, 12:23:39 PM',
#  'crawled_as': 'Googlebot smartphone',
#  'crawl_allowed': 'Yes',
#  'indexing_allowed': 'Yes',
#  'user_declared_canonical': 'https://www.ranksense.com/',
#  'google_selected_canonical': 'Inspected URL'}

pd.DataFrame(data)
Here is what an example run looks like.
With the data in pandas, we can slice and dice it to easily isolate the main reasons for pages missing from the index.
We can also export our data frame to Excel or CSV to share with other team members.
Resources to Learn More
If you are still on the fence about whether you should learn Python, I hope that automating your day to day work gets you really excited about the possibilities. Your imagination and creativity are really the only limit.
Here are some example community members who are picking up Python and seeing great success:
Thanks to you @hamletbatista I picked up Python coding in 2 weeks, and built a Log file analyzer tool, which fetch all access logs from an SFTP, unzip them, filter to googlebot hits (by IP and user agent), export to csv and generate graphs with pandas and matplotlib pic.twitter.com/GiiBT7qtE0
— Moshe Ma-yafit (@napo789) March 2, 2019
Finally added Jupyter and Pandas to my workflow after @hamletbatista‘s TechSEO Boost talk. pic.twitter.com/YuRtSHqlkq
— Chris Johnson (@defaced) March 29, 2019
You can follow these growing list of SEO pros to stay up to date on the latest Python stuff:
Here are some resources I found useful when researching this article:
More Resources:
- How to Use Python to Analyze SEO Data: A Reference Guide
- Reorganizing XML Sitemaps with Python for Fun & Profit
- A Complete Guide to SEO: What You Need to Know in 2019
Image Credits
All screenshots taken by author, April 2019
