


As many of you may know, e-commerce website owners are investing a lot of money into PPC advertising with Bing ads and Google AdWords. With the many different methods for online marketing out there, I thought it would be helpful if I were to share a case study that I have been conducting on an e-commerce PPC campaign specifically geared towards using dynamic remarketing with advanced audience lists and briefly explain how to set up a dynamic remarketing campaign along the way.
Unlike traditional remarketing, dynamic remarketing allows you to get very granular with your audience lists. For example, you can have an audience list optimized for each of your products or categories that your website offers. When you create your audience lists, you can create specific rules that will determine weather or not a visitor can meet the requirements to be added to that particular list. For example, you can create rules to include visitors that have added an item to their shopping cart and a separate “AND” rule that excludes anyone who visited the order confirmation page (excluding visitors who already converted) so you can remarket to those who were very close to converting.
This is a great way to increase your e-commerce PPC campaign’s ROI because you are marketing to very relevant visitors who showed an interest in a particular product by adding that item (or a similar one) to the shopping cart but did not ultimately make a purchase. Think about it: if you are shopping around for a product and something comes up, you might not go back to that same store when you finally make a purchase. The term for this type of visitor is the shopping cart abandonder, and most of the time, these abandoners just need a little remarketing magic to turn them into a paying customer.
The best part of using precision based remarketing lists is that you can segment your audience lists and serve image ads of the exact same product that the visitor had in their shopping cart. So if you go to my clients store and place an item in your shopping cart then leave without converting, you will see that same item follow you around in display ads that we created for his dynamic remarketing campaign. Needless to say, this type of innovative marketing strategy can be very effective if setup correctly and luckily for you, I am going to teach you how to create an effective dynamic remarketing campaign that uses precision based remarketing lists.
Setting up Your Remarketing Campaign With Google AdWords
First you will need to create a campaign. If you already have one setup and you are just reading this post to learn how to setup advanced remarketing lists I would recommend scrolling down to the next heading that reads, “setting up your remarketing lists”.
You are going to need to have an already established Google Merchant account in order to set up dynamic remarketing, assuming you already have one you will need to link your AdWords and Merchant center accounts. Simply log into your Google Merchant account and click on settings, then click “AdWords” then simply enter you AdWords customer ID number and click “Add”.This is what will allow your Adwords account to pull data from your Merchant center which is critical. Once your two accounts are linked up you will want to setup you campaign in Adwords, I have outlined a step by step procedure on getting this started below.
1.) Log into your AdWords account and click the +Campaign button then the Display Network Only sub-menu option as shown in the screen shot below.

Screen shot taken 4/14/2014 on adwords.google.com
2.) In the next window that you are prompted to, give your new campaign a name first then select Remarketing next to ‘type’. And last but not least, at the bottom of the page after clicking Remarketing as the type, a blue button will appear that says “Set up dynamic remarketing“, click that.
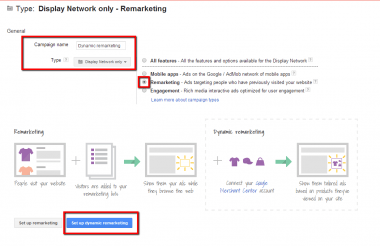
Screen shot taken 4/14/2014 on adwords.google.com
3.) Next, you will need to enter the email address of your webmaster or the person that will be installing the dynamic remarketing code. A screen shot of what this display window looks like is below. Keep in mind that installing your dynamic remarketing campaign is a task for an experienced webmaster (I have included some reference links for getting started at the end of this post).
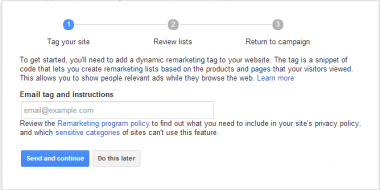
Screen shot taken 4/14/2014 on adwords.google.com
You will need to slightly modify your GA tracking code to include the double click cookie tracking method. The changes are compatible with the synchronous and asynchronous versions of the GA tracking codes and will not have an effect on any previous modifications that you may have made to your code. AdWords will provide you with 4 standard remarketing lists by default. The lists are not going to be covered as the topic of this post is about using advanced remarketing lists. So to speed things along, you can click on the ‘next’ button to skip the list review and then ‘return to campaign’ in the following two steps proceeding the step where you enter the webmasters address.
4.) Next, it’s time to setup your bidding and budget options. To learn about Google’s bidding options and which one is best for your marketing goals, you can read this helpful link from the Google Support center. On this same page that you are prompted to, you need to also make sure that they check box next to ‘Enable dynamic remarketing’ is checked as shown in the screen shot below.
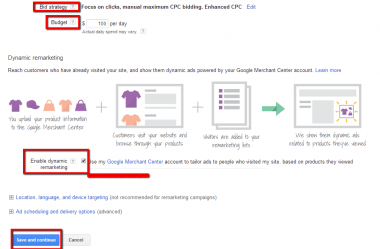
Screen shot taken 4/14/2014 on adwords.google.com
You can also set your ad location and schedule settings on this page, so if you are targeting specific locations and only showing ads at certain times, you will want to make your modifications accordingly here.
And now that you have setup your campaign, you will need to proceed to creating your first ad group. This is where things get a little more tricky because you need to take into consideration just how granular you want to be with your remarketing strategy. For example, you can choose to have an ad group for each product that you find to be important, and that particular ad group can have its own unique remarketing list. This is probably one of the most effective (and time consuming) ways to setup your remarketing lists. However, if you have thousands of products it can be very cost prohibitive and time prohibitive. It’s recommended that you choose your ad group strategy wisely, this is the most important step in the process.
I will explain briefly explain how to conduct an anlysis on your e-commerce data from Google Analytics to create a data driven set of remarketing lists. Since you will need to select which remarketing list to use when you create your first ad group, we are going to skip the setup of the ad group for now and jump into creating your precision based remarketing list in Google Analytics. Then we can explain how to use that list with a corresponding ad group in Google AdWords.
Setting up Advanced Remarketing Lists
Selecting Your Targets
In this example, I will demonstrate how to create ad groups that focus on brands that a specific client of ours sells. Depending on your business, you may want to target product categories instead. In this case, the client sells heating and cooling supplies from air conditioning units to replacement parts for water heaters. They carry several brands being that they have re-seller agreements with many manufacturers and this is a great project to demonstrate with.
Remember, your campaign is unique, so it may not be a good fit to go after “brand-intrinsic” ad groups, but you can still see how to go about setting up your lists from reading this post and you can apply the techniques you learn in any scenario.
The example project we are working on is a large e-commerce store so a lot of time analyzing data was spent setting up the remarketing lists for this campaign. When dealing with big data, I tend to rely heavily on excel to do my research and analysis’, so I am going to give a quick demonstration on how I go about using excel to streamline the way I analyze large Google Analytics e-commerce reports. In this example, I generated a landing page report and filtered only search engine visitors. In the screen shot below, you can see that the report shows landing pages (which are all product pages for the most part) and the metrics associated with each landing page.
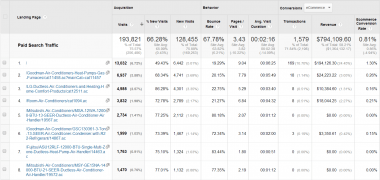
Screen shot taken 4/14/2014 on analytics.google.com
The metrics that I personally feel are most important are e-commerce conversion rates, bounce rates, average time on site and number of unique visits. The number of unique visits allows for an adequately sized data sample to be used, the bigger the data sample, the more reliable the data. As I mentioned before if you are dealing with a large campaign, you will want to export this data into excel and then begin to use your excel knowledge to streamline your process. I wrote a great post on my blog that covers all of the excel tips and tricks for SEOs. It also covers most of the excel functions and formulas that I use when dealing with big data and e-commerce SEO or PPC campaigns. I encourage you to brush up on your Google Analytics and excel abilities if you plan on managing large dynamic remarketing campaigns such as the one I am describing. Knowing your way around excel can save you countless hours of research and manual data interpretation.
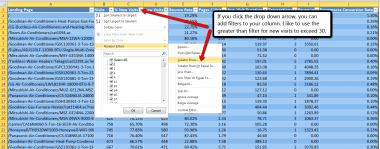
Once your data is exported into excel, I recommend adding a table to your spreadsheet with the data. When using tables, you can easily filter your columns by creating filters for each metric. I like to first add a filter that includes only landing pages with at least 30 unique visits to ensure that I have a reliable data sample. To add a filter, simply click on the drop down arrow next to any of the column headers. As shown in the screen shot below, after clicking that drop down arrow you will open up several filter options.
Screen shot taken 4/14/2014 using Excel
I recommend experimenting with each filter option as each one can provide its unique benefits. I chose to use the “Greater Than” filter option and entered a value of 30 as shown below.
Screen shot taken 4/14/2014 using Excel
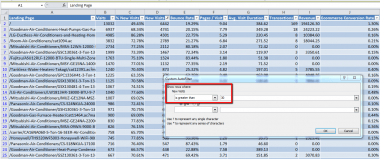
Once the unique visitor column is filtered, I typically will filter out pages with a bounce rate that is higher than 80% to avoid going after pages that are not performing well. You can choose to filter your data any way you’d like, and in dealing with certain industries you should consider all your variables. Again, you may want to choose different types of filters or reports depending upon the unique variables that every campaign has. The more experience you have in using excel, the more efficient you will become. I always say, an SEO is only as good as the tools he or she knows how to use.
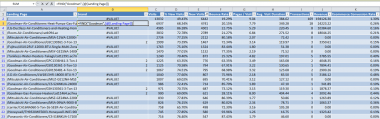
Now that I have a list of landing pages that are driving high quality traffic to my site, its time to find out which brands the landing pages belong to. I rely on a simple find function to sort through the lists of the landing page URL’s to search for specific brand names. By adding a column to the right of the landing page url column, I can include brand tags to each URL. The snap shot below shows how I used the find function to search for any landing page URL that contained the brand name ‘Goodman’.
Screen shot taken 4/14/2014 using Excel
By placing the find function in column ‘B’ and dragging the formula down, you now have a value next to each URL that contained ‘Goodman’ within it. By simply sorting column ‘B’ by smallest to largest, you will arrange the data showing the rows that have found a match at the top of the list.
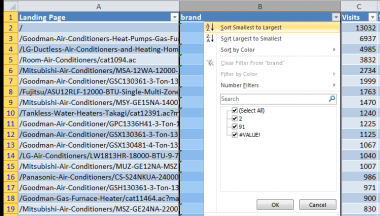
Screen shot taken 4/14/2014 using Excel
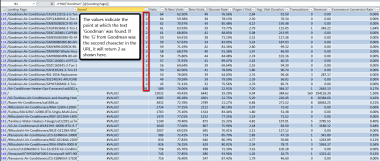
Any cell that contains a numerical value will have a URL that contains ‘Goodman’ to the left of that cell. What I like to do is replace the values with the brand name to keep things organized. Simply add the brand name to the first cell after the column header and drag the little black box on the corner of the cell to replace each cell with a value with the corresponding brand name.
Screen shot taken 4/14/2014 using Excel
If I do this with the other 20 brands that the client carries, I now have a list of the top performing brands AND top performing landing pages that belong to that brand. So now that I have this awesome table, I can organize it with a pivot table or just use this data as is to create my remarketing lists. Having a list of your brands and landing pages is very useful when creating precision based remarketing campaigns and you will find out why in the next section which explains how harvest your visitors correctly using Google Analytics.
Gathering Your Audience With Google Analytics Remarketing Lists
After you have your handy excel spread sheet organized, you are going to want to begin setting up your remarketing lists in Google Analytics. To do this, you will need full admin access to your Google Analytics account. Once you have access, simply login to your admin panel and click on remarketing lists. Here you will be prompted to create your remarketing then on ‘lists’. Next, click on +New Remarketing List and like always you will need to start by giving your list a name. To create your own precision based remarketing lists, you will want to choose the ‘Create my own remarketing type using segments’ option. And this is where the fun begins 🙂
After clicking on the ‘Create my own remarketing type using segments’ you will see a display open up with a navigation on the left hand side. This is your main navigation for creating segments and it is very similar to setting up a advanced segment, which I wrote another post on here on my website. If you are not familiar with creating advanced segments, they are basically a set of filter/rules that need to be fulfilled by visitors in order to show in the report. In this case, the rules or filter (or sequences) need to be fulfilled in order for the visitor to enter the remarketing list. So starting from the top we will cover each tab briefly.
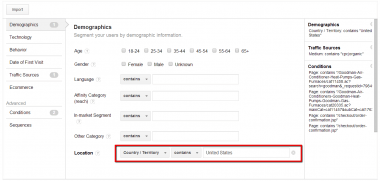
1.) Demographics: In this option, you can set you age, gender, language and location settings. In this project’s case, I only chose to use visitors from the USA because our client only sells in the US. I simply set location to exactly match ‘United States’ as shown in the screen shot below:
Screen shot taken 4/14/2014 on analytics.google.com
It’s worthy to note that a summary of your rules/filters will show up on the right side of your screen as you continue to add new rules and filters (as shown in screen shot above).
2.) Technology: Allows for the ablity to choose to only include visitors that are using certain operating systems, browsers, devices etc. I chose to leave this section blank, but if you want to get really granular you can choose to only focus on tablet users or Iphone users according to your data analysis’.
3.) Behavior: In this section we can choose to segment visitors by how often they visit and conduct transactions on your site. This may be a option to play with if you sell products that need to be replaced regularly. In this example, we left his option blank.
4.) Date of First Visit: Here you can segment your visitors according to the date that they entered your site. This can be useful for certain types of seasonal sales. In this case, we left this blank.
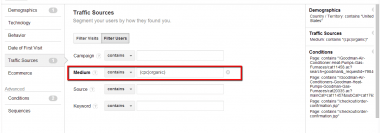
5.) Traffic Sources: In this option, we have the ability to segment visitors according to how they found your site. I chose to only include visitors who found the site through organic or CPC mediums only. As shown in the screen shot below, I used a regex filter that reads (cpc|organic) which instructs Google to only include visitors that used one of the two mediums.
Screen shot taken 4/14/2014 on analytics.google.com
6.) E-Commerce: In this section, you can segment your visitors according to transaction and revenue specifications which can be useful, be we decided to leave this blank to not narrow our chances of getting an audience quickly.
7.) Conditions: In this advanced option, you have the ability to do a lot. Like advanced segments you can apply several rules and you can also specify whether or not all rules have to be met OR if only one or another has to be met. For example, if you look at the screen shot below, I choose to create a filter with 3 rules, either of the three requirements can be met as it is a ‘OR’ rule combination. If I were to have created a “AND” rule, then the visitor would have had to gone to both pages in order to qualify as a member of this list. I simply included the URL’s that were in my handy excel spread sheet.
You may notice that I was able to cover all my URL’s by using the ‘include’ option, I just identified the comment URL tag that is found in all my top performing pages from my excel sheet. The majority of the pages contained a common URL parameter and I included a filter for each common parameter.
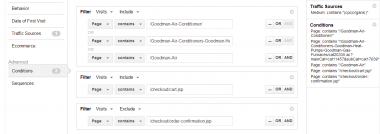
Screen shot taken 4/14/2014 on analytics.google.com
Additionally, I created a filter that includes any visitors who went to a page that had ‘/checkout/cart.jsp’ in the URL. Why? Because if that text appears in the visitors URL then that means they had an item in their shopping cart which means they were close to making a purchase. The next rule, filters our visitors who went to a page that contains ‘/checkout/order-confirmation.jsp’. If you didn’t already guess, this filter is used to exclude visitors that made a purchase.
After all these rules are taken into consideration, we are left with shopping cart abandoners who showed interest in Goodman product pages that are known to provide high quality search engine traffic from the USA.
Using Your Remarketing Lists In Your New Ad Groups
So now that you have your remarketing lists setup, its time to use them! Luckily, the hard work is all over. Now you just need to go back into Google AdWords and follow a few simple step. The first thing you will need to do is click on your dynamic remarketing campaign and then click on +Adgroup. Here you will simply need to give you ad group a name and then select your default bid.
Additionally, you will find your newly created remarketing lists available in this window. So for ad group that you create, make sure to use the right remarketing list. Note that your lists will have to populate over time and once they have enough members in the list, they will become eligible for use. What I am going to do is create an ad group using the Goodman list that I created earlier. By default, you will be prompted to the image ad creator tool within AdWords.
To upload your own remarketing ads, which I recommend you do, you can click on “skip ad creation” and proceed to add new image ads that a graphic designer puts together. You can make really compelling ads that entice the visitor to come back and purchase that item they once had in their shopping cart. Best practices when it comes to precision based image ads include offering discounts on the product intrinsic ads and messages that create a sense of urgency such as ‘Only 12 Goodman Units Left!’.
Once you have your ads, your ad groups, your campaign and your lists running you are pretty much ready to go! Make sure to continue optimizing and testing as you collect data with AdWords and Google Analytics and that’s all that is really left to do! Once I have a adequately sized data sample, I will be sharing a case study to show just how profitable this campaign ends up being. I know this has been quite a long post but I enjoyed writing it and I hope you have enjoyed reading! If you have any questions please feel free to comment and I will do my best to get back with you!
